Klik hier voor de Nederlandse versie
Intro
For the ‘Inspirational Hexies’ blog serie I have designed two hexagon patterns for you to use and apply your own color scheme on (or use the ones I made). One has a granny stitch pattern and the other has solid rounds of double crochets (US). You can find the pattern for those two hexie motifs here and you can find all hexies I made here. Now it’s time to join the Hexies into a blanket. I have designed two different borders to do that. They are compatible, so you can choose which one to work with or use both.
Links
- Main Page with all Hexies and all posts about this project
- Pattern for the Hexies
- Pattern for joining the Hexies
- Pattern for the Half Hexies
- Pattern for the border around the blanket
- Ravelry page
Yarn
Approx. 23 balls of Scheepjes Stone Washed* regular (not XL), 130m/50g in colour Moonstone (801) to work the joins, half hexies and the border. You will use a little more than one ball per two hexies.
If you don’t have a retailer nearby, please consider buying your Scheepjes Stone Washed via one of the links below. It will give me a small commission, but it won’t cost you anything extra.
- UK/International: Wool Warehouse , The Knitting Network, Deramores or Black Sheep Wools
- Benelux: Caro’s Atellier
- Here’s a list of all Scheepjes retailers: Scheepjes Website
Notions
- 4 mm (G) hook
- Thread clippers
- Darning needle
Gauge & Size
One motif with the joining border around it, measures 28cm/11.2″ measured across from point to point.
Notes & Helpful Tips
- You can join new yarn by working a standing stitch or [slip stitch, ch1, 1sc]
- You can close the last round of the border with a slip stitch or work a needle join
- When working the solid border, the first stitch after the corner can be a bit hidden. Dedri Uys from Look at What I made has an excellent tutorial about recognizing these hidden stitches! Find it HERE.
Stitches & Abbreviations (US terms)
ch chain
ch-sp chain-space
sl st slip stitch
st stitch
sc single crochet
dc double crochet
sk skip
sp space
rep repeat
pic picture
R Round
{text} important/helpful notes and picture references
[…] work the steps within these brackets for the number of times that’s stated behind it
(…) work the steps within these brackets before continuing to the next set of instructions
*…* work the steps within these asterisks for the number of times that’s stated behind it
Crochet diagram symbols
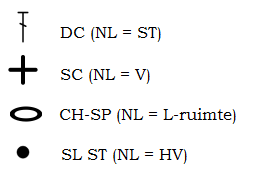
The Pattern
Notes before you begin
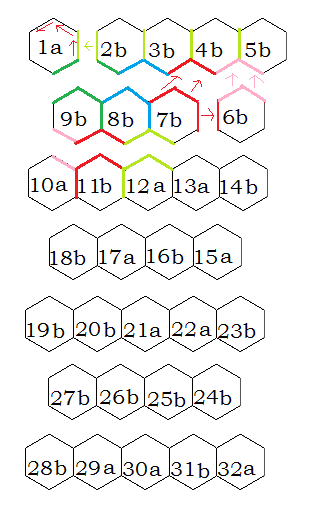
- Look at the schematic for the blanket lay-out. It will give you a clear understanding for which sides of the hexies are joined and how. The motifs are joined from left to right, then right to left, then left to right, etc. in the order of appearance. The number stands for the week the hexie appeared in. (find all Hexies here)The letter A stands for the solid edge joining instructions and the letter B stands for the floral edge joining instructions. So 1A is the first hexie that appeared in the series and you are using the solid edge join. 2B is the second hexie that appeared and you are using the floral edge join. Use the corresponding colored lines to see how to join the hexies.
- A ch1 is used to begin the round, but it never counts as a st. If you want to use another method of beginning the round, you are, of course, welcome to use it.
- The motifs are joined with joining picots, these are little points where a sl st is made into the ch3-space of the adjacent joining picot, which joins one motif to the other.
Blanket schematic
Border A: border instructions with solid edge (scroll down for the chart)
R1 Beginning in any corner-sp; *[1sc, ch2, 1sc] in corner-sp, 1sc in next 18 st* work between * * for all 6 sides, join in first sc, sl st to corner-sp.
Stitch count on each side: 20 sc
R2 ch1 {doesn’t count as a st here and throughout}, *[1dc, ch2, 1dc] in corner-sp, 1dc in next 20 st* work between * * for all 6 sides, join in first dc, sl st to corner-sp.
Stitch count on each side: 22 dc
R3&4 ch1, *[1dc, ch2, 1dc] in corner-sp, sk first {hidden} st, 1dc in each st to next corner-sp* work between * * for all 6 sides, join in first dc, sl st to corner-sp. Rep these instructions again for R4.
Stitch count on each side, R3: 23 dc, R4: 24 dc
R5 ch1, *[1sc, ch3, 1sc] in corner-sp, 1sc in first st, [1sc, ch3, 1sc] in next st {joining picot made}, 1sc in next 2 st, [ch3, 1sc in next 4 st] 4 times in total, ch3, 1sc in next 2 st, [1sc, ch3, 1sc] in next st, 1sc in last st* work between * * for all 6 sides, fasten off yarn.
Stitch count on each side: 28 sc, 7 x picots {excluding the corner-sps}
Note: this R5 is only used for the very first Hexie. From now on you will use the joining round of border A or B instead of R5.
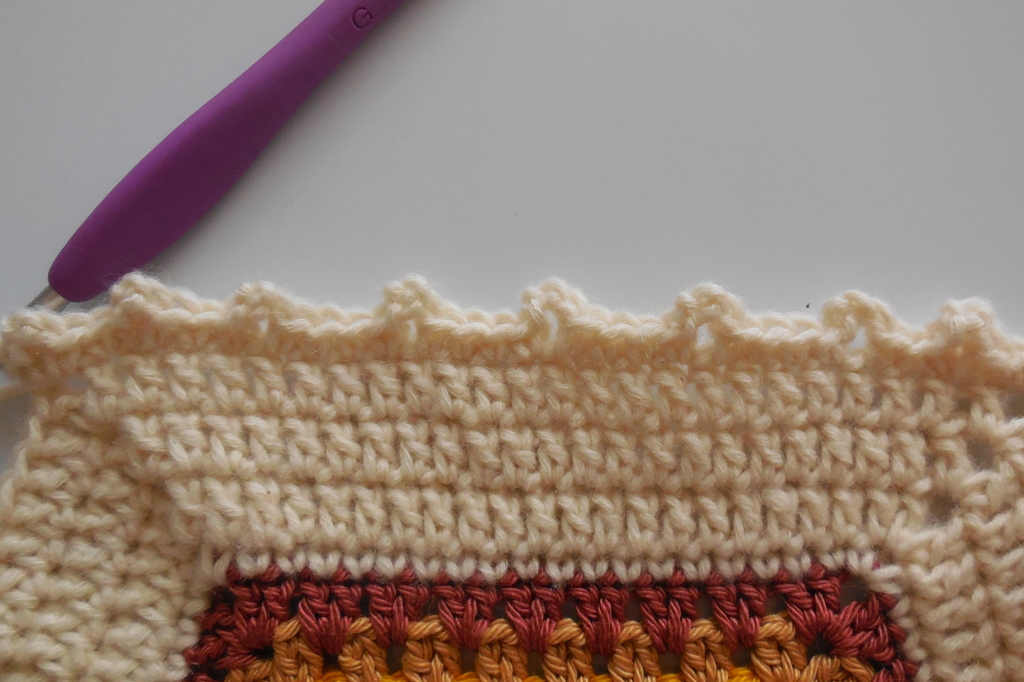
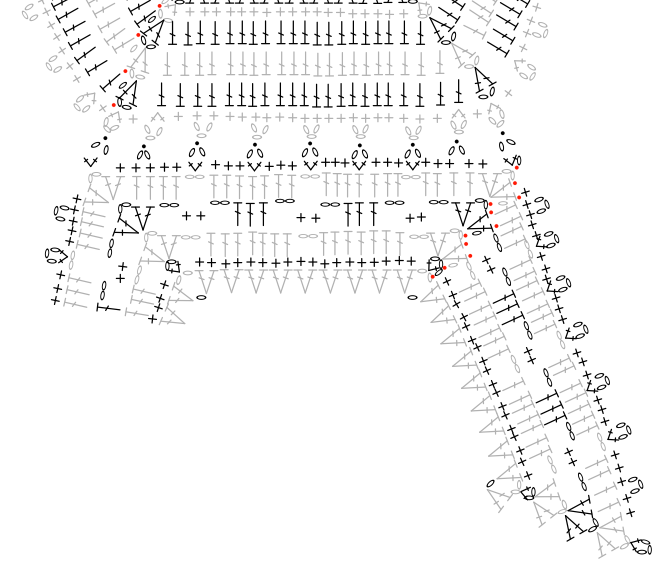
Chart for border A
Continue to border B instructions for next four Hexies to end the first row of hexie motifs. After that, come back to the instructions for border A. Look at schematic for the layout.
Joining round border A:
Joining side: Work each side that needs to be joined as follows: ch1, *1sc in corner-sp of current motif, ch1, sl st in corner-sp of finished motif, ch1, 1sc in same corner-sp of current motif,
1sc in next 2 st, ch1, sl st in picot of finished motif, ch1, 1sc in same st as last sc of current motif, 1sc in next 2 st,
[ch1, sl st in next picot of finished motif, ch1, 1sc in next 4 st of current motif] 4 times in total, ch1, sl st in next picot of finished motif, ch1, 1sc in next 3 st of current motif, ch1, sl st in last picot of finished motif, ch1, 1sc in same st as last sc of current motif, 1sc in last st* work between * * for all sides that need to be joined, ending with the joining of a corner-sp, after that continue with the normal side instructions, omitting the first corner instructions.
Normal side: ch1, *[1sc, ch3, 1sc] in corner-sp, 1sc in first st, [1sc, ch3, 1sc] in next st {picot made}, 1sc in next 2 st, [ch3, 1sc in next 4 st] 4 times in total, ch3, 1sc in next 2 st, [1sc, ch3, 1sc] in next st, 1sc in last st* work between * * for all sides that don’t need to be joined, fasten off yarn.
Stitch count on each side: 28 sc, 7 x picots {excluding the corner-sps}
Border B: border instructions with floral edge (scroll down for the chart)
R1 Rep R1 of border A
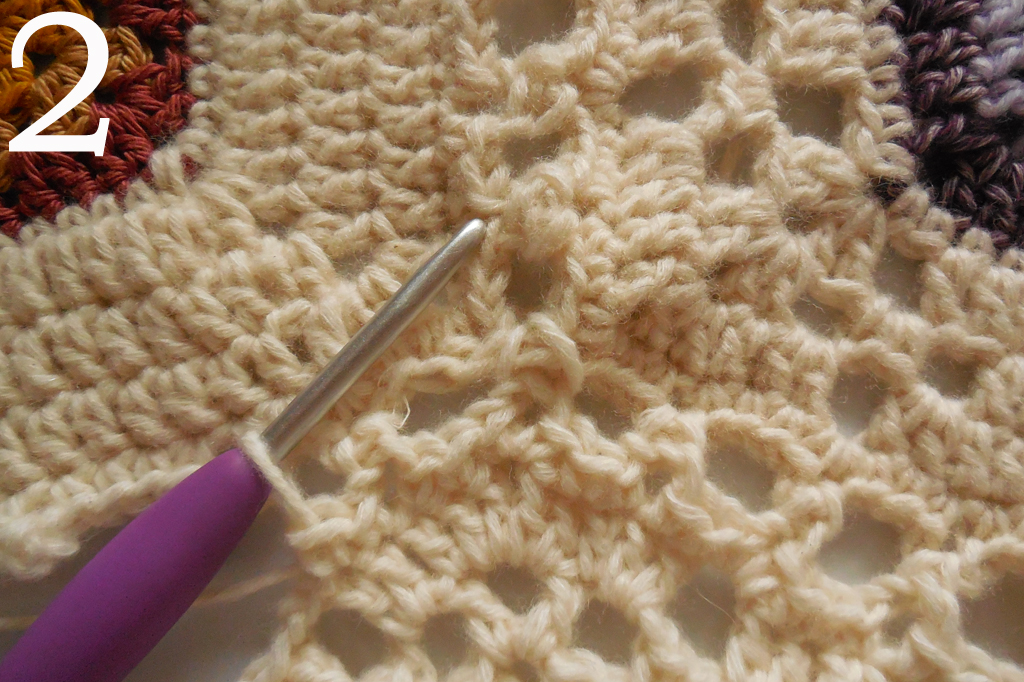
R2 ch1, *[2dc, ch2, 2dc] in corner-sp, [ch2, sk next 2 st, 1dc in next 7 st] 2 times in total {mind the first hidden stitch after the corner, pic 1}, ch2, sk last 2 st* work between * * for all 6 sides, join in first dc, sl st to next corner-sp.
Stitch count on each side: 18 dc, 3 ch2-sp


R3 ch1, *[2dc, ch2, 2dc] in corner-sp, [ch2, sk next 2 st, 2sc in next ch2-sp, ch2, sk next 2 st, 1dc in next 3 st] 2 times in total, ch2, sk next 2 st, 2sc in next ch2-sp, ch2, sk last 2 st* work between * * for all 6 sides, join in first dc, sl st to next corner-sp.
Stitch count on each side: 8 dc, 6 sc, 6 ch2-sp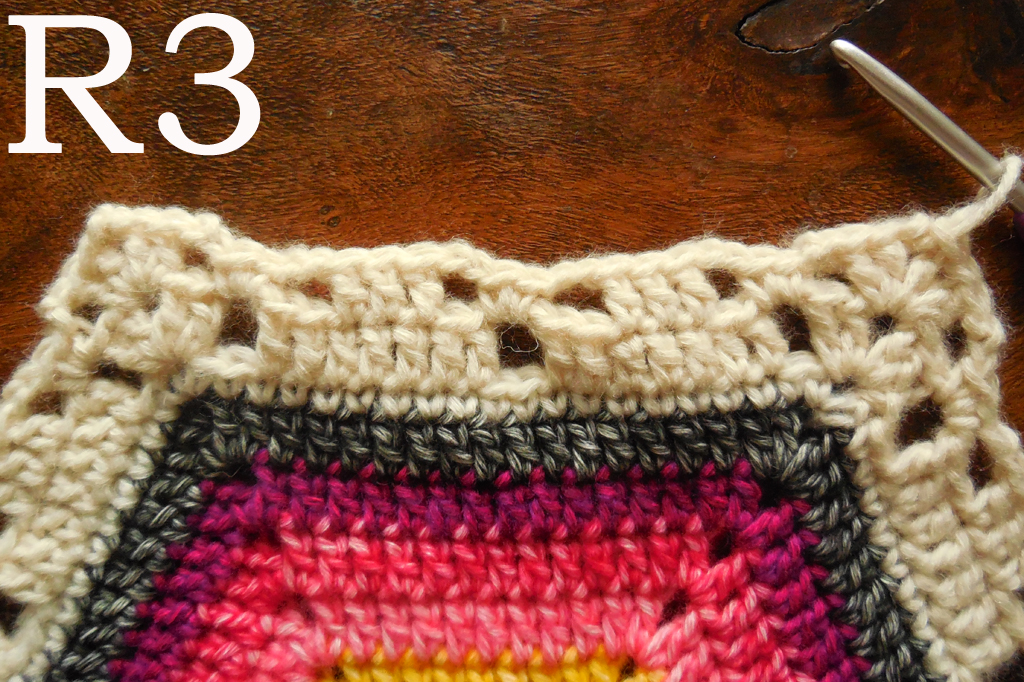
R4 ch1, *[2dc, ch2, 2dc] in corner-sp, 1dc in next 2 st, 2dc in next ch2-sp, [ch2, sk next 2 st, 2dc in next ch2-sp, 1dc in next 3 st, 2dc in next ch2-sp] 2 times in total, ch2, sk next 2 st, 2dc in next ch2-sp, 1dc in last 2 st* work between * * for all 6 sides, join in first dc, sl st to next corner-sp.
Stitch count on each side: 22 dc, 3 ch2-sp

Joining round border B:
- These notes also apply to joining rounds of border A
- These following instructions will give a distinction between a ‘joining side’ or a ‘normal side’. You can use these instructions according to which sides of the hexie need to be joined.
- It is advised to first do the joining sides and then the normal sides.
- The instructions tell you when to work into the ‘current motif’ {the hexie that you’re working on, and still needs to be joined to another hexie} and the ‘finished motif’ {the hexie that is already done}
- When joining hexies, you put the wrong sides together, so when it lays flat, the right sides are facing you.
- Picot: [1sc, ch3, 1sc] in same space or stitch
Joining side: ch1, *1sc in corner-sp of current motif, ch1, sl st in corner-sp of finished motif, ch1, 1sc in same corner-sp of current motif {pic 1},
sk first st, 1sc in next 2 st, ch1, sl st in picot of finished motif {pic 2}, ch1, 1sc in next 3 st of current motif,
[(1sc in next ch2-sp, ch1, sl st in picot of finished motif, ch1, 1sc in same ch2-sp of current motif), 1sc in next 4 st, ch1, sl st in picot of finished motif, ch1, 1sc same st of current motif, 1sc in next 3 st of current motif] 2 times in total, 1sc in next ch2-sp, ch1, sl st in picot of finished motif, ch1, 1sc in same ch2-sp of current motif, 1sc in next 3 st, ch1, sl st in last picot of finished motif, ch1, 1sc in next 2 st of current motif, sk last st before next corner*
work between * * for all the sides that need to be joined, always ending with the joining of a corner-sp, after that continue with normal side instructions, omitting the first corner instructions.
Normal side: *[1sc, ch3, 1sc] in corner-sp, sk first st, 1sc in next 2 st, ch3, 1sc in next 3 st, [picot in next ch2-sp, 1sc in next 3 st, ch3, 1sc in next 3 st] 2 times in total, picot in next ch2-sp, 1sc in next 3 st, ch3, 1sc in next 2 st, sk last st before next corner* work between * * for all the normal edges, fasten off yarn at the end.
Stitch count: 32 sc, 7 x picot {excluding the corner-sps}

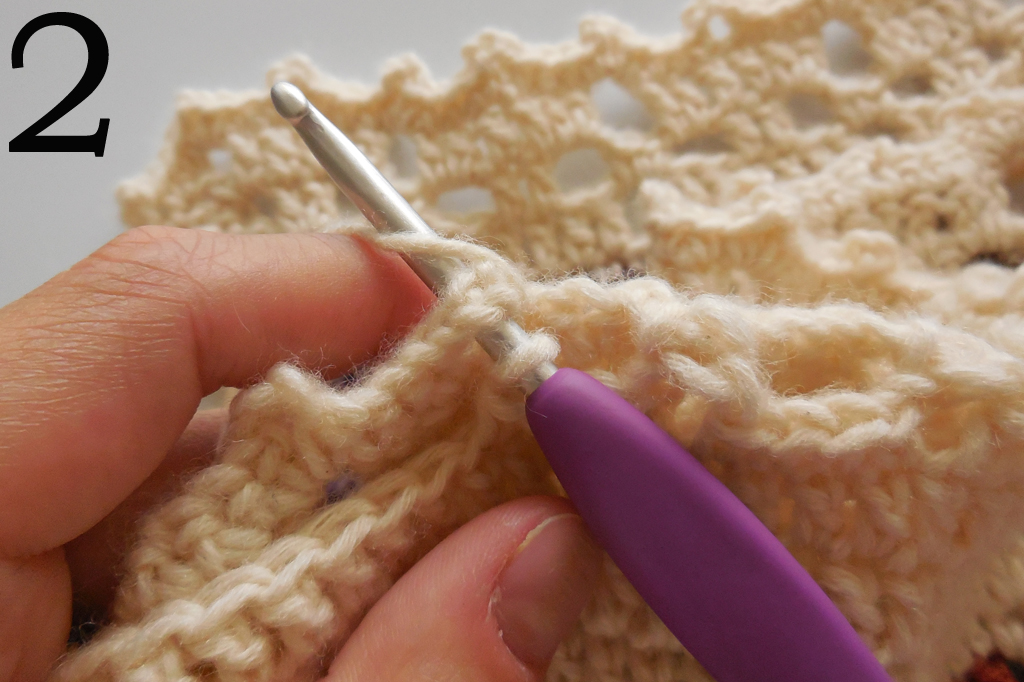
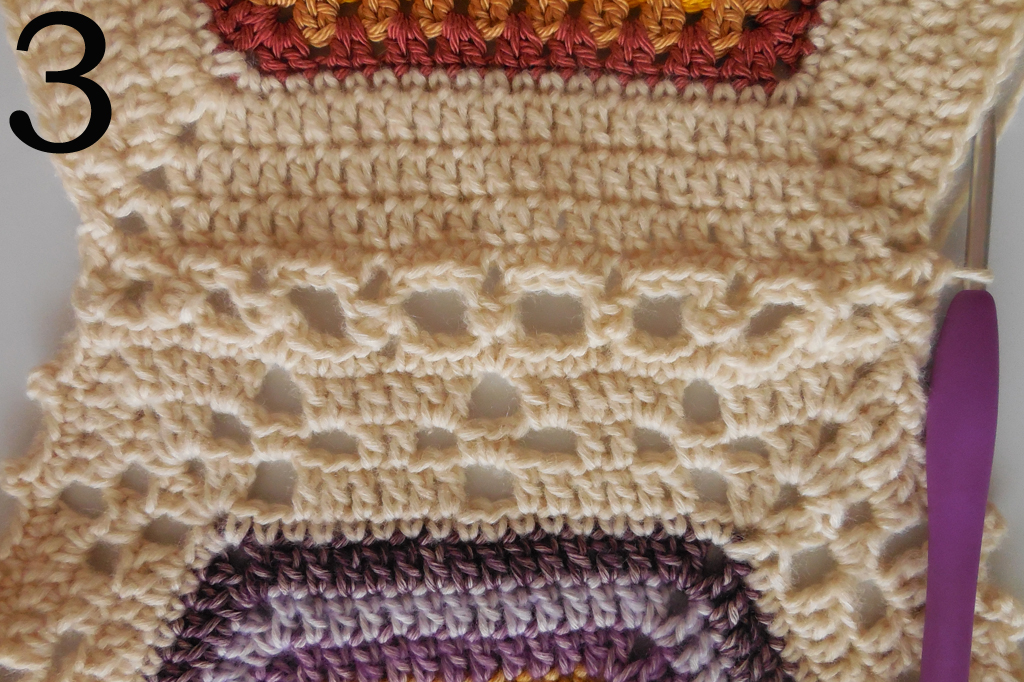
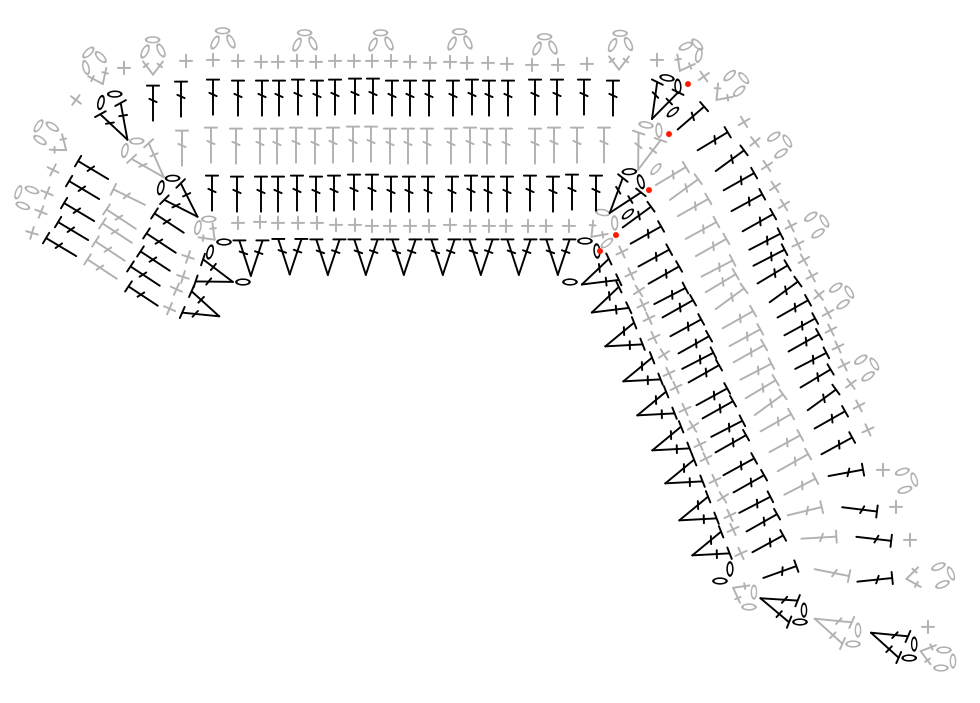
Chart for Border B
 Notes for future joins into the corners: from hexie 6 onwards, when you need to join into a corner-sp of finished motif that’s already joined with another hexie, work into the space created by two other joined hexies instead. See pic 1&2

I love to see your creations! Please share on Facebook or tag me on Instagram (@aspoonfulofyarn)! And if you have a question, please don’t hesitate to ask using the contact page.
*******************************************************************************************************************************************************************
Affiliate disclaimer
This post contains affiliate links. When you click this link and purchase something, I will get a small commission, but it will not cost you extra money. This way you can support my blog and I can keep making free patterns.
Copyright
All patterns are for unlimited personal use. Do not reproduce, sell or publish (parts of) the patterns. Patterns may not be copied in any way (print or digitally), in part or in full, except for personal use. Items may be sold that are made from this pattern as long as the designer is credited.
2 Comments
Comments are closed.