Voor de Nederlandse versie klik hier! For part 3 click here!
Before you go on, let me ask you: Do you want to learn more about crochet design, pattern writing or running your own crochet design business?

Did you like this free blog series and want to achieve your crochet designer dream? I have great news for you, because you can now also follow my crochet design coaching account: Christina Crochet Coach. Here, you will get HIGH QUALITY tips and advice, tailored specifically to crochet designers (to-be)! So you can take your crochet designs to the next level <3 I also host LIVE Instagram Q&A’s every other week where you can ask all your crochet design related questions. And I have a bi-weekly newsletter where you get the BEST crochet designer tips, Q&A updates and special offers and discounts!
Website: www.christinacrochetcoach.com
Newsletter: Sign up for the newsletter
Instagram: @Christinacrochetcoach
Facebook: Christina Crochet Coach
Intro
I can’t believe this is already the last part! I hope the information so far has been useful to you and that you are deep into your own sweater design 🙂 Please share your progress on social media with #ASOYcrochetsweater so we can inspire each other!
Pattern grading
Now that you have your own design and pattern finished, it needs to be ‘translated’ to different sizes for it to be a pattern that most of the crocheters can use. Grading is not hard, but it takes time and, yes sorry, more calculations. Remember that I told you to write down all the adjustments you’ve made for positive and negative ease? We will apply them to all the other sizes too!
- Get a chart with all the sizes you want to ‘translate’ your pattern to
- Apply the negative and positive ease for all these sizes
- Translate your measurements to stitches and rows, just like you did for your own size.
It is very useful to also use excel for this. It takes time to set up, but after that you can easily adjust numbers for each size. And after you’ve finished the pattern, you will have all your numbers in one place, which is useful when something is off. When you are writing the pattern, you can either write it separately for all the different sizes, or you can merge the pattern to include all sizes, with the repeat numbers in order of size. An example would be this: R1: 1 sc in first sc, *ch 2, sk next sc, 1 sc in next sc* rep between * * 5, (7, 7, 10, 12) times more. If you are making a pattern in the sizes XS to XL for example, the order will be XS, (S, M, L, XL), so the first number will be for size XS only, the second number will be for size S, etc. The advantage of this method is that it saves you a lot of work and time. The downside is that it might make the pattern longer when there are differences in the pattern between the sizes that cannot be merged within a pattern line, so it is up to you what you prefer. That’s all for pattern grading really!
Calculation yarn amounts
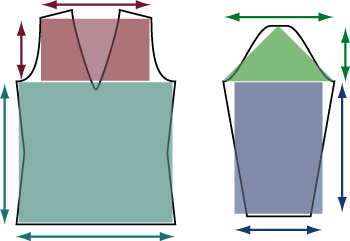
When you have made calculations for all the different sizes, you also want to calculate the yarn amounts for each size. When you’ve kept track of your yarn amounts this is fairly easy to do. First you need to calculate the total surface area of your sweater;
Image from Knitty.com
- Body: (width x 2 for the front and back) x length
- Upper body, shoulders and neckline: imagine a rectangle from the widest and highest part of the upper body and calculate (width x 2) x length for this imaginary rectangle
- Sleeves: take the (widest part of the sleeve x 2) x the length of the sleeve (when it’s a straight sleeve)
- Add all these numbers to get the total surface area for each size
- Don’t forget that your sweater is 3D (just like you), so a sleeve measured while laying flat is twice as wide!!!
Calculate ratio’s; 
Surface area other size / surface area own size = ratio other size ratio other size x yarn amount of own size = yarn amount for other size
- The surface area for your own sweater size is your basis, which has the factor of 1.
- To calculate all other ratio’s divide the areas of the other sizes by the surface area of your own size. For example: my sweater’s surface area is 1200 (size M) and the surface area of size L is 1300. (1300 (L)/1200 (my size)=) 1,083. This number is the ratio for size L. You do this for each size.
- Now you take the yarn amount you used and multiply it by the ratio number of each size. For example: I have used 1400 meters of yarn. The ratio number for size L is 1,083, so size L will use approximately (1400×1,083=) 1516,7 meters of yarn. You will calculate this for each size and round the numbers off to how you see fit.
Pattern testing
Now that you have the whole pattern written out for all sizes, it is time to put it to the test! This is very important, since sweater patterns in multiple sizes might not turn out how you imagined it to work out. If a tester sees that the sweater does not fit like yours, you can still make adjustments. There can also be mistakes in your pattern, even though you’ve been super meticulous. It will happen! Getting testers is fairly easy, since there are always people that would like to help you out. There is a special testers group on Ravelry which you can post your request on, or use your blog or social media. A few tips from my own experience:
- Always get twice as much testers as you need. If you think it will do to get your pattern tested by 3 people per size, admit 6 people! There will always be some that get sick, can’t finish due to personal circumstances or will just not finish the test due to other reasons. You might think that this will not happen, but although most testers are really willing to help you out, life can and will get in the way of their and your goals.
- Be very clear in your communications. Most of the time you will not know your testers personally, so all communications will be in writing (through email, Facebook message, Ravelry forum, etc.). This also means that there is less nuance in what you mean and expect from your testers. Laying out the rules and expectations prior to handing out your pattern will make sure you understand each other better.
- Give a note in your messages that testers need to confirm receipt within a set response deadline. Although this might sound strict, it is necessary for most people to include a phrase in your message like ‘please respond to this email within 48, confirming the receipt of the pattern. If I do not receive a reply I will assume that you have abandoned the test.’ Unfortunately we live in an era with a lot of message overload and it is no longer the norm to reply to each and every message you receive. By including a phrase like this, you make sure that the testers are still active in their communications and their test.
- Be polite and grateful for their feedback. This might seem very logical, but like I said before, if all communication will go in writing, the nuance can be lost and you might come across as ‘cold’. Saying ‘thank you’ and putting in a smiley here and there, will make you come across as appreciative and involved, which of course you are! It is also a fact that almost all testers will not receive compensation for their time (except for a free pattern), so I am always thankful that they take the time to make my pattern so much better!
To end these series I have a few very useful resources I used for my own sweater:
- General pattern design and publishing
- Sizing charts and taking measurements
- More information about pattern grading
- pattern grading with separate panels and calculating yarn amounts
I hope this series has been useful to you! I can’t wait to see all your newly designed sweaters on social media! Please use the hashtag #ASOYcrochetsweater so I won’t miss yours!
Before you go, let me ask you: Do you want to learn more about crochet design, pattern writing or running your own crochet design business?

Did you like this free blog series and want to achieve your crochet designer dream? I have great news for you, because you can now also follow my crochet design coaching account: Christina Crochet Coach. Here, you will get HIGH QUALITY tips and advice, tailored specifically to crochet designers (to-be)! So you can take your crochet designs to the next level <3 I also host LIVE Instagram Q&A’s every other week where you can ask all your crochet design related questions. And I have a bi-weekly newsletter where you get the BEST crochet designer tips, Q&A updates and special offers and discounts!
Website: www.christinacrochetcoach.com
Newsletter: Sign up for the newsletter
Instagram: @Christinacrochetcoach
Facebook: Christina Crochet Coach
Discover more from A Spoonful of Yarn
Subscribe to get the latest posts to your email.
