Voor de Nederlandse versie klik hier!
Intro
How are your swatches going? I’m sure by now you will have your head floating with all sorts of great stitch combinations and design ideas! Please share your ideas and swatches on social media with #ASOYcrochetsweater, I love to see your progress!
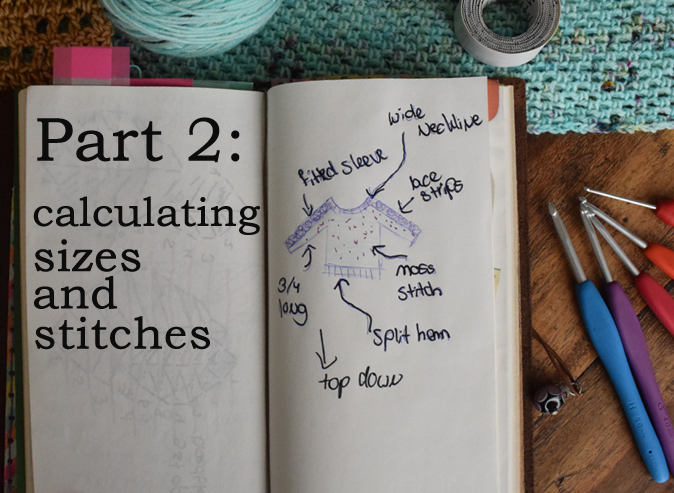
All ready for part 2 of the design your own crochet sweater series? There is a lot of information and calculations in today’s post. Don’t be scared of them, it’s all part of the sweater design process! At the beginning of my own process I had an enormous jumble of all these different numbers scattered across an excel sheet that didn’t even make sense anymore after a while. Gradually I learned which measurements and numbers I needed, but I will save you the time and trouble by providing the minimal information you are going to need without having to figure it out yourself.
A little note before we start: All calculations are given in centimeters, because that’s what I work with as a Dutch designer. For your reference, 1 inch is approximately 2,5 cm.
Deciding on measurements
You need to match your own size to a chart of all the standard measurements, like bust, waist, arm circumference, shoulder width etc.
There is a very helpful chart with sizes from XS to 5XL on the craftyarncouncil website, which I also used to design my Picking Flowers sweater. The chart doesn’t have all measurements you might need, but most are there.
Make a chart with all the sizes you need for your sweater*;
- Bust circumference (measured under the armholes over the biggest point of your breasts)
- Bust height (from shoulder to nipple, this is very useful if you want to make a fitted model, since you know where the biggest part of the bust is)
- Waist circumference (if you plan on making a fitted sweater)
- Hip circumference (if you plan to make a long sweater)
- Cross back (shoulder to shoulder)
- Shoulder width (from the start of your neck to the shoulder point)
- Back length (from the bottom of your neck up to the waist)
- Arm length (from shoulder to cuff)
- Upper arm circumference
- Wrist circumference
- Armhole depth (from shoulder to the bottom of the armpit)
- Neck circumference
- Side length (from armhole to hip)
*The bullets in cursive are optional, depending on how fitted you want to make the sweater.
Keep in mind that these are the measurements of the body, NOT the measurements of your sweater! If you want to know how to take your own measurements to compare to the chart, click here.
I advise to work with an excel sheet from now on, because it will make calculations so much easier (since you don’t have to do them yourself once you have inserted all the standard calculations in the cells). For all the ins and outs for keeping track of your pattern in excel, see this excellent and very extensive tutorial.
Negative and positive ease
Negative ease means that the finished measurements (of parts) of the sweater are smaller than your body measurements. If you want to use negative ease in your sweater, you will need a stitch pattern that has enough stretch to fit the body without getting uncomfortable. I used a negative ease of 1 cm around the arms for the sleeves. My chosen stitch pattern for the picking flowers sweater (stretchy moss stitch) and yarn fibre (merino/silk blend) has enough stretch to accommodate this negative ease.
Then there’s positive ease. This means that the finished measurements are bigger than the body (which is the case with most sweaters). If you want to have an oversized look for example, you can add extra centimeters to the bust circumference. Read more about negative and positive ease here.
Calculating the finished measurements of your sweater
Now that you know what the measurements are for all the different parts of the body, you can calculate the final size of the finished sweater.
To do this, take all the measurements and add or subtract centimeters for negative and positive ease. List these positive and negative ease centimeters, since you will apply them to other sizes later! (of course you don’t have to do this if you plan to make a sweater for your own size only. The tutorial assumes that you want to make more sizes.)
Do not be alarmed by all these calculations, it is the lesser part of designing a sweater if you don’t like math, but absolutely necessary and not that hard! I have given some examples below.
TIP: You can also simply take your favorite sweater, measure up all the measurements you need and compare them to the actual body measurements of the chart you’ve created, this way you will know exactly how much negative and positive ease there is used for each part.
Calculation examples (all numbers are fictional and might not be true to real body measurements):
Sweater width:
Oversized sweater: Bust circumference + positive ease= sweater body circumference
The bust circumference is 85cm, (85 cm /2 sides=) 42,5cm for the front and 42,5cm for the back.
I would like an oversized sweater, so I need to add positive ease. I will add (20 cm for the front and 20 cm for the back=)40 cm to the total, giving me a sweater circumference of (85+40=) 125 cm, this will be (125/2=) 62,5 cm for the front and 62,5 cm for the back.
Sleeves:
Fitted sleeves:
Upper arm circumference – negative ease = sleeve circumference for the upper arm
Wrist circumference – negative ease = sleeve circumference for the wrist
The arm length measured from the point of the shoulder to cuff is 50 cm, the circumference for the upper arm is 25 cm and the circumference for the wrist is 18 cm. I want a close fitted long sleeve, so for that I can subtract for a little negative ease. The sleeve will stay 50 cm long for a long sleeve.
I subtract 1 cm for the upper arm and wrist, so the finished measurements will be (25-1=) 24 cm for the upper arm and (18-1=) 17 cm for the wrist. Only use negative ease for fitted sleeves when you have enough stretch in your stitch pattern and yarn. If you don’t have enough stretch (or no stretch at all) you can use the measurements of the arm itself or add a little bit of positive ease.
Determining the neckline width:
Neckline: half bust circumference – (shoulder width x 2) = net. neckline width
Adjusting the neckline: net. neckline width + extra width = finished neckline width
Adjusting the shoulders: (half bust circumference – finished neckline width) / 2 = shoulder width per shoulder
when you know the width of the shoulders (from neck to shoulder point) and the half bust circumference (bust circ. /2) you can determine how much width is left over for the back and front neckline separately.
Example: The half bust measures 38 cm. 1 shoulder measures 12 cm. You have 2 shoulders, so the total shoulder width is (12×2=) 24 cm. You will have left over: (38-24=) 14 cm for the neckline. This is the standard measurement for the body, so you need to add extra width for the head to fit in. Every cm you add to the neckline will be subtracted from the shoulders.
This means that when I want the neckline to be (14+4=)18 cm , I need to subtract those 4 cm evenly from both shoulders. The shoulders will then measure ((38 cm – 18) / 2=) 10 cm each.
Now that we have determined the width, we can also determine the depth. The basic depth is from where your neck ends. So that’s no depth at all. When you want to have a lowered neckline, you can lower it 5 or 10 cm. You can also do this for the back, but less rigorously, unless it’s a design feature to have a very low back neckline.
Please note that there are A LOT of ways to determine neckline width and depth in relation to the shoulder width, body width etc. Just know for now that they are all connected to each other and that each correction affects another part of your design. In part 3 I will give you a lot more examples of different necklines and how to determine the width, depth and shape!
Length from shoulder to armhole:
When you work the sweater top-down, you start with the shoulders and neckline and gradually work your way down. This is where the armhole depth comes in handy! If I want to want a nice loose armhole that I can move around in, I will add positive ease. When the armhole depth is 17 cm (measured from the shoulder to the armhole) I will add 5 cm to that number. Now I know I will need to crochet (17+5=) 22 cm before I can close up the armhole to work the body. I advise to ALWAYS add at least 1 cm to the armhole depth for it to be comfortable.
Sweater length:
When we already know where the armhole ends we can just measure from the armhole to where you want the sweater to end, and there you have your length.
I understand that these calculations can be very overwhelming and sometimes hard to determine how many cm you need to add or subtract, but it is all part of the process and not really hard to do! Otherwise you can just use the simple version of using a sweater you already have, like I said in my TIP.
Turning these measurements into stitches
Now that you have all the measurements you need for your sweater and you know your gauge, we can get busy with the beginnings of an actual pattern! This means yet more math, but it is a great feeling to finally put all these boring centimeters in actual stitches 🙂
First we will need the number of stitches and rows per cm for your blocked/washed gauge.
For the people that are used to working with inches; I suggest that you calculate the number of stitches and rows per half inch, to make your calculations as accurate as possible.
For example: when your blocked/washed gauge is 20 sc/18 rows for a 10×10 cm (4×4″) square you will have a number of (20/10=) 2 stitches per cm and (18/10=) 1,8 rows per cm. (for inches that would come down to 20/8 half inches= 2,5 stitches per half inch for example)
Now you will multiply the measurements of your sweater with these numbers. Please be aware that you will use the stitch gauge for width and the row gauge for length!
width measurements of the sweater x stitch gauge = number of stitches
Length measurements of the sweater x row gauge = number of rows
Example: I want a body circumference of 125 cm, so I need to multiply this number with my stitch gauge of 2. The number of stitches I need for the body is (125×2=) 250 stitches.
I want my sweater length to be 40 cm from the armholes down, so I need to multiply this number with my row gauge of 1,8. The number of rows I need for the length is (40×1,8=) 72 rows.
What happens if it’s not a rounded number, like 71,8? You can just round off these decimals to how you see fit. If you need an even or uneven numbers of stitches because of your used stitch pattern, you can round off to an even or uneven number for example.
PRO TIPS:
- Keep track of your calculations. Whenever there’s a mistake, you will know if that is due to a calculation error or not.
- Also keep track of your unrounded numbers and your rounded numbers, so you know how much you rounded off. This is important if your math is off, so you will know if any differences are due to rounding off these numbers.
- Like I said before, keep track of your applied positive and negative ease if you are planning to design your sweater for different sizes.
- Make sure to use the correct numbers corresponding to what you want to calculate. This means that when you are working out the stitches for the front only, you will work with HALF of the bust circumference. When you work the body in the round, you will work with the full bust circumference. When you are figuring out the total of shoulder width for your sweater front, make sure to double the shoulder width, since you have two shoulders, etc.
Phew, that is part 2 finished! I understand that this is a lot of information at once, but take it one thing at a time and you will be fine! I would love to see your progress! Please share with the hashtag #ASOYcrochetsweater on social media.
In the next part we will get really going 🙂 I will give you a lot of examples for necklines, sleeves and body shapes so you can practice yourself!
Discover more from A Spoonful of Yarn
Subscribe to get the latest posts sent to your email.