Vind de Nederlandse versie hier
Get this pattern as a PDF
Like to work from paper or want to support me as a designer? Buy the PDF version on Etsy or Ravelry. This will include a printerfriendly option. Thank you for your support <3
Intro & Links
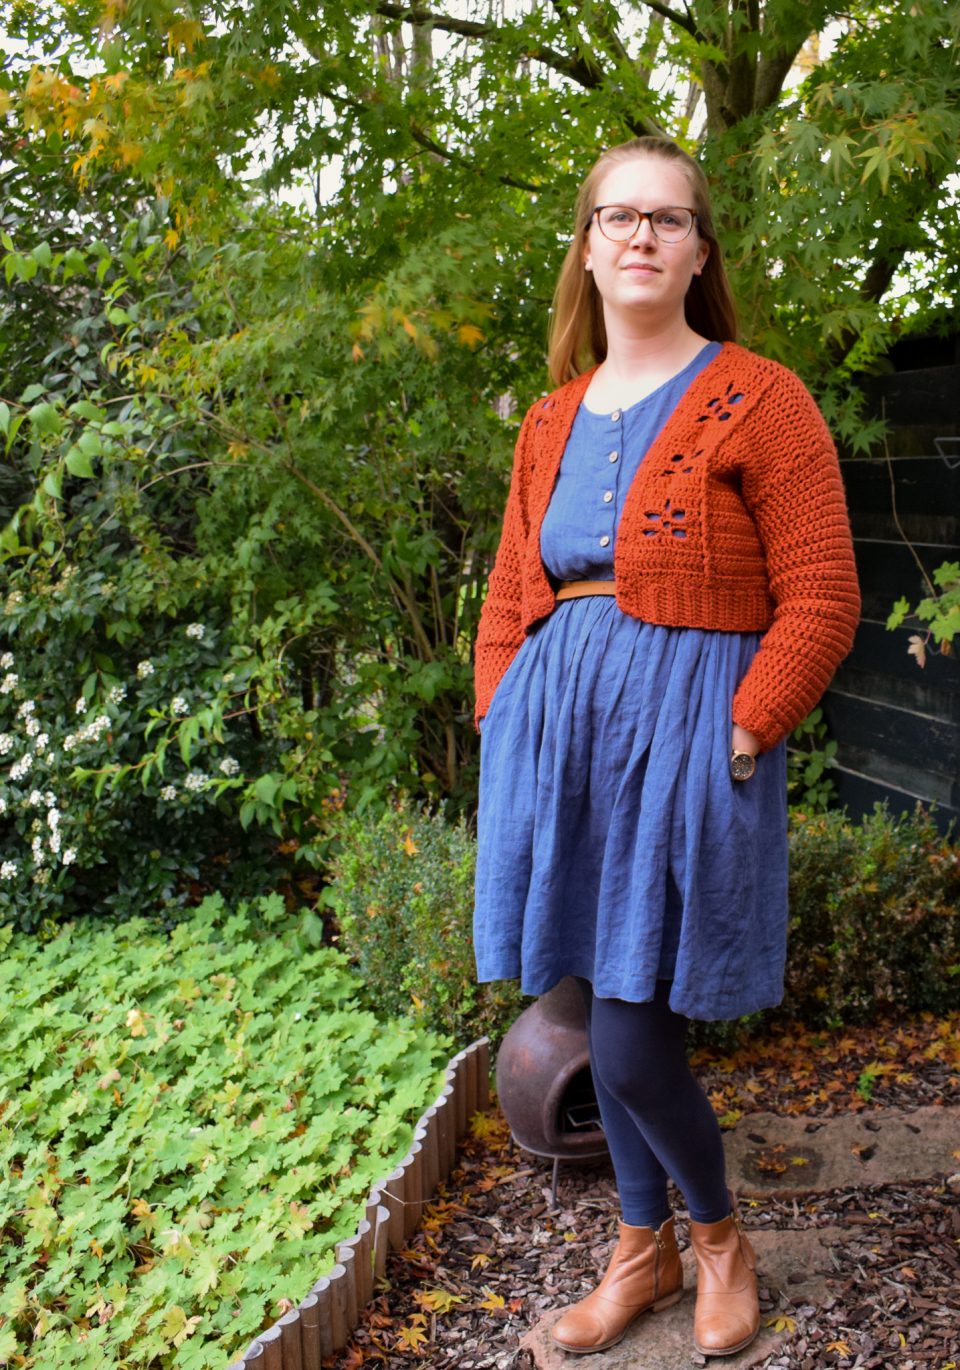
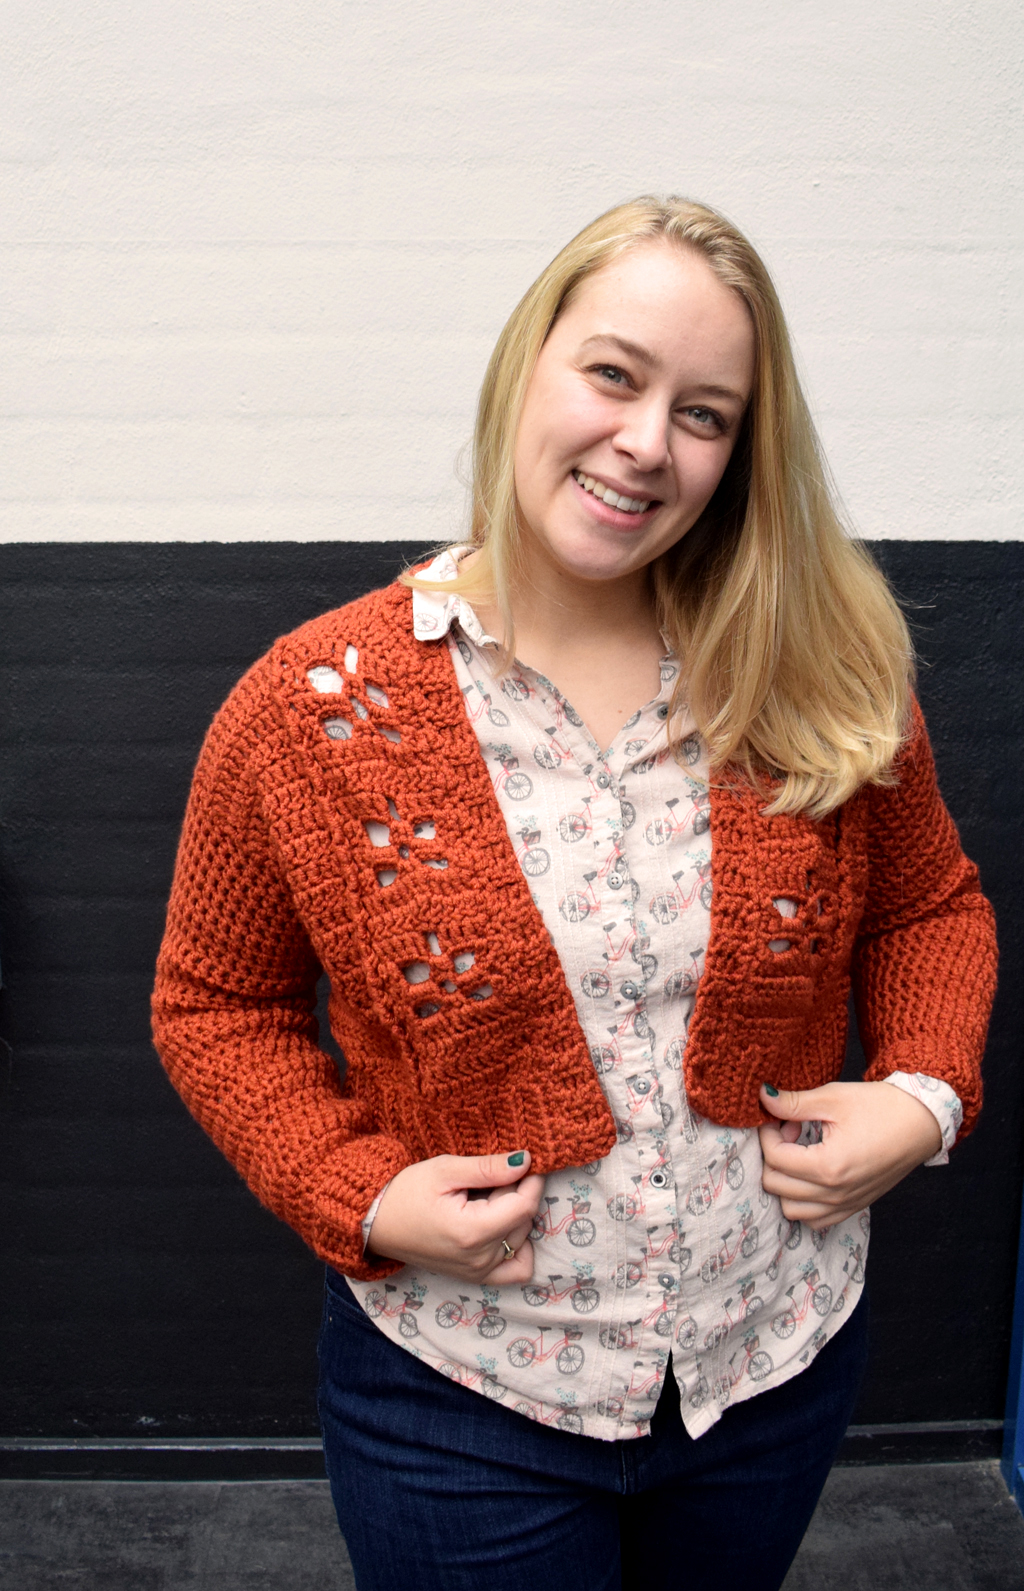
Don’t you just love Autumn? All the trees shifting in color from bright green to warm oranges, reds and yellows. The weather (finally) cooling. All the lovely colors of the fallen leaves decorating the moist earth <3 And lets not forget mosses growing rich and abundant and mushrooms popping up randomly when the conditions are just right. Yes. I love Autumn. This cardigan is for all Fall-lovers out there who like to bring a little Fall into the room everywhere they go <3
- Read all previous posts about this pattern here, here and here.
- Create a project page on Ravelry, queue it for later or give it some love
- Like to work from paper or want to support me as a designer? Buy the PDF version on Etsy or Ravelry. This will include a printerfriendly option. Thank you for your support <3
Poem
This pattern is part of my Poetry Collection. I have written a haiku to accompany the design in the spirit of Fall.
Red, yellow, orange
Wet dancing leaves around me
Essence of Autumn
Yarn
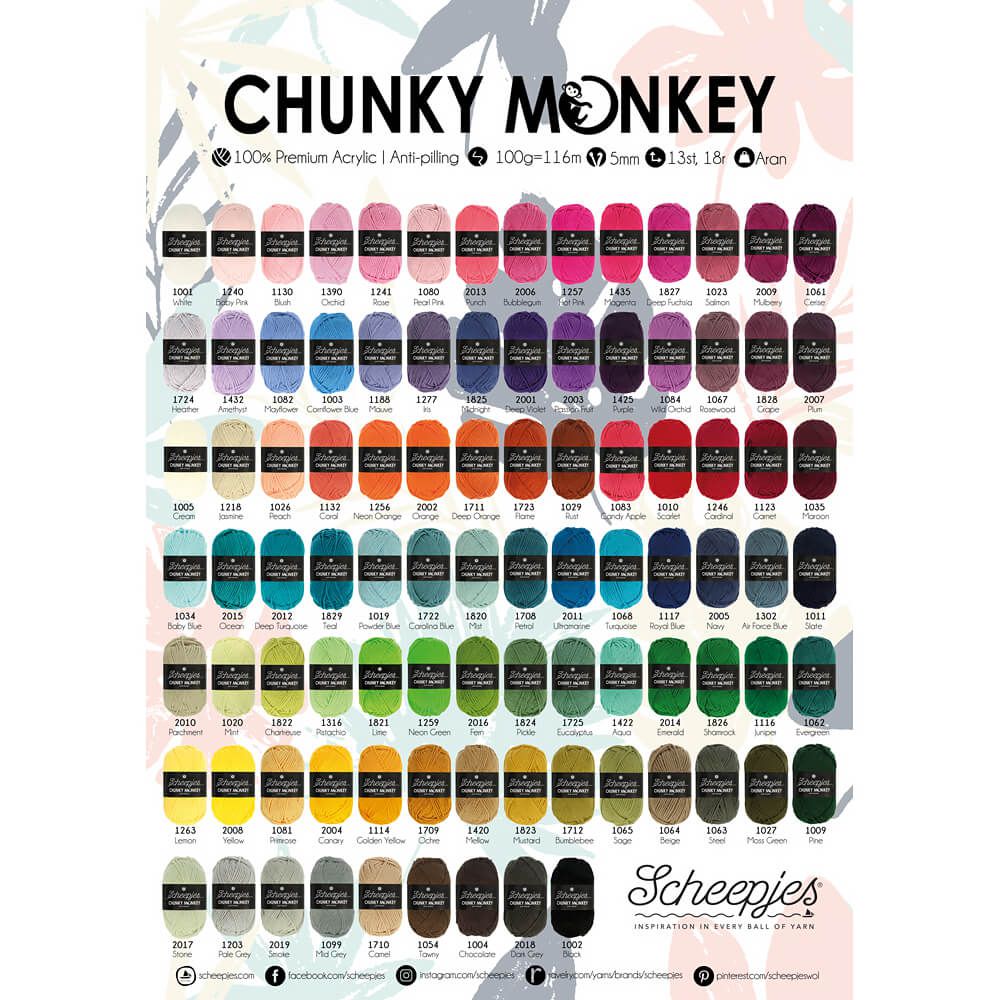
Scheepjes Chunky Monkey* in color 1029 Rust, (100% premium acrylic), 116m/100g. You will need 4, (5, 5, 6, 7)(7, 8, 8, 9) balls or approximately 436, (514, 567, 647, 702)(767, 820, 924, 952) meters/476, (561, 619, 707, 767)(838, 897, 1010, 1040) yards.
If you don’t have a Scheepjes retailer nearby, please consider buying your Scheepjes yarn via one of the links below. It will give me a small commission, but it won’t cost you anything extra. This way I can keep making free patterns.
UK/International: Wool Warehouse or The Knitting Network
Benelux: Caro’s Atelier
List of all / Lijst van alle Scheepjes retailers: Scheepjes website
Notions
- 6mm hook or other size to obtain gauge
- 5mm hook for the crochet ribbing, or 1mm smaller than your main hook
- Darning needle, thread clipper & blocking materials
Gauge & Size
10x10cm/4×4” = 12 dc x 6.5 rows with 6mm hook. Please swatch, as the correct gauge is important if you want your cardigan to be the right size.
The pattern comes in sizes XS-5XL. See the chart below for measurements. I have chosen not to put in any positive ease, so you can pick your size based on your body measurements.
Unfortunately sizes L and 3XL-5XL are not tested. Please let me know if you’d like to test one of these sizes.
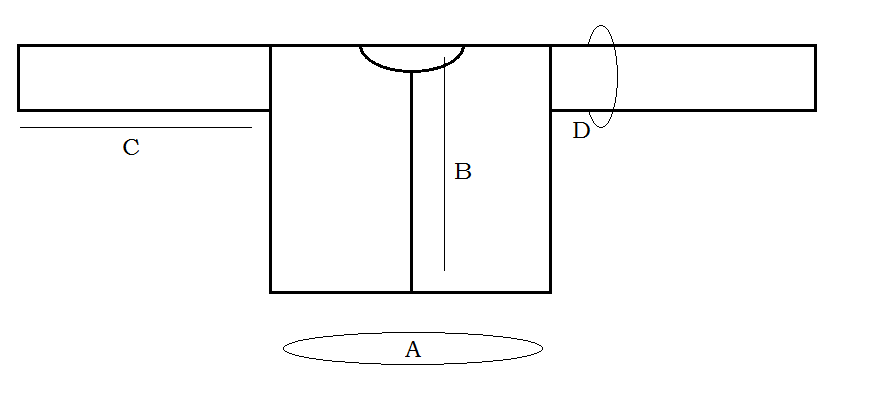
Measurements of finished cardigan in cm’s and inches
| Size | A (bust circumference) | B (length from back of neck to hem) | C (sleeve length) | D (upper arm circumference) |
| XS | 77 cm – 30.8” | 37 cm – 14.8” | 44.5 cm – 17.8” | 30 cm – 12” |
| S | 85 cm – 34” | 38.5 cm – 15.4” | 46 cm – 18.4” | 32.5 cm – 13” |
| M | 95 cm – 38” | 41.5 cm – 16.6” | 46 cm – 18.4” | 32.5 cm – 13” |
| L | 105 cm – 42” | 41.5 cm – 16.6” | 47.5 cm – 19” | 37.5 cm – 15” |
| XL | 117 cm – 46.8” | 43 cm – 17.2” | 47.5 cm – 19” | 37.5 cm – 15” |
| 2XL | 130 cm – 52” | 43 cm – 17.2” | 47.5 cm – 19” | 40 cm – 16” |
| 3XL | 140 cm – 56” | 43 cm – 17.2” | 47.5 cm – 19” | 45 cm – 18” |
| 4XL | 148 cm – 59.2” | 46 cm – 18.4” | 49 cm – 19.6” | 47 cm – 18.8” |
| 5XL | 152 cm – 60.8” | 46 cm – 18.4” | 49 cm – 19.6” | 50 cm – 20” |
Stitches & Abbreviations (US terms)
ch chain
ch-sp chain space
st stitch
sl st slip stitch
sc single crochet
hdc half double crochet
Blhdc work a hdc in the back loop of the stitch
Connecting hdc yo, insert hook in last st of ribbing and pull up loop {3 loops on hook}, insert hook in next st of bottom of cardigan and pull up loop, yo and pull through all loops on hook
dc double crochet
tr treble
fptr front post treble
bptr back post treble
dc2tog double crochet two together: [yo, insert hook in described space/st, pull up loop, yo, pull through two loops] two times, yo, pull through all 3 loops
dc3tog double crochet three together: [yo, insert hook in described space/st, pull up loop, yo, pull through two loops] three times, yo, pull through all 4 loops
yo yarn over
sk skip
rep repeat
RS right side of your work
WS wrong side of your work
[…] work between brackets for the number of times indicated in the pattern
*…* work between asterisks for the number of times indicated in the pattern
{abc} references to pictures and notes are given in cursive between these brackets
Notes
- Instructions for different sizes are shown in brackets as follows: XS, (S, M, L, XL)(2XL, 3XL, 4XL, 5XL). When only one number is given, it applies to all sizes.
- When possible, sizing notes on how to adjust for your own measurements are given. Please note that this will affect the required yardage.
- The pattern is worked seamlessly: the top piece is made from the back armpits upwards, over the shoulder and then down again to the front. Then the rest of the body is attached, closing the armholes in the process. After that the sleeves are worked into the armholes, picking up stitches and working in rounds until the sleeves are long enough.
The Pattern
Back
Sizing note: If you’d like a bigger or smaller bust circumference, add or subtract chains in the beginning chain. You will also need to add or subtract the same number at the front.
Setup: With 6mm hook; ch45, (50, 56, 62, 69)(78, 84, 88, 91).
R1 (RS) Start in 3rd chain from hook; 1dc in each of next 43, (48, 54, 60, 67)(76, 82, 86, 89) chains, ch2, turn. {turning chain doesn’t count as a st here and throughout}
Stitch count: 43, (48, 54, 60, 67)(76, 82, 86, 89) st
Sizes S-5XL only:
R2 dc2tog, 1dc in each dc to last 2 st, dc2tog, ch2, turn.
Stitch count: –, (46, 52, 58, 65)(74, 80, 84, 87) st
Rep R2 for –, (1, 2, 3, 6)(9, 12, 14, 15) times
Stitch count: –, (44, 48, 52, 53)(56, 56, 56, 57) st
Sizes XS-3XL only:
Next row 1dc in each dc across, ch2, turn. Stitch count remains the same.
Rep ‘Next row’ 8, (7, 6, 7, 4)(2, –, –, –) times. You will have worked a total of 10, (11, 11, 13, 13)(14, 15, 16, 17) rows, ch1 instead of 2 on the last row.
All sizes:
Sizing note: If you’d like a bigger or smaller armhole, add or subtract repeats of ‘next row’. Each rep adds or subtracts approx. 1.5cm. You will need to work an equal amount of repeats at the front though, so keep that in mind.
Back shoulder shaping row: 1sc in next 5, (5, 5, 5, 5)(5, 5, 6, 6) st, 1hdc in next 10, (10, 10, 11, 11) (11, 11, 11, 11) st, 1dc in next 13, (14, 18, 20, 21)(24, 24, 22, 23) st, 1hdc in next 10, (10, 10, 11, 11)(11, 11, 11, 11) st, 1sc in last 5, (5, 5, 5, 5)(5, 5, 6, 6) st, ch1, turn.
Stitch count: 43, (44, 48, 52, 53)(56, 56, 56, 57) st
Work back shoulder shaping row for a total of 3 times, stitch count remains the same. Your back piece should measure 17.5, (19, 19, 22, 22)(23.5, 25, 26.5, 28)cm/7, (7.6, 7.6, 8.8, 8.8)(9.4, 10, 10.6, 11.2)” high at the sides.
Right front
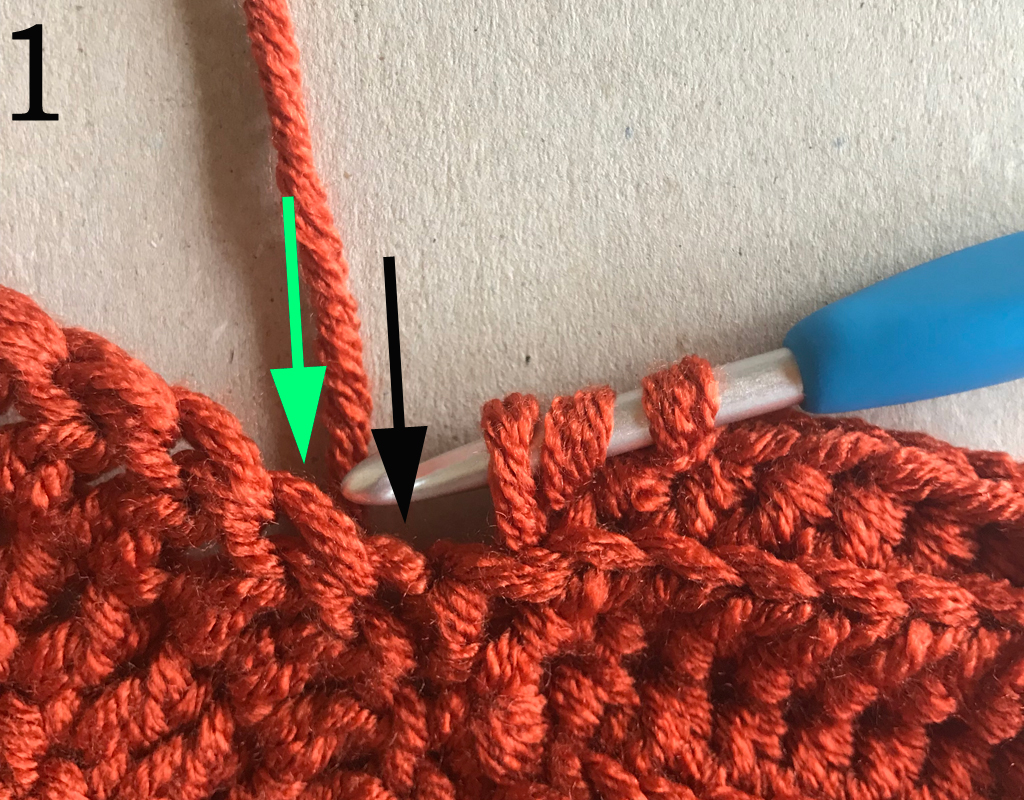
Post st: Work a fptr when working on the right side (RS) of your work and a bptr when working on the wrong side (WS) of your work. This way you will get a nice ridge at the right side of the cardigan. To help you, place a marker on the right side of your work. Please note that the stitch where the post st is made around is skipped. The black arrow shows the st you need to skip, the green arrow is the stitch you will work in next.

Next row (RS): 1sc in next 3 st, 1hdc in next 3 st, 1dc in next 5, (5, 6, 7, 7)(7, 7, 7, 7) st, 1tr in next 3, (3, 3, 4, 4)(4, 4, 5, 5) st, 2tr in next st, ch3, turn.
Stitch count: 16, (16, 17, 19, 19)(19, 19, 20, 20) st
Next row (WS): 2tr in first st, 1tr in next 4, (4, 4, 5, 5)(5, 5, 6, 6) st, 1dc in next 5, (5, 6, 7, 7)(7, 7, 7, 7) st, 1hdc in next 3 st, 1sc in next 3 st, ch1, turn. Stitch count: 17, (17, 18, 20, 20)(20, 20, 21, 21) st
Next row (RS): 1sc in next 3 st, 1hdc in next 3 st, 1dc in next 5, (5, 6, 7, 7)(7, 7, 7, 7) st, 1tr in next 5, (5, 5, 6, 6)(6, 6, 7, 7) st, 2tr in next st, ch4 (4, 6, 8, 12)(12, 12, 12, 12), turn.
Stitch count: 18, (18, 19, 21, 21)(21, 21, 22, 22) st – 1 x long chain
Next row (WS): Starting in 3rd ch from hook; 1dc in next 2, (2, 4, 6, 10)(10, 10, 10, 10) ch, 1dc in next 9, (9, 7, 5, 1)(1, 1, 1, 1) st, post st around next st, sk next st, 1dc in each st to end, ch2, turn.
Stitch count: 20, (20, 23, 27, 31)(31, 31, 32, 32) st
Note: The following rows will include a maple leaf patterning. This patterning is separated with a post stitch. You will work this patterning throughout the length of the cardigan.
Maple row 1: 1dc in each st to post st, post st around post st, sk next st, 1dc in next 5 st, ch2, sk next 2 st, 1dc in last 4 st, ch2, turn.
Stitch count: 18, (18, 21, 25, 29)(29, 29, 30, 30) st, 1 x ch-sp
Maple row 2: 1dc in first st, ch3, sk next 3 st, 2sc in ch-sp, ch3, sk next 3 st, 1dc in next 2 st, post st around post st, sk next st, 1dc in each st to end, ch2, turn.
Stitch count: 14, (14, 17, 21, 25)(25, 25, 26, 26) st, 2 x ch-sp
Maple row 3: 1dc in each st to post st, post st around post st, sk next st, 1dc in next 2 st, 3sc in ch-sp, ch2, sk next 2 sc, 3sc in ch-sp, 1dc in last st, ch2, turn.
Stitch count: 18, (18, 21, 25, 29)(29, 29, 30, 30) st, 1 x ch-sp
Maple row 4: Rep maple row 2
Maple row 5: 1dc in each st to post st, post st around post st, sk next st, 1dc in next 2 st, 3dc in ch-sp, 1dc in next 2 sc, 3dc in ch-sp, 1dc in last st, ch2, turn.
Stitch count: 20, (20, 23, 27, 31)(31, 31, 32, 32) st
Maple row 6: 1dc in each st to post st, post st around post st, sk next st, 1dc in each st to end, ch2, turn.
Stitch count: 20, (20, 23, 27, 31)(31, 31, 32, 32) st
Notes
- !!!Please read the following notes and instructions entirely, before continuing to crochet!!!
- The instructions will ask you to work ‘in pattern’, what this means is that you continue working the maple rows 1 – 6 until you have worked a total number of rows stated in the instructions.
- You will also work increases at the same time when called for. You will only do this at the armhole side, i.e. the side that is straight and does not contain the maple leaf patterning.
Work in pattern {see notes} until you have worked 9, (10, 10, 12, 12)(13, 14, 15, 16) maple rows in total. You should end with Maple row 3, (4, 4, 6, 6)(1, 2, 3, 4).
AND AT THE SAME TIME:
XS-2XL only:
On the last 2, (4, 4, 3, 3)(6, –, –, –) rows, work an increase of 1 stitch in each row by working 2 dc in the first st at the armhole side. You will have increased a total of 2, (4, 4, 3, 3)(6, —, –, –) stitches. Omit the ch2 at the end of the last row and break yarn.
3XL-5XL only:
When reaching the last –, (–, –, –, –)(–, 8, 9, 10) rows; work an increase of 1 stitch in each of next –, (–, –, –, –)(–,7, 7, 8) rows by working 2 dc in the first st of the row at the armhole side.
On the last –, (–, –, –, –)(–, 1, 2, 2) rows, work an increase of 2 stitches in each row by working 3 dc in the first st of the row at the armhole side. You will have
increased a total of –, (–, –, –, –)(–, 9, 11, 12) stitches. Omit the ch2
at the end of the last row and break yarn.
Sizing note: If you’d like a bigger or smaller bust circumference of the cardigan, you can add or subtract increases. You will need to work these within the number of rows stated in the pattern though, because this affects the armhole size.
Left front
Re-join yarn in the first sc at the opposite side of the back piece; rep right front instructions, with the difference that RS rows are now WS rows and vice versa. Break yarn at the end of the last row.
Body
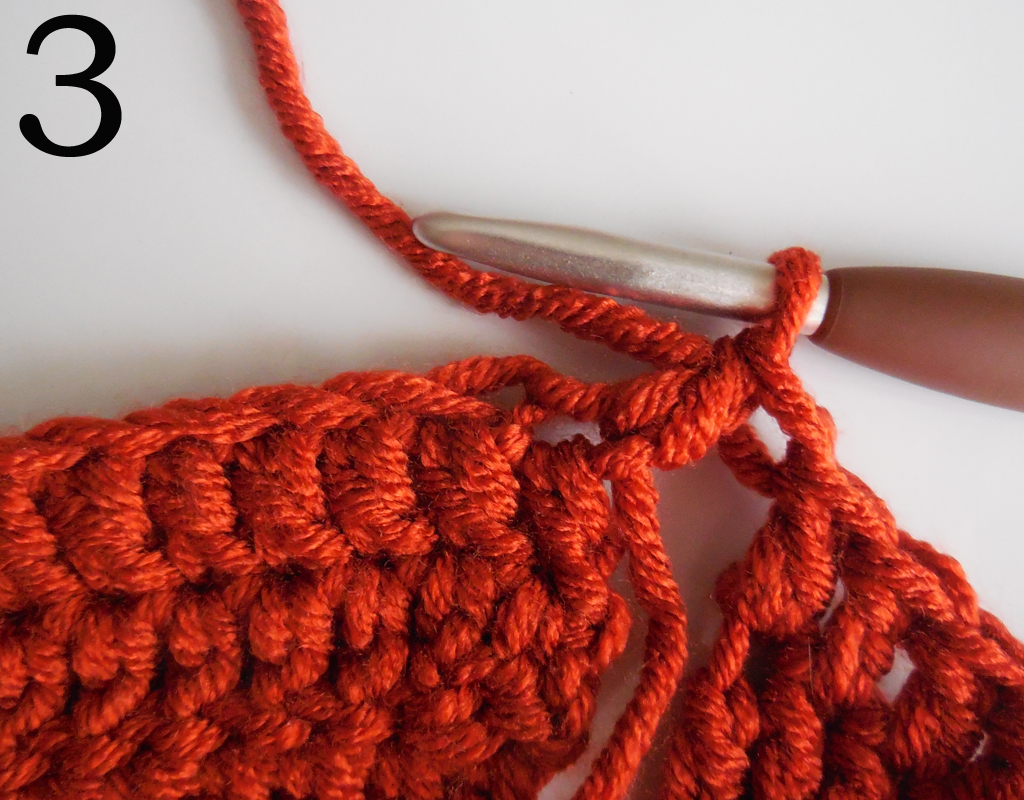
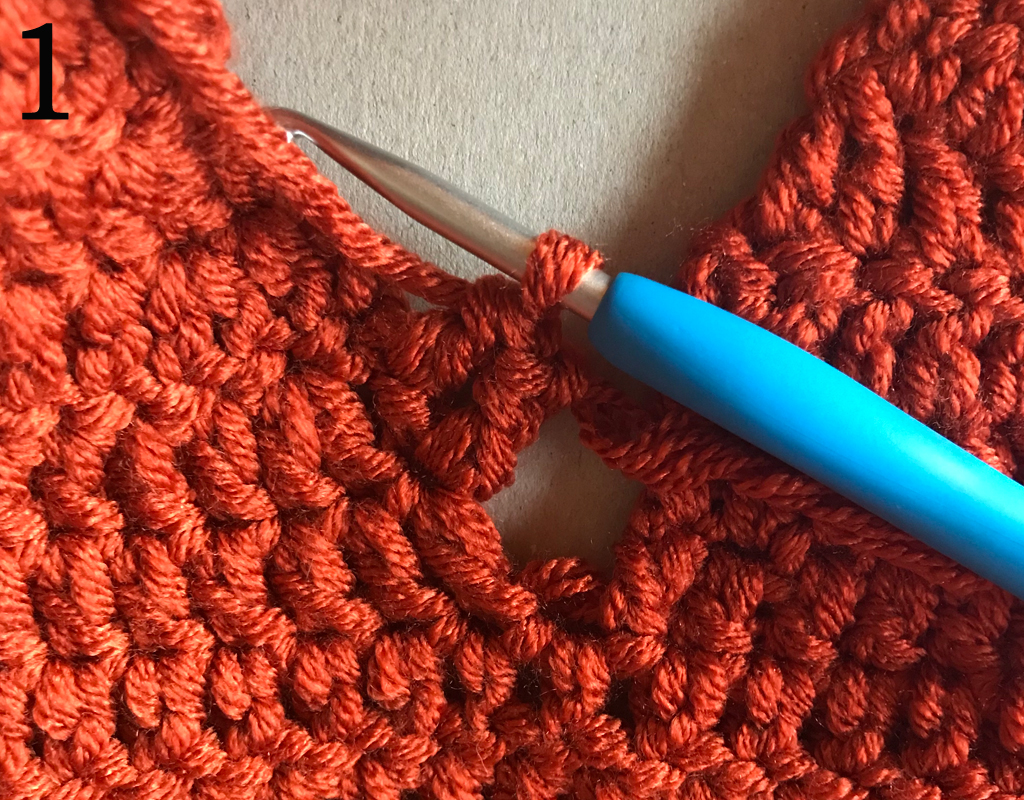
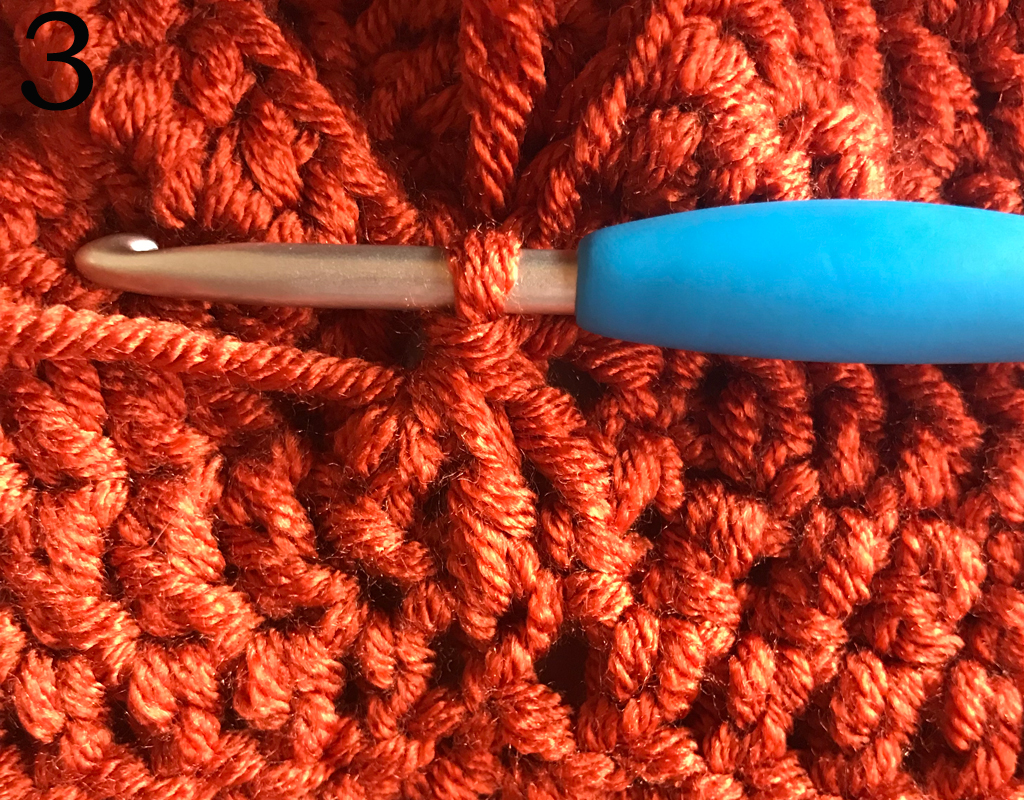
Re-join yarn with the RS facing in the first st of the left front panel {red arrow pic 1}; work first underlined section of Body maple row 4, (5, 5, 1, 1)(2, 3, 4, 5) {see Body maple rows below}, work 1dc in each st to the end of the left front panel,
join the left front panel to the back {pic 1-3} by working 1dc in each of next 43, (48, 54, 60, 67)(76, 82, 86, 89) bottom of the starting ch, join the back to the right front panel with a dc in the first st of the right front panel, work 1dc in each st to post st, work second underlined section of Body maple row 4, (5, 5, 1, 1)(2, 3, 4, 5) {see Body maple rows below, pic 4 = finished round}, ch2, turn.

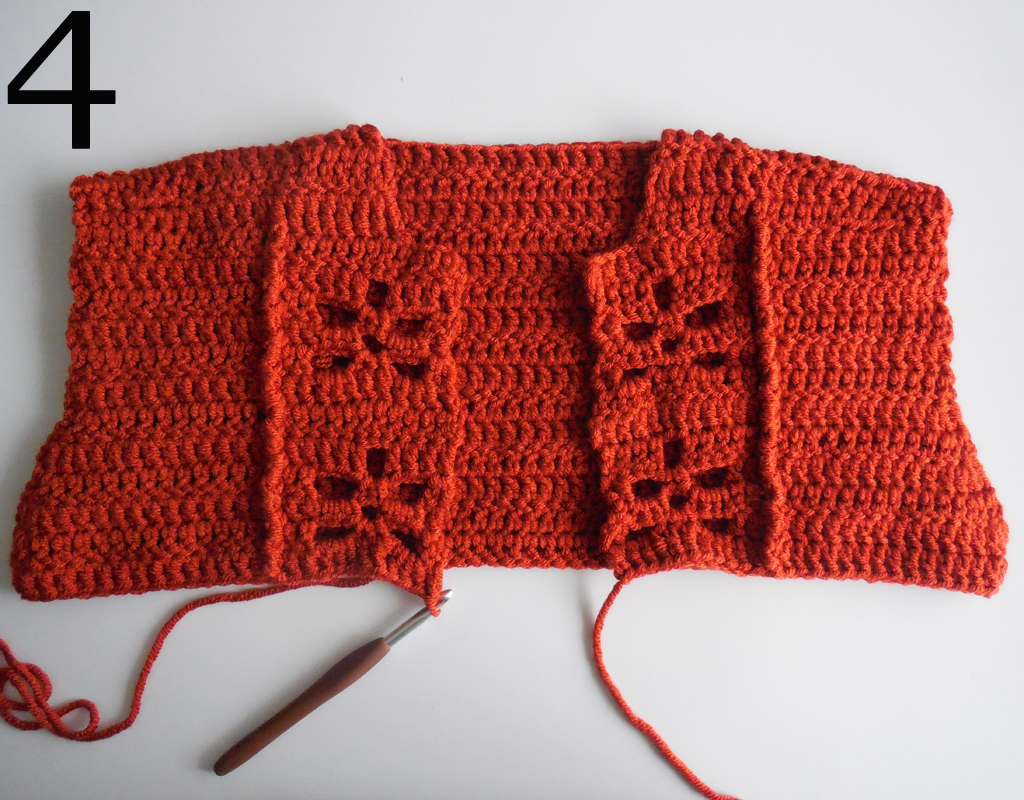
Continue to work in pattern {using the body maple rows below according to where you are in the pattern} for a total of 7, (6, 6, 4, 5)(4, 3, 3, 2) rows from the bottom of the armhole. You should end with Body maple row 4, (4, 4, 4, 5)(5, 5, 6, 6) as your last worked row. You should have 3 Maple leaves in total.
Body maple row 1: 1dc in next 4 st, ch2, sk next 2 st, 1dc in next 5 st, post st around post st, sk next st, 1dc in each of next st to post st, post st around post st, sk next st, 1dc in next 5 st, ch2, sk next 2 st, 1dc in next 4 st, ch2, turn.
Stitch count: 83, (92, 104, 116, 131)(146, 158, 168, 173) st, 2 x ch-sp
Body maple row 2: 1dc in first st, ch3, sk next 3 st, 2sc in ch-sp, ch3, sk next 3 st, 1dc in next 2 st, post st around post st, sk next st, 1dc in each st to next post st, post st around post st, sk next st, 1dc in next 2 st, ch3, sk next 3 st, 2sc in ch-sp, ch3, sk next 3 st, 1dc in last st, ch2, turn.
Stitch count: 75, (84, 96, 108, 123)(138, 150, 160, 165) st, 4 x ch-sp
Body maple row 3: 1dc in first st, 3sc in ch-sp, ch2, sk next 2 sc, 3sc in ch-sp, 1dc in next 2 st, post st around post st, sk next st, 1dc in each st to next post st, post st around post st, sk next st, 1dc in next 2 st, 3sc in ch-sp, ch2, sk next 2 sc, 3sc in ch-sp, 1dc in last st, ch2, turn.
Stitch count: 83, (92, 104, 116, 131)(146, 158, 168, 173) st, 2 x ch-sp
Body maple row 4: Rep body maple row 2
Body maple row 5: 1dc in first st, 3dc in ch-sp, 1dc in next 2 sc, 3dc in ch-sp, 1dc in next 2 st, post st around post st, sk next st, 1dc in each st to next post st, post st around post st, sk next st, 1dc in next 2 st, 3dc in ch-sp, 1dc in next 2 sc, 3dc in ch-sp, 1dc in last st, ch2, turn.
Stitch count: 87, (96, 108, 120, 135)(150, 162, 172, 177) st
Body maple row 6: 1dc in each st to post st, post st around post st, sk next st, 1dc in each st to next post st, post st around post st, sk next st, 1dc in each st to end, ch2, turn.
Stitch count: 87, (96, 108, 120, 135)(150, 162, 172, 177) st
Sizing note: you can add or subtract length to the body by working the body maple rows in pattern for the length that you like.
XS (WS), S (RS), M (RS) and L (RS) only: 1dc in first st, 3dc in ch-sp, 1dc in next 2 st, 3dc in ch-sp, 1dc in next 2 st, post st around post st, sk next st, dc across to post st, post st around post st, sk next st, 1dc in next 2 st, 3dc in ch-sp, 1dc in next 2 st, 3dc in ch-sp, 1dc in first st, ch2, turn. XS only: omit the ch2, continue to hem ribbing instructions.
Stitch count: 87, (96, 108, 120, –)(–, –, –, –) st
XL (WS), 2XL (RS), 3XL (WS), 4XL (WS), and 5XL (RS) only: 1dc in each st to post st, post st around post st, sk next st, 1dc in each st to post st, post st around post st, sk next st, 1dc in each st to end, ch2, turn.
Stitch count: –, (–, –, –, 135)(150, 162, 172, 177) st
All sizes: rep Body maple row 6 for 0, (1, 3, 3, 3)(3, 3, 4 4) times more, omit the ch2 on the last row.
Hem ribbing
Sizing note: If you have made modifications to the number of stitches worked in the cardigan, make sure the final stitch count is a multiple of 3 before working the ribbing.
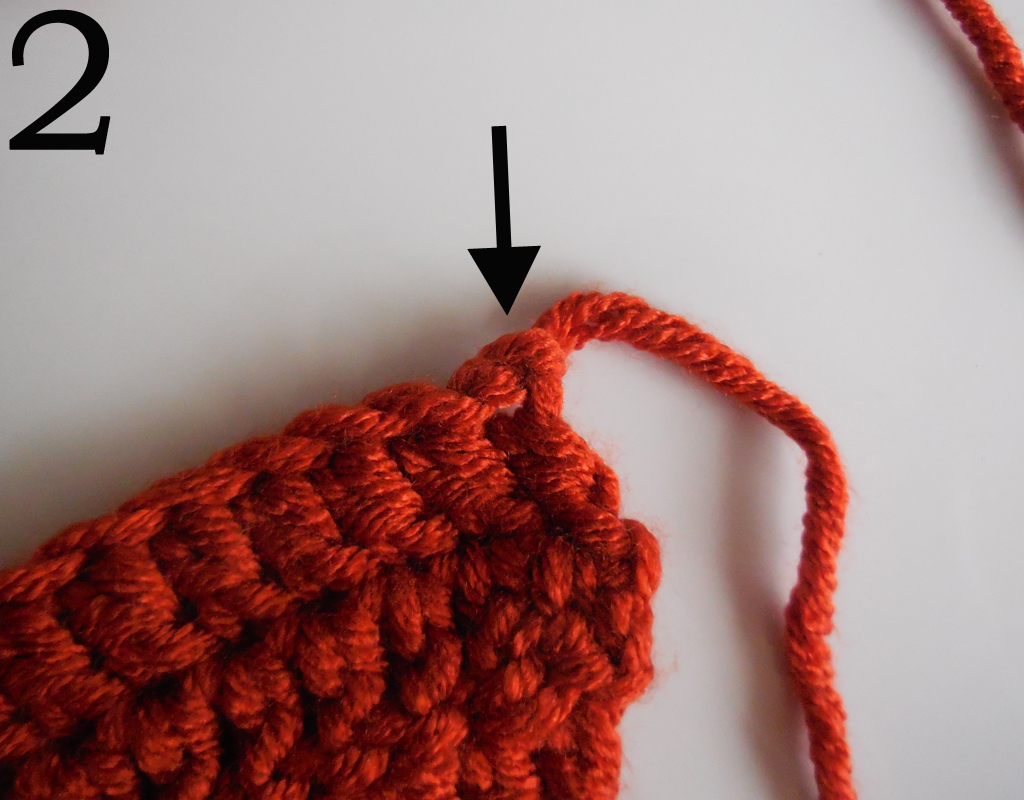
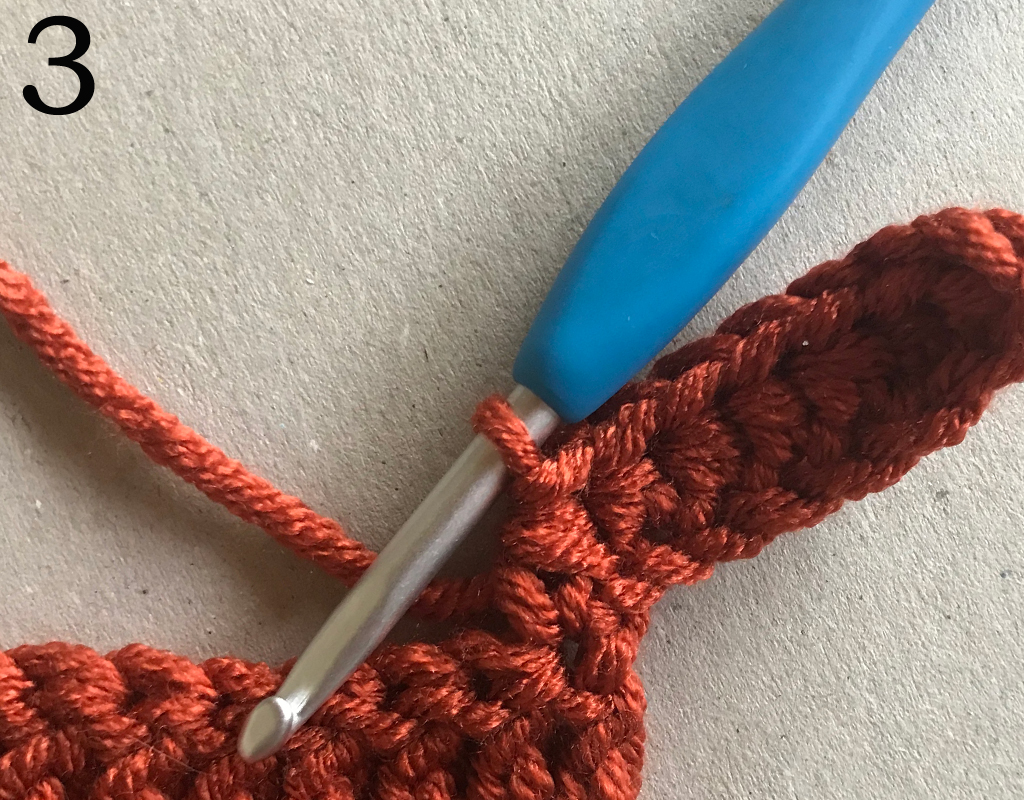
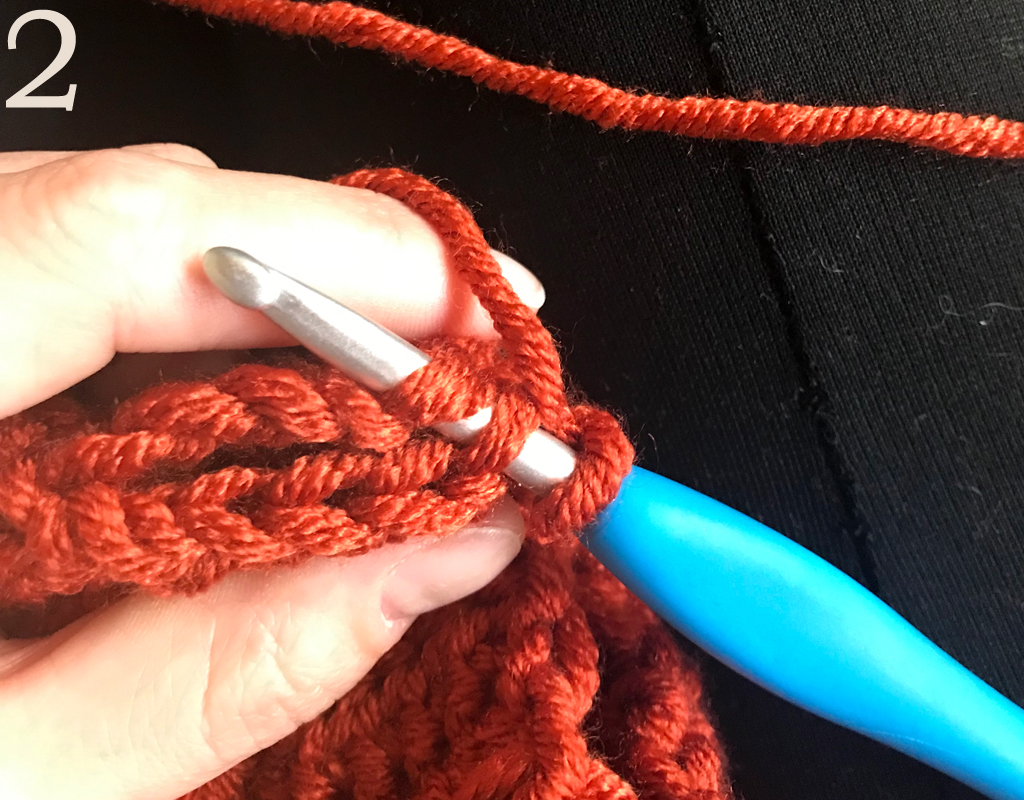
R1 Switch to 5mm hook; ch9, starting in the second ch from hook work 1hdc in each of next 7 chains, connecting hdc {see stitches and abbreviations} in last st and st at base of chain {pic 1-3}, sl st in next 2 st of the bottom of the cardigan, turn.
R2 1blhdc in each of next 7 st {mind where to place the first st, because the sl st can also look like a st}, 1hdc in last st, ch1, turn.
R3 1blhdc in each of next 7 st, connecting hdc {make sure to sk the st where the last sl st is made, pic 1}, sl st in next 2 st of bottom of the cardigan, turn.
Rep R2&3 across the bottom of the cardigan, you will end on R2. Break yarn and work away ends.
Sleeves (work instructions for both sleeves)
Sizing note: if you’d like a larger or smaller sleeve circumference, you can add or subtract repeats of the decrease round. To make the sleeve longer or shorter, add or subtract repeats of R3.
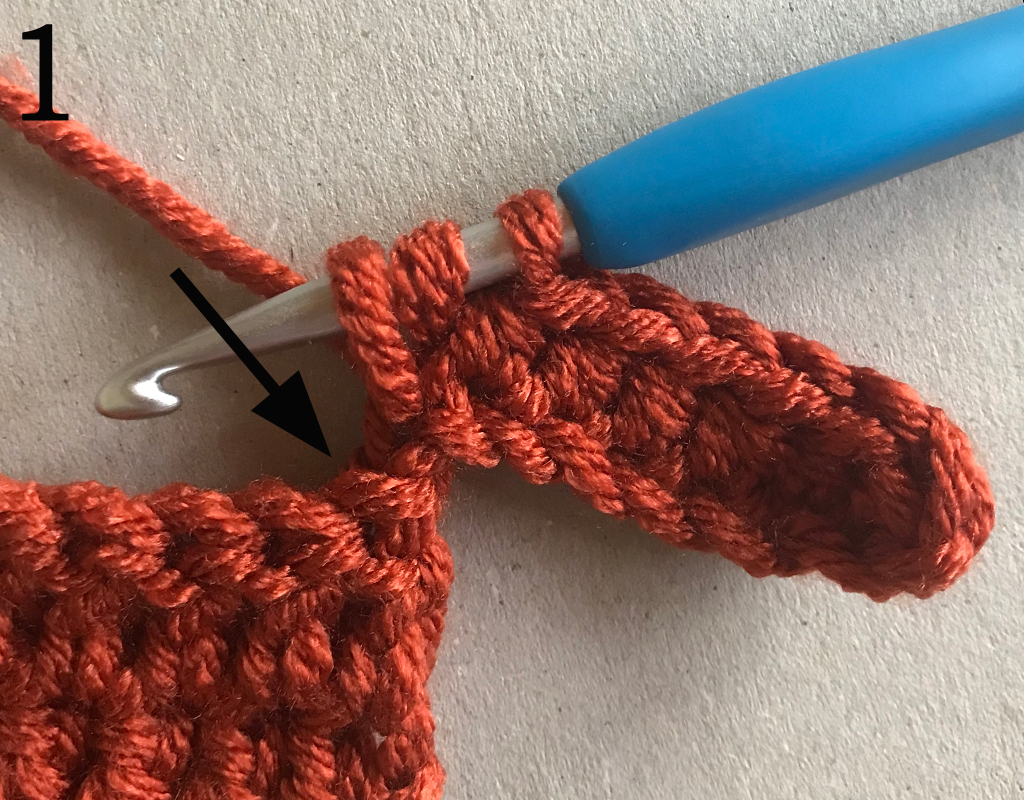
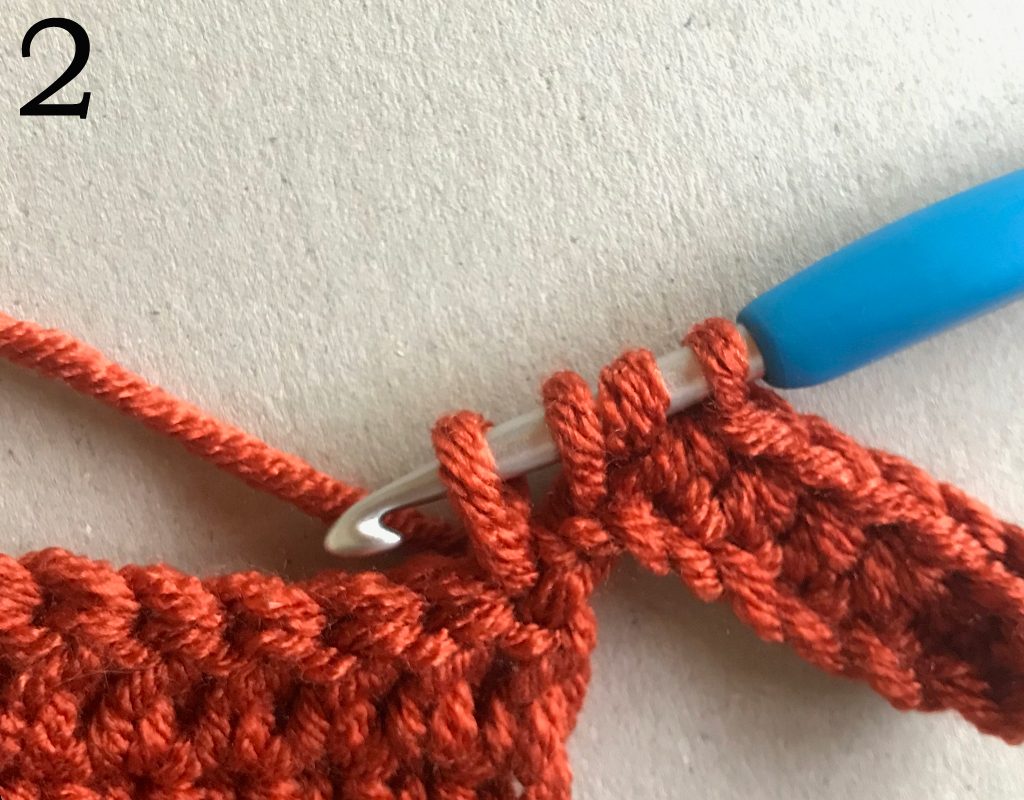
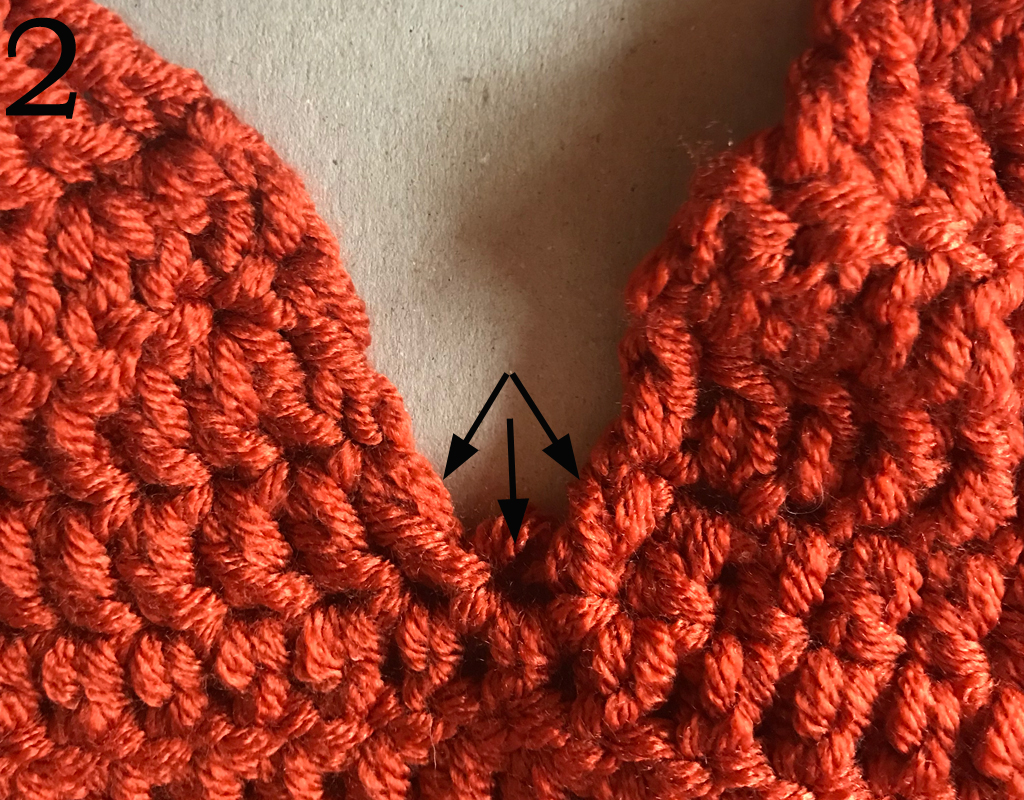
R1 (RS) With 6mm hook and RS facing you; Start in the side of the second row from the bottom of the armhole at the left {pic 1}, work 35, (38, 38, 44, 44)(47, 53, 56, 59) dc in the armhole spread evenly, work a dc3tog over the side of the last row, the bottom stitch and the side of the first row at the left of the armhole {pic 2-3}, sl st in first st, ch1.
Stitch count: 36, (39, 39, 45, 45)(48, 54, 57, 60) sts
R2 (Decrease round, RS): dc2tog, 1dc in each st around to last 2 st, dc2tog, sl st in first st, ch1. You will have decreased 2 stitches.
R3 (RS) 1dc in each st around, sl st in first st, ch1.
Work R3 three times more. [work R2 once, work R3 four times] four times. After that rep R2 once. You will have decreased 12 stitches in total and worked a total of 27 rows.
Stitch count: 24, (27, 27, 33, 33)(36, 42, 45, 48) sts
Rep R3 for 0, (1, 1, 2, 2)(2, 2, 3, 3) more times, omitting the ch1 on the last row. You will have worked 27, (28, 28, 29, 29)(29, 29, 30, 30) rows in total.
Ribbing R1 With 5mm hook; ch6, starting in the second ch from hook work 1hdc in each of next 4 chains, connecting hdc in last ch and st at base of chain, sl st in next 2 st of the bottom of the sleeve, turn.
Ribbing R2 1blhdc in each of next 4 st {mind where to place the first st}, 1hdc in last st, ch1, turn.
Ribbing R3 1blhdc in each of next 4 st, connecting hdc, sl st in next 2 st of bottom of the sleeve, turn.
Rep R2&3 to the end of the sleeve. You will end on R2, omit ch1 on the last row. Close the ribbing by working slip stitches through the back loop of the stitches of the last row and the starting chains of Ribbing R1 {pic 1-2}, break yarn and work away ends.

Front ribbing
Note: make sure R1 has a stitch count that’s a multiple of 3 before continuing to R2.
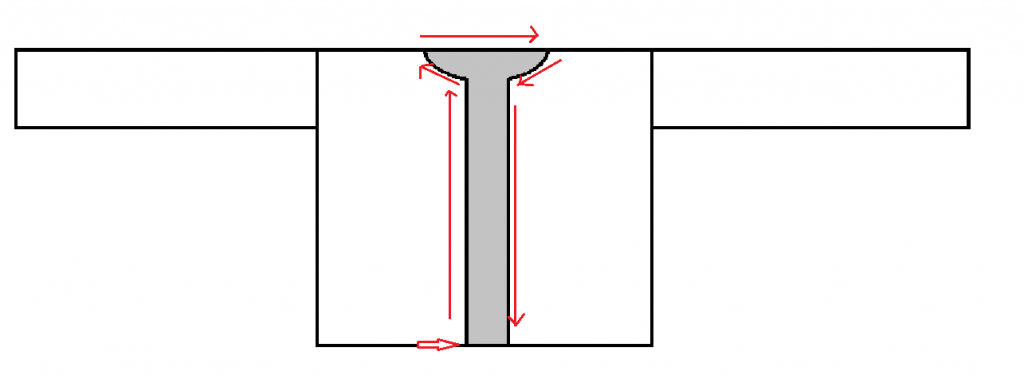
R1 (RS) With 5mm hook and RS facing you; work 1sc in each of next 8 hdc of the hem ribbing, work [2sc in side of dc row, 1sc in side of next dc row] until you get to the neckline with the starting chains of the front maple panel, work 3sc in the bottom of first ch, 1sc in the bottom of the remaining chains, work 2sc in each of next three tr rows, work 1sc in the following 13, (14, 16, 16, 17)(20, 20, 18, 19) dc, work 2sc in each of next three tr rows, 1sc in the bottom of the chains to the last ch, 3sc in the bottom of the last ch, work [1sc in side of next dc row, 2sc in side of next dc row] until you reach the hem ribbing, 1sc in last 8 hdc of the bottom ribbing, ch4, turn.
R2 Starting in the second ch from hook; work 1hdc in next 2 ch, connecting hdc in last st and st at base of chain, sl st in next 2 st of side of the cardigan, turn.
R3 1blhdc in each of next 2 st {mind where to place the first st}, 1hdc in last st, ch1, turn.
R4 1blhdc in each of next 2 st, connecting hdc, sl st in next 2 st of side of the cardigan, turn.
Rep R3&4 across the front of the cardigan. You will end on R3, omit ch1 on the last row. Break yarn and work away all ends. Block cardigan to measurements given at the top of this page.
I love to see your creations! Please share on Facebook or tag me on Instagram (@aspoonfulofyarn)! And if you have a question, please don’t hesitate to ask using the contact page.
************************************************************************************************************************************************
Affiliate disclaimer
This post contains affiliate links. When you click this link and purchase something, I will get a small commission, but it will not cost you extra money. This way you can support my blog and I can keep making free patterns.
Copyright
All patterns are for unlimited personal use. Do not reproduce, sell or publish (parts of) the patterns. Patterns may not be copied in any way (print or digitally), in part or in full, except for personal use. Items may be sold that are made from this pattern as long as the designer is credited.
3 Comments
Comments are closed.
This is absolutely beautiful!
Thank you <3
Love this! I was hoping to make it from dk yarn…..could you suggest any way to adjust the pattern or is that just too difficult! Trying to reduce my stash lol