Klik hier voor de Nederlandse versie
Free Pattern: Watercolor Granny Blanket
Intro & Links
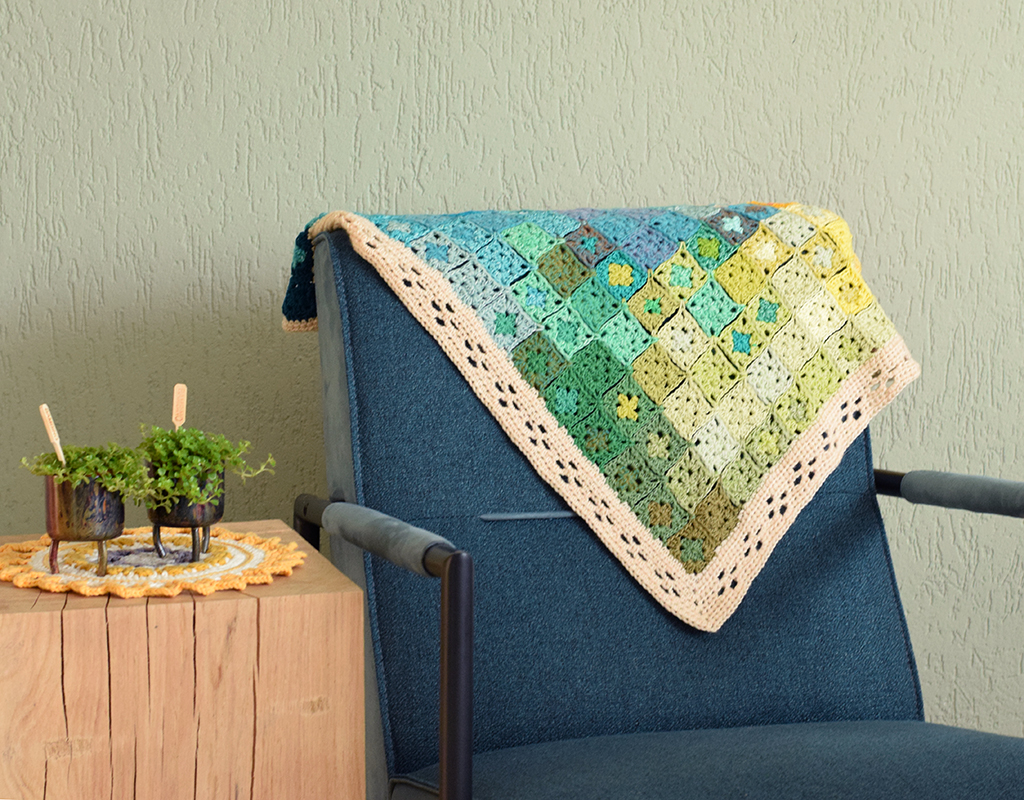
The Watercolor Granny Blanket is the perfect pattern to use up all your little leftovers and scraps from other projects! The pattern instructions are designed in a way, so you can keep going until you’ve used up all of your leftovers, making it a true stash buster : ) The pattern also gives tips for how to select colors for a stunning watercolor-like gradient within your blanket <3
- Read all previous posts about this pattern here, here and here.
- Create a project page on Ravelry, queue it for later or give it some love.
Yarn

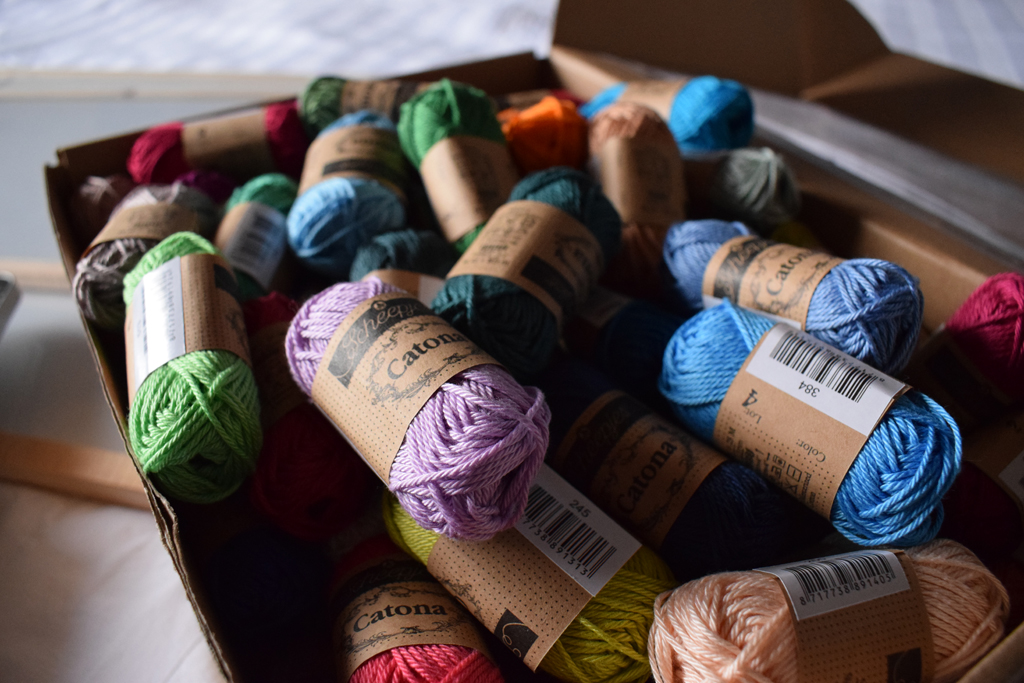
Granny squares: 290 grams of scraps and leftovers of the Scheepjes Catona Colour Pack* (100% mercerized cotton) and the Scheepjes Stone Washed and River Washed Colour Pack* (78% cotton, 22% acrylic).
Border: 1.5 balls of Scheepjes Stonewashed (78% cotton, 22% acrylic, 50g/130m) in colour Pink Quarzite.
Please note amounts may vary depending on how big you want your blanket to be.
If you want to make this blanket yourself, or just try out the yarn and you don’t have a retailer nearby, please consider buying your Scheepjes yarn via one of the links below. It will give me a small commission, but it won’t cost you anything extra. This will help me keep making free patterns : )
UK/International: Wool Warehouse
Benelux: Caro’s Atelier
List of all Scheepjes Retailers: Scheepjes website
Notions
- 3mm hook (for Scheepjes Stone Washed/River Washed) and 3.5mm hook (for Scheepjes Catona) or other size to obtain gauge
- Darning needle and thread clipper
- Blocking materials
Gauge & Size
The sample blanket is 14 x14 squares.
1 finished square measures 4cm/1.6” before blocking, and 4.5cm/1.8″ after blocking. The Blanket measures 75cm/30” after blocking.
Stitches & Abbreviations (US terms)
ch chain
ch-sp chain space
corner-sp corner space
MR magic ring
sk skip
sl st slip stitch
st stitch
sc single crochet
hdc half double crochet
dc double crochet
rep repeat
WS wrong side of your work
RS right side of your work
*…; rep from * to … work the instructions after * and then rep that section as specified.
[…] indicates stitch counts at the end of the instructions, but is also used when a group of sts need to be worked into the same st/sp or for a certain repeat.
{italic text} indicates notes and tips throughout the pattern.
Notes & Tips
- The pattern uses the join-as-you-go technique, which will be explained with text and photos. With this technique, you don’t have to sew all those squares together at the end and also makes sure the color transition is seamless.
- Close the round with a sl st when you work the next round with the same color, sl st to the next corner-sp.
- Close the round with either a sl st or an invisible needle join when you work the next round with a different color.
- Ch3, which will count as your first dc, when working the next round with the same color.
- Use a ch3 or a standing-dc when working the next round with a different color.
The pattern
Click here for a tutorial on how to group and select colours for a watercolor gradient within your blanket.
The first granny square
Note: Scheepjes Stone Washed/River Washed is a tiny bit thicker than Scheepjes Catona, so use the 3mm hook for Scheepjes Stone Washed/River Washed and the 3.5mm hook for Scheepjes Catona. This way you can mix and match both yarns in the same pattern.
R1 (RS) In a MR; Ch3 {counts as first dc}, 2dc, [ch2, 3dc] 3 times, ch2, close round in top of ch3, sl st to next corner-sp or fasten off. {see Notes & Tips} [12 dc, 4 corner-sp]
R2 (RS) Ch3 or work a standing-dc in corner-sp {see Notes & Tips}, [2dc, ch2, 3dc] in same corner-sp, [3dc, ch2, 3dc] in next 3 corner-sps, close round in top of ch3 or standing-dc, fasten off. [24 dc, 4 corner-sp]
TIP!
When you only have a tiny scrap left, you can also choose to work [2dc, ch3, 2dc], instead of [3dc, ch2, 3dc].
Joining a square in two places
Notes:
* When joining squares, lay the squares opposite each other with the right sides facing upwards.
* The square that’s already finished will be referred to as ‘finished square’ and the square that you’re still working on will be referred to as ‘current square’.
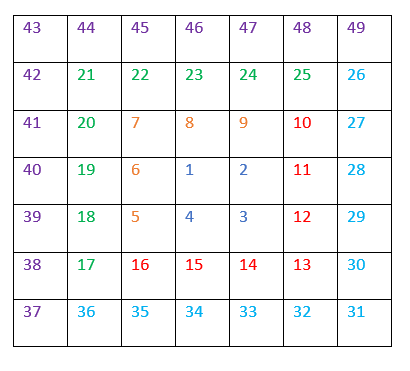
* Join the squares in a spiral fashion as pictured in the schematic below. This will ensure that you will always end up with a square blanket when your left overs are finished.
Schematic for joining order
R1 (RS) Rep R1 of first granny square
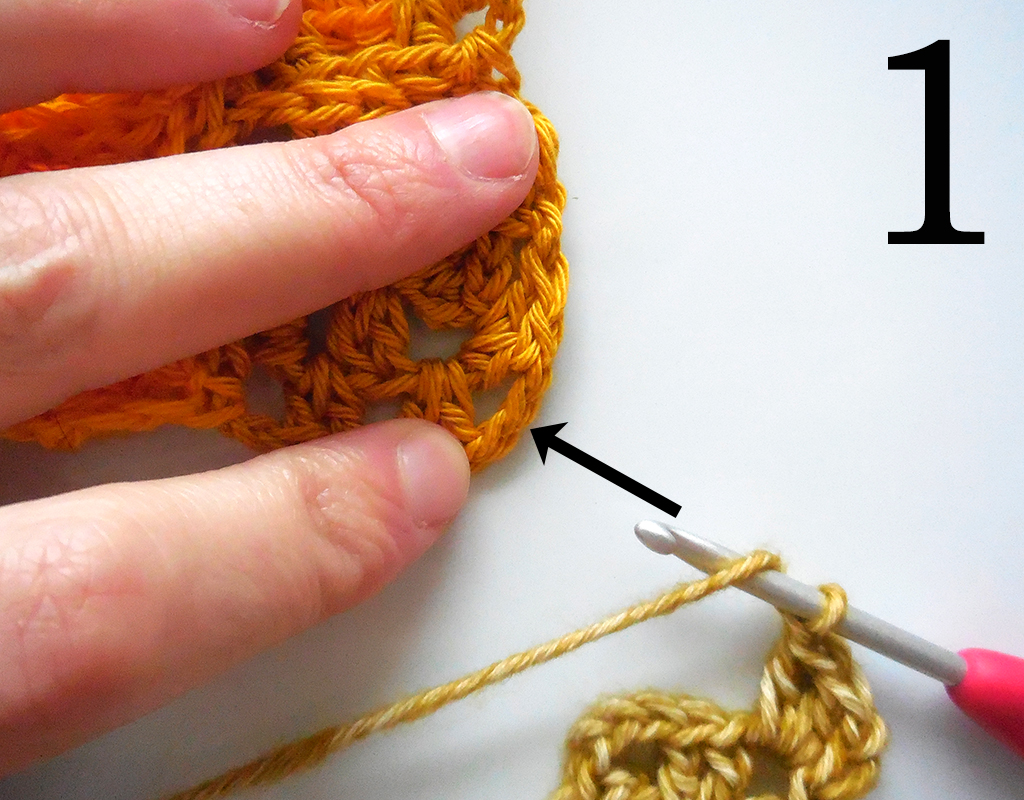
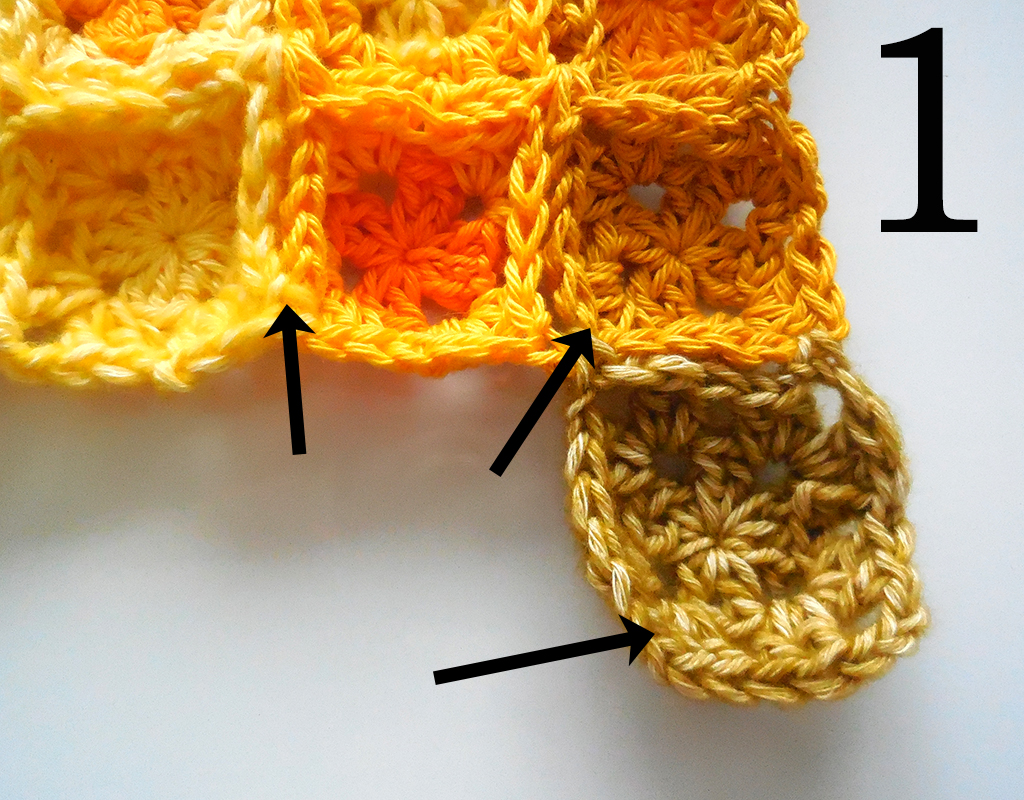
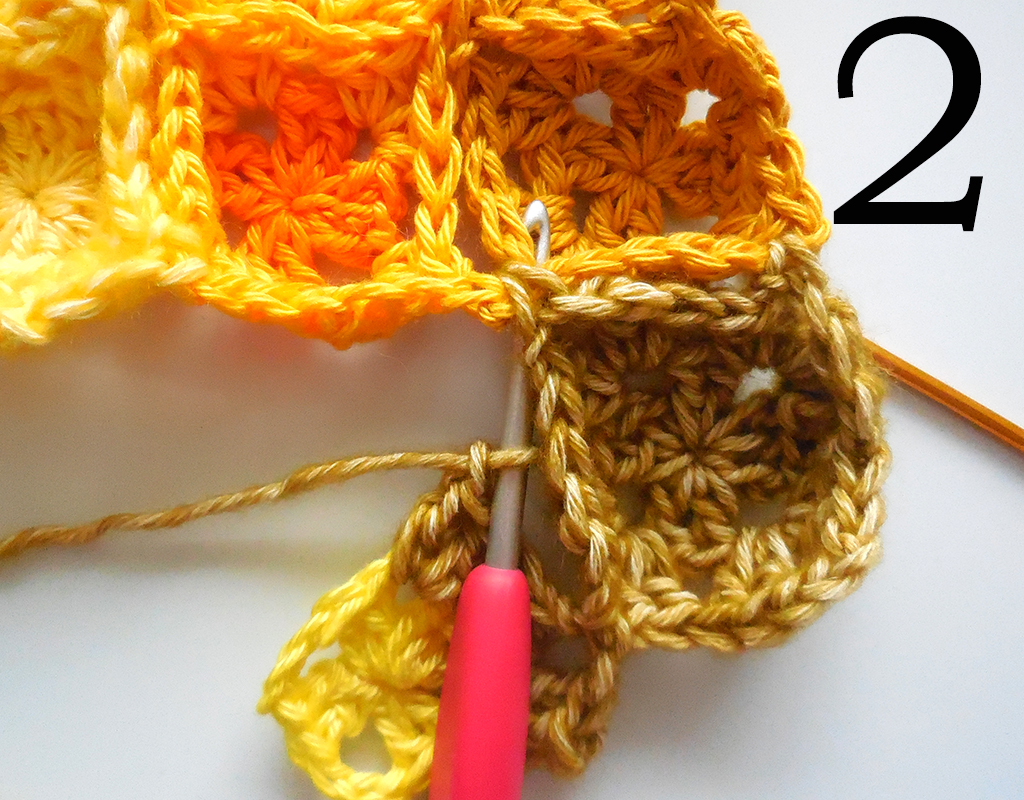
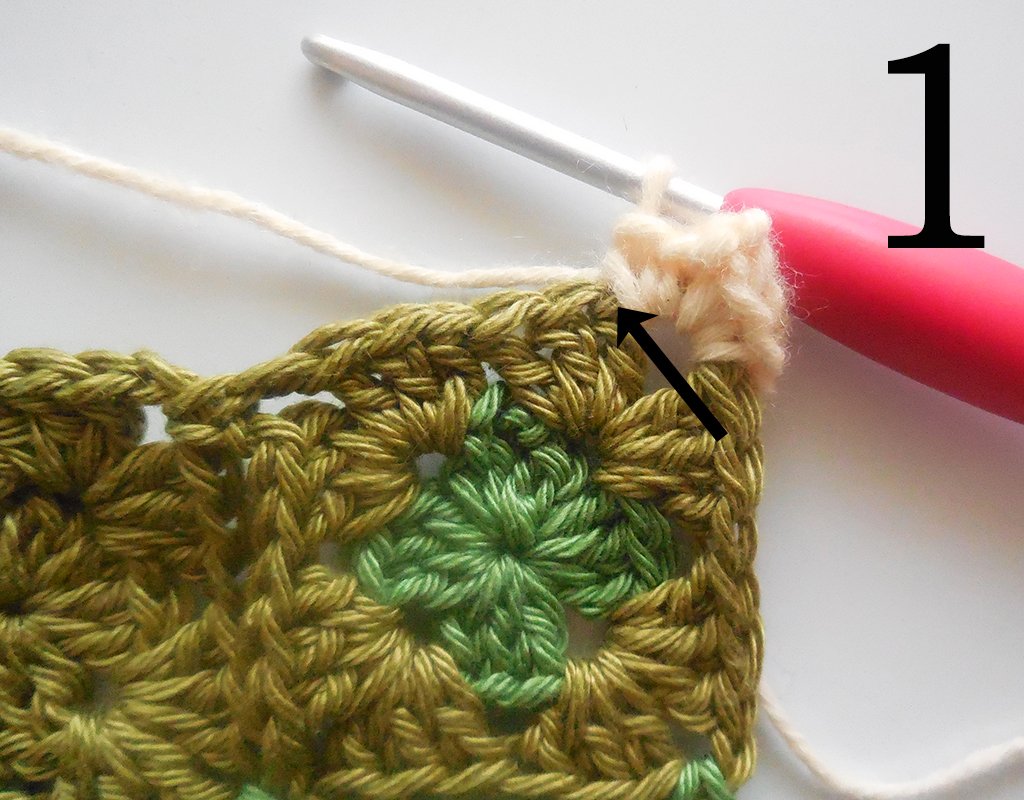
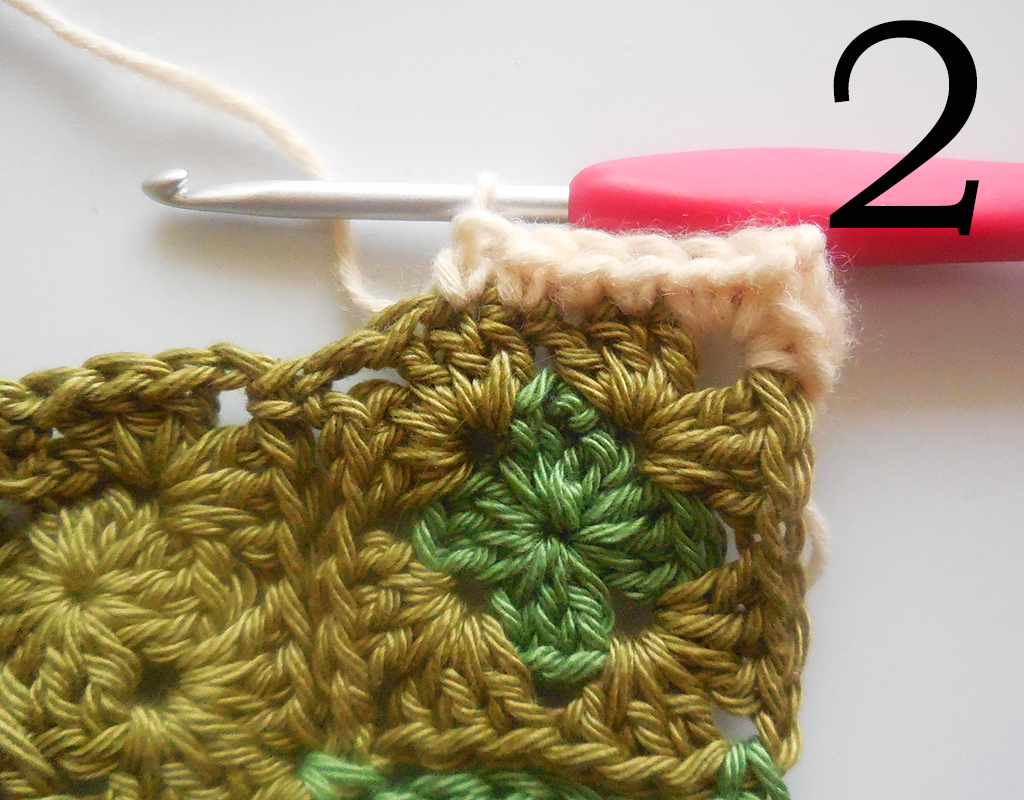
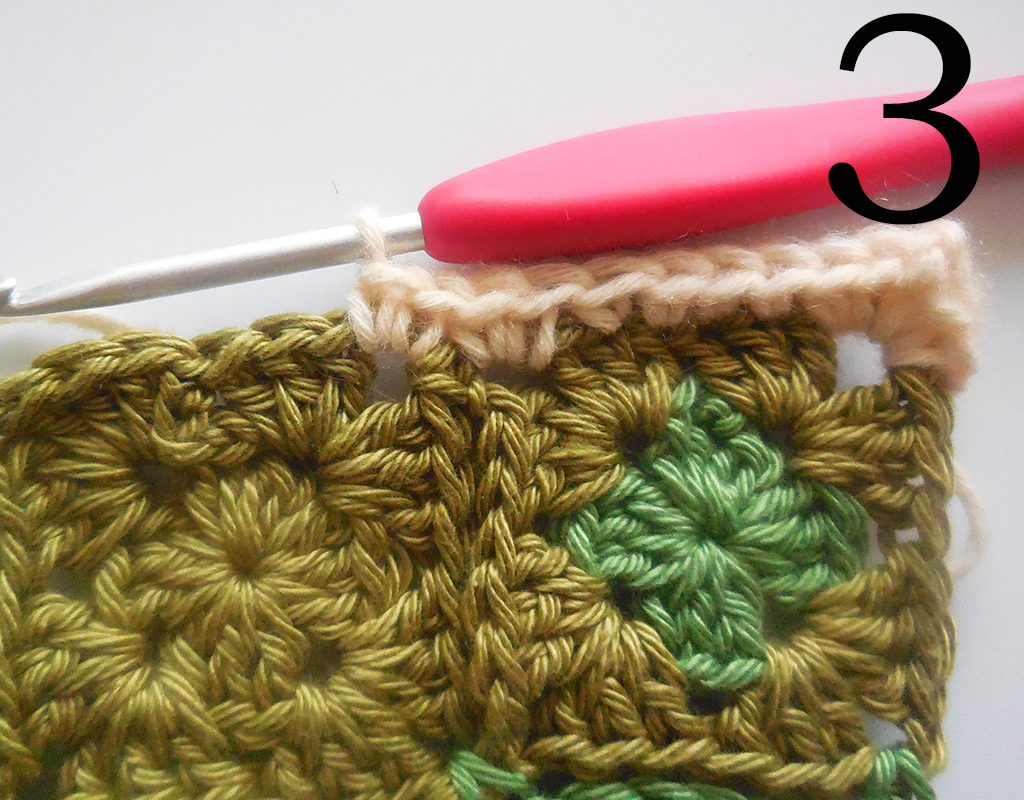
R2 (RS) Ch3 or work a standing-dc in corner-sp {see notes}, 2dc in same corner-sp, ch1, sl st in corner-sp of finished square {pic 1-2}, ch1, 3dc in corner-sp of current square,
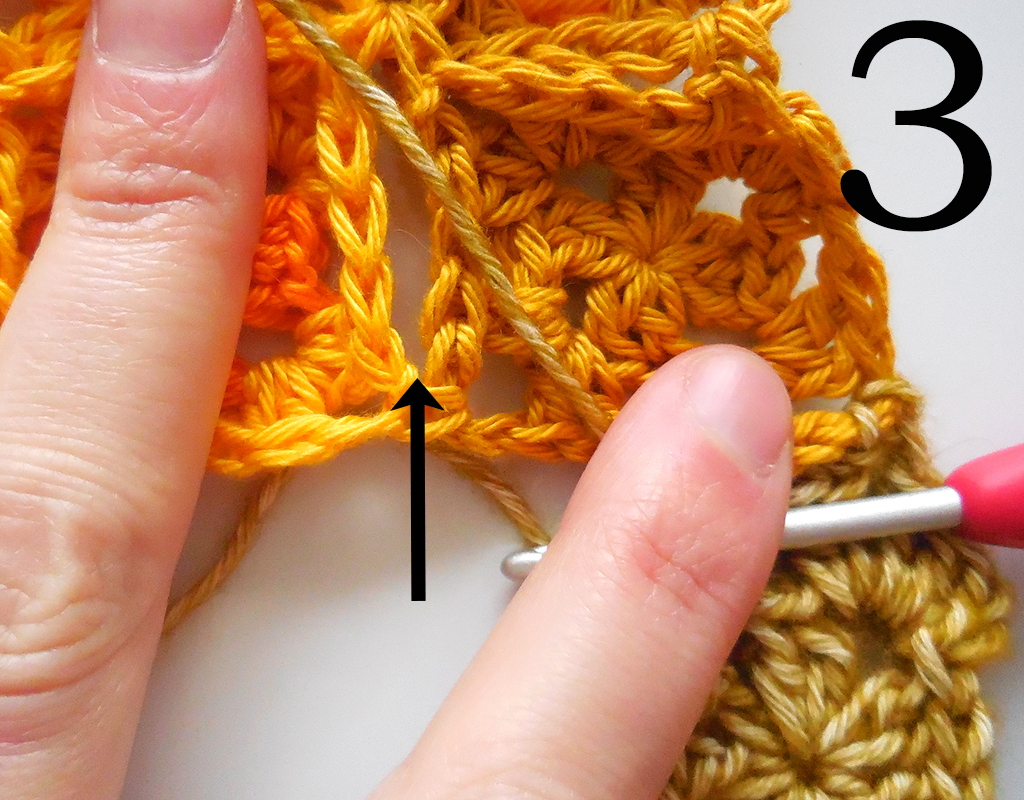
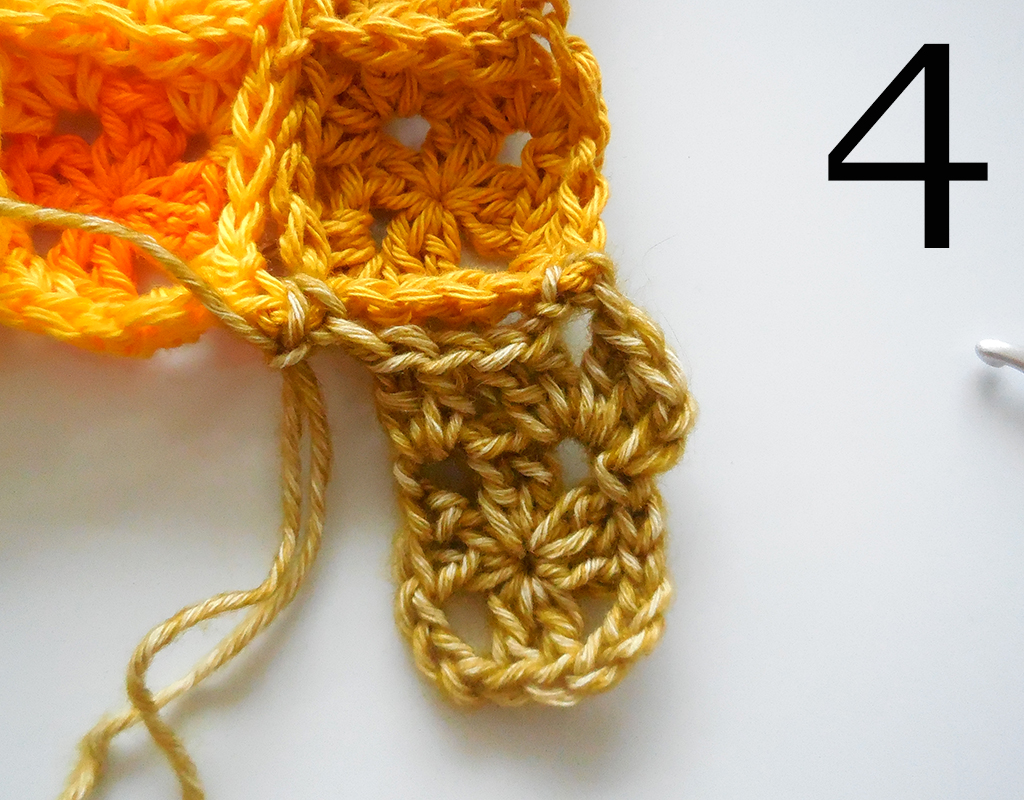
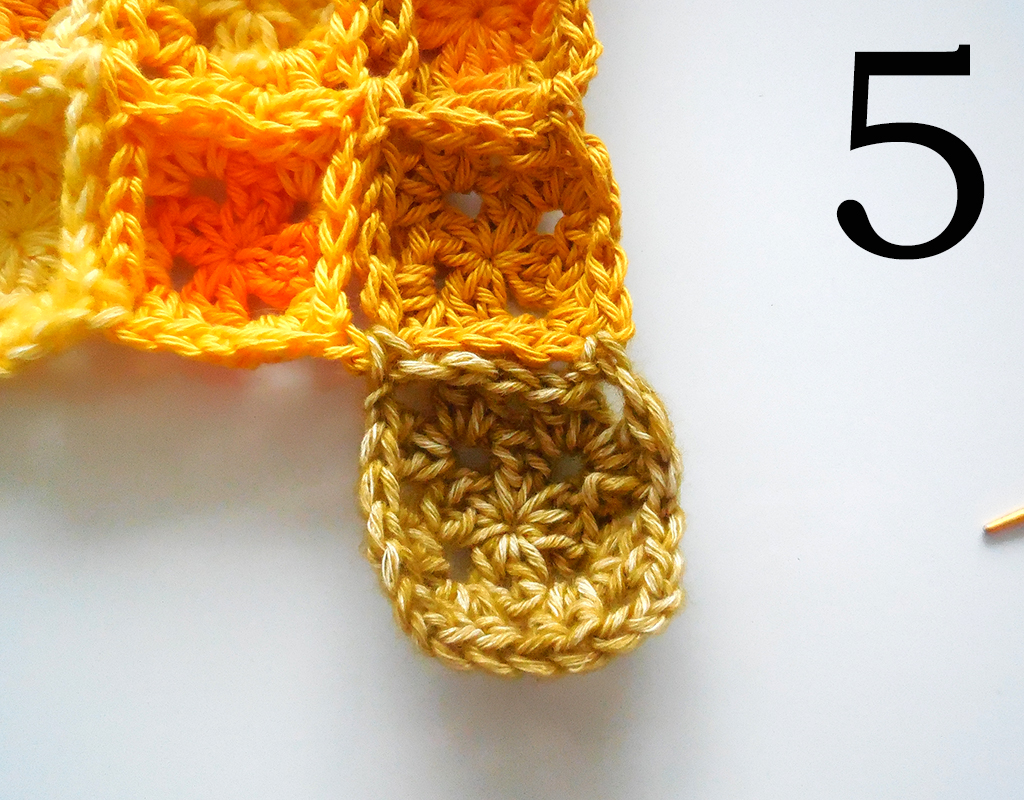
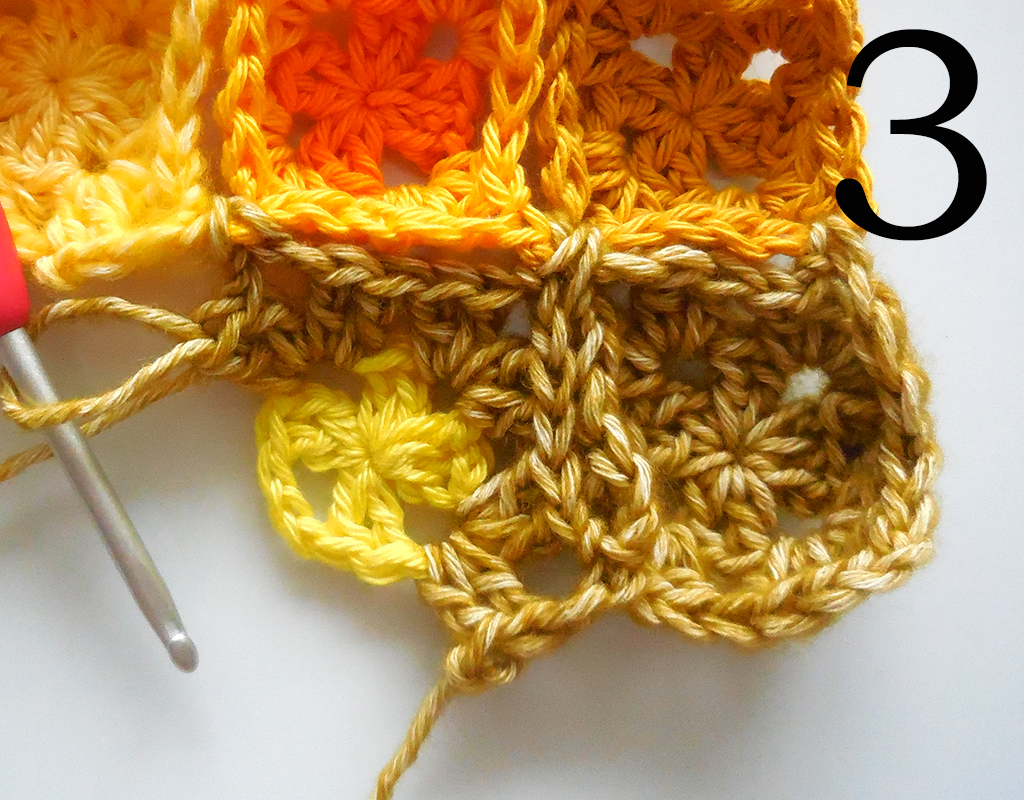
3dc in next corner-sp of current square, ch1, sl st in next corner-sp of finished square {OR in the space between two joined squares, pic 3-4}, ch1, 3dc in corner-sp of current square, [3dc, ch2, 3dc] in next 2 corner-sps of current square, close round in top of ch3 or standing-dc, fasten off {pic 5}. [24 dc, 4 corner-sp {two of them joined}]

Joining a square in three places
Some squares require joining in three places (ex. see square 4 in the joining schematic above). If that’s the case, use the pattern below.
R1 (RS) Rep R1 of first granny square
R2 (RS) Ch3 or work a standing-dc in corner-sp {see notes}, 2dc in same corner-sp, ch1, sl st in corner-sp of finished square, ch1, 3dc in corner-sp of current square,
[3dc in next corner-sp of current square, ch1, sl st in next corner-sp of finished square, ch1, 3dc in corner-sp of current square] two times {pic 1-3}, [3dc, ch2, 3dc] in last corner-sp of current square, close round in top of ch3 or standing-dc, fasten off. [24 dc, 4 corner-sp {three of them joined}]
Keep joining squares in a spiraling fashion {see joining schematic}, joining in two or three places depending on where you need to join. Continue until you’ve used up all of your leftovers. Block the blanket before attaching the border, as the squares will cup if they are unblocked.
TIP!
Work away your ends after each square, your future self will thank you ; )
Border
This pattern comes with two border styles you can choose from: Floral and Ribbed. It doesn’t matter how many squares there are in your blanket. Both borders are worked on the wrong side of the blanket after R1.
Floral border
TIP!
Whenever you’ve worked a square with [2dc, ch3, 2dc] in the corners {see previous tip} you don’t need to skip any dc in R1.
R1 (RS) With Scheepjes Stonewashed in color Pink Quarzite and 3.5mm hook, start with the RS facing, attach yarn with sl st in any outer corner-sp of the blanket; Ch1 {doesn’t count as a st here and throughout}, *[2sc, ch2, 2sc] in corner-sp, sk next dc {which is partially hidden, pic 1}, 1sc in next 4 st {pic 2}, sk next dc, 2sc in next two ch-sp {skipping the sl st join in between squares, pic 3}; rep from * to next corner-sp {omiting the last 2sc in the ch-sp}, work the * rep three times more, join the round with sl st in first corner-sp. [8 sc per square]
R2 (WS) Ch1, TURN, *[1hdc, ch2, 1hdc] in corner-sp, 1hdc in each st to next corner-sp; rep from * three times more, join the round with sl st in first corner-sp.
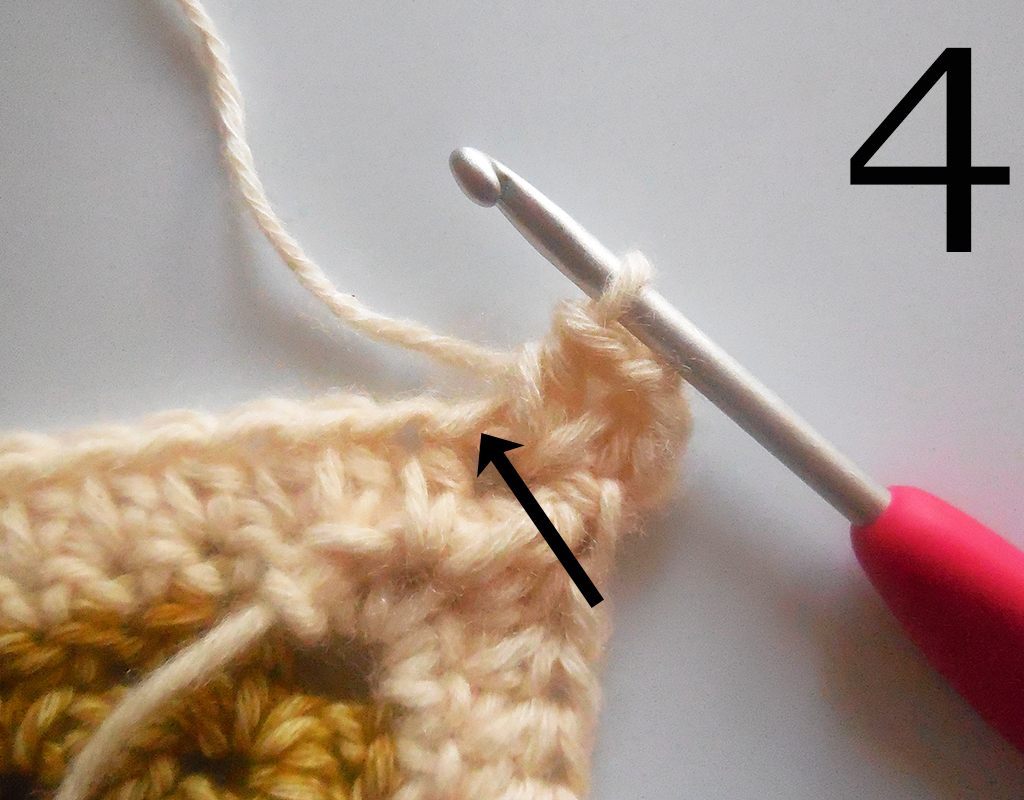
R3 (WS) Ch1, *[1hdc, ch2, 1hdc] in corner-sp, 1hdc in first 4 st {first is hidden, pic 4}, [ch2, sk next 2 st, 1hdc in next 6 st] work between [..] until you’ve reached the next corner-sp, ending with 4 hdc instead of 6; rep from * three times more, join the round with sl st in first corner-sp. Pic 5 shows the finished rep.

R4 (WS) Ch1, *[1hdc, ch2, 1hdc] in corner-sp, 1hdc in first 3 st {first is hidden}, [ch3, sk next 2 st, 2sc in ch-sp, ch3, sk next 2 st, 1hdc in next 2 st] work between […] until you’ve reached the next corner-sp, ending with 3 hdc instead of 2; rep from * three times more, join the round with sl st in first corner-sp. Pic 6 shows the finished rep.
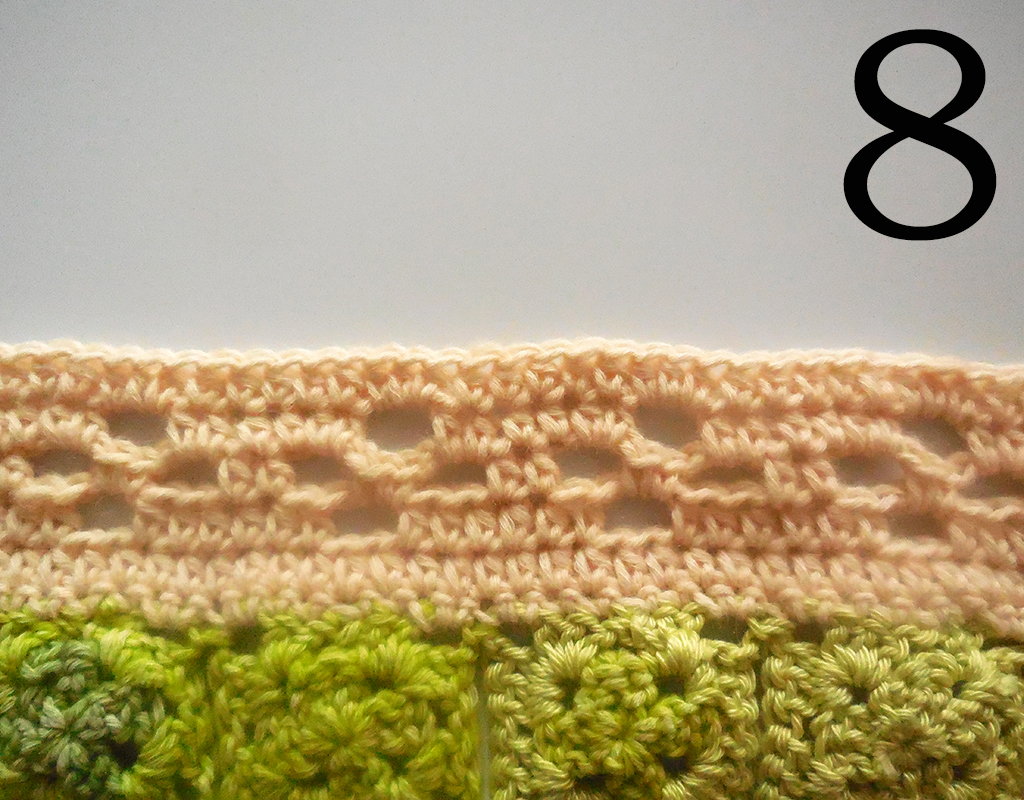
R5 (WS) Ch1, *[1hdc, ch2, 1hdc] in corner-sp, 1hdc in first 4 st {first is hidden}, [2hdc in ch-sp, ch2, sk next 2 st, 2hdc in ch-sp, 1hdc in next 2 st] work between […] until you’ve reached the next corner-sp, ending with 4 hdc instead of 2; rep from * three times more, join the round with sl st in first corner-sp. Pic 7 shows the finished rep.

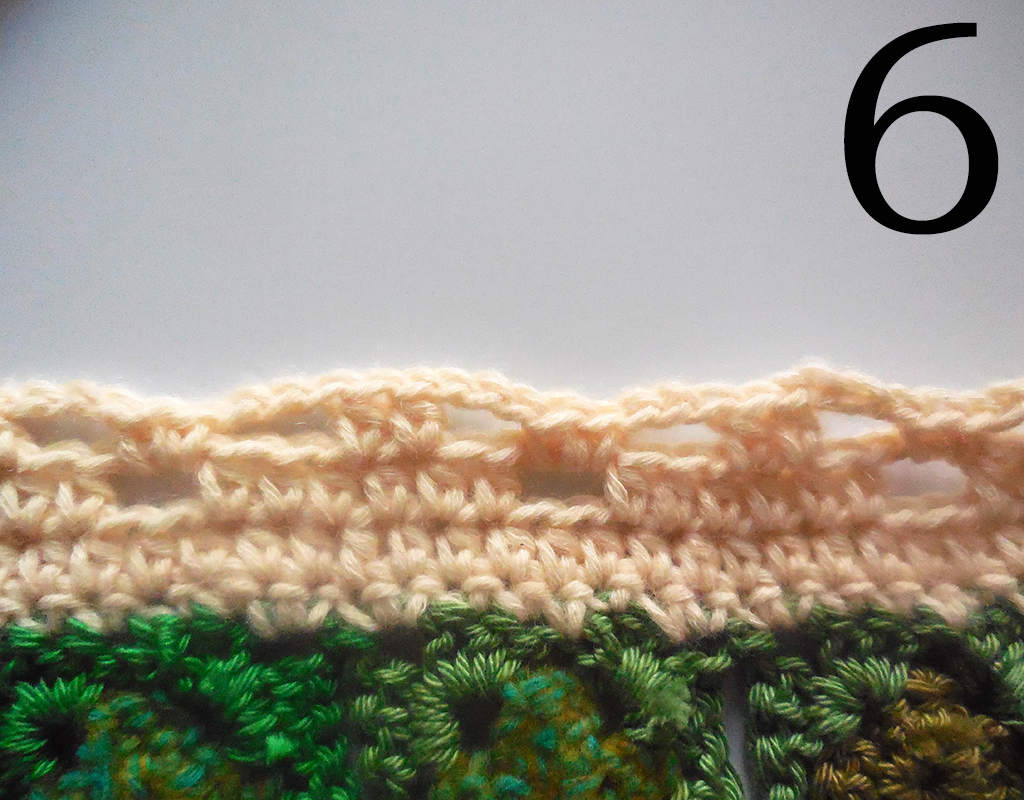
R6 (WS) Ch1, *[1hdc, ch2, 1hdc] in corner-sp, 1hdc in first hidden st, [1hdc in next 6 st, 2hdc in ch-sp] work between […] until the last ch-sp, 1hdc in last 7 st before next corner-sp; rep from * three times more, join the round with sl st in first corner-sp or with an invisible needle join, fasten off. Pic 8 shows the finished rep.
Ribbed border

R1 (RS) Rep R1 of the Floral border.
R2-6 (WS) Work R2 of the Floral border 5 times, join the round with sl st in first corner-sp or with an invisible needle join, fasten off.
I love to see your creations! Please share on Facebook or tag me on Instagram (@aspoonfulofyarn)! And if you have a question, please don’t hesitate to ask using the contact page.
************************************************************************
Affiliate disclaimer
This post contains affiliate links. When you click this link and purchase something, I will get a small commission, but it will not cost you extra money. This way you can support my blog and I can keep making free patterns.
Copyright
All patterns are for unlimited personal use. Do not reproduce, sell or publish (parts of) the patterns. Patterns may not be copied in any way (print or digitally), in part or in full, except for personal use. Items may be sold that are made from this pattern as long as the designer is credited.
Discover more from A Spoonful of Yarn
Subscribe to get the latest posts sent to your email.
5 Comments
Comments are closed.
Thank you, Christina! I found you during the 2020 Scheepjies RAL and since then can’t get enough of your patterns! Your work is gorgeous and thank you for another beauty!
That’s wonderful to hear, thank you ?
Hi, I love this blanket. I have the supplies and my daughter wants to learn how to crochet. Do you by chance have the color numbers written down? For a first project she will want to follow the directions to get such a great look and it would be helpful to follow the colors.
I’m trying to group them from your one blog post but with different computer screens I’m having some trouble matching colors.
Thank you for your help!
Cindy
Hi Cindy! That sounds wonderful ❤️ As it is a scrap project, I didn’t note down the numbers unfortunately.
I understand. I told her you probably didn’t, so she can tap into her creative side! I think it’s a great fun first project. She’s at an age where friends are having babies.