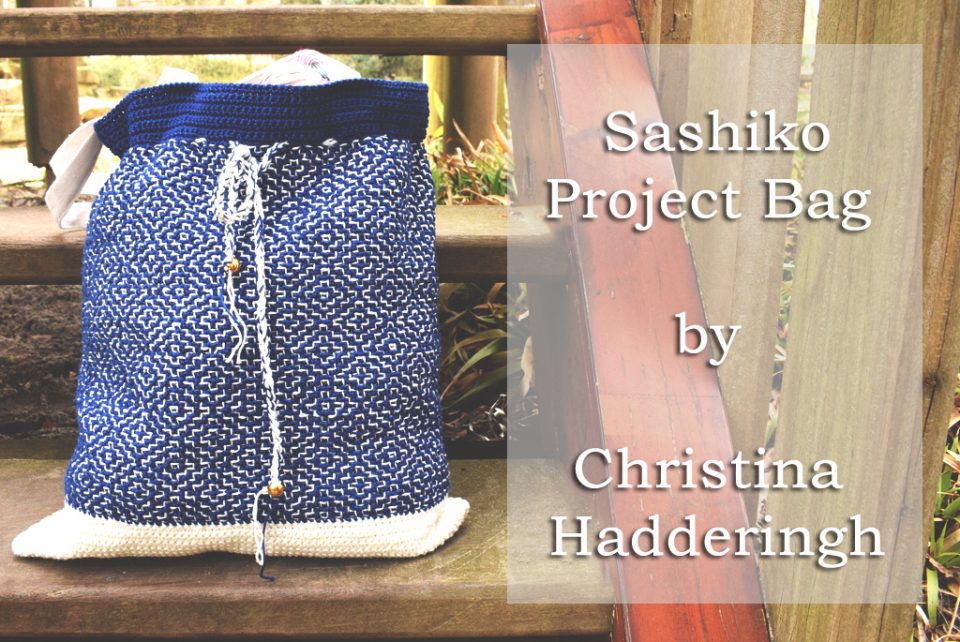
Klik hier voor de Nederlandse versie
Add this pattern to your Ravelry queue or projects
Intro
Sashiko is a centuries old Japanese embroidery technique which was originally used as a necessity rather than to make something pretty. Farmers spun and wove their own clothes, but often times it wasn’t strong enough to endure the hard labour and the fabric would rip and tear too easily. Sashiko was used to strengthen the fabric, as well as mend holes with new patches of cloth. The indigo dye was also meant to make hard wearing clothes that would supposedly also repel insects and snakes. It was not all pragmatic though. The embroidery was also said to prevent evil spirits from entering the body and sometimes they even stitched some secret symbols inside the clothes to protect the wearer*. I hope the embroidery will protect our projects too <3
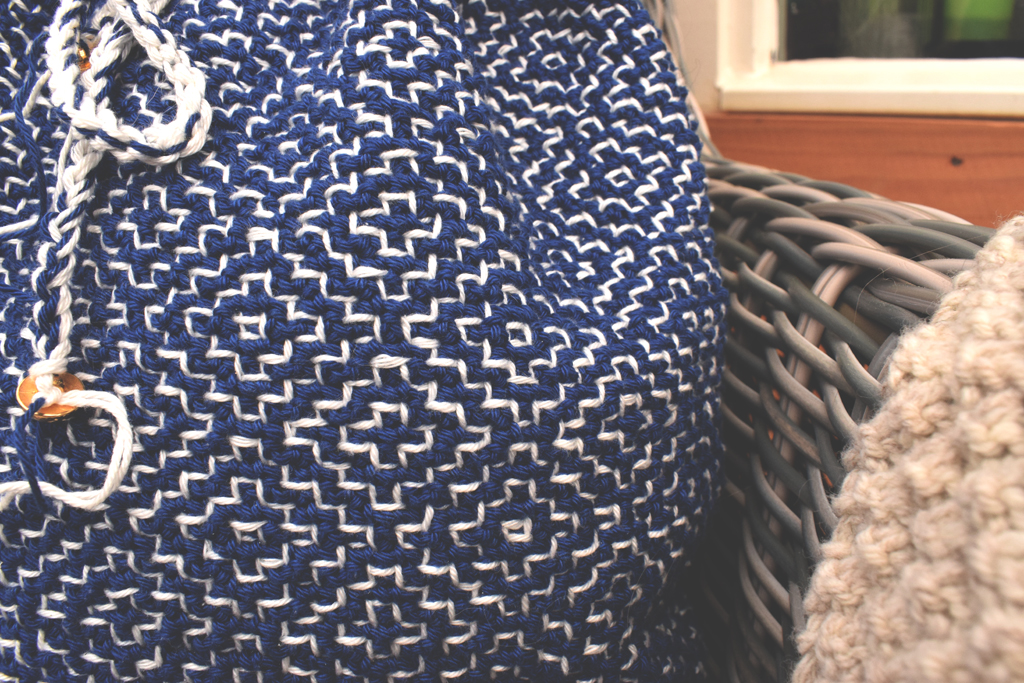
The stitch that’s used for this bag is called ‘kaki no hana’ stitch, or ‘persimmon flower’ stitch. We are going to make a project bag, but while the bag is for practical purposes and the stitch gives it extra strength, I confess that the main reason I chose the stitch is purely because it’s just so darn pretty. And as a cherry on top; doing the embroidery gives a whole new level of calm. It was so relaxing to do row after row of simple running stitch and to see the pattern emerge from under your fingertips is just magical. I hope you enjoy it as much as I did!
*Source: sewguide.com
Yarn
Scheepjes Catona 100% cotton, 125m/50g*:
Main Color: 4 balls of color 527
Contrast Color : 2 balls of color 105
NOTE: I did not have any yarn left at the end, so if you need to order online, it’s a good idea to order one extra ball of both colors.
**************************************************************************************************************************************************************
If you don’t have a retailer nearby, please consider buying your Scheepjes yarn via one of the links below. It will give me a small commission, but it won’t cost you anything extra.
UK/International: Wool Warehouse, The Knitting Network or Black Sheep Wools
Benelux: Caro’s Atelier
List of all / Lijst van alle Scheepjes retailers: Scheepjes website
**************************************************************************************************************************************************************
Notions
For the crochet part:
- 3,5 mm (E) & 4 mm (G) hook or size to obtain gauge
- Thread clippers
- Darning needle
- Two markers
- Optional: Little embellishments for the drawstring, like buttons, tassels or pompoms
For the lining part:
- Simple canvas bag with handles of 37 cm/14.8″ wide (measured flat) x 40 cm/16″ high to use as lining
- Sewing pins
- Some sewing thread that matches the Main Color crochet yarn to attach the lining
- Sewing needle
Gauge & Size
10×10 cm/4×4″= 20 sc and 25 rows with 3,5 mm (E) hook. Note that it’s important to check your gauge, because otherwise you might need more yarn and/or the lining won’t fit. The bag measures 37 cm/14.8″wide (flat) and 40 cm/16″ high.
Notes & Helpful Tips
- You can start a new color by working a standing stitch or [slip stitch, ch1, sc]
- You can alter the width of the bag by chaining a multiple of 10 plus 1. Please note that it’s better to have a little room to spare for your lining than not enough room, because the embroidery also alters the size a bit.
- IMPORTANT: Please follow the closing and turning instructions like the pattern describes. This makes the stitches run parallel, instead of shifted, which can happen when you work in the round.
Stitches & Abbreviations (US terms)
ch chain
sl st slip stitch
st stitch
sc single crochet
pic picture
R Round/Row
rep repeat
RS right side
WS wrong side
{text} important/helpful notes and picture references
[…] work the steps within these brackets for the number of times that’s stated behind it
*…* work the steps within these asterisks for the number of times that’s stated behind it
The Crochet Part
Setup: with 4 mm (G) hook and Contrast Color yarn; ch151
R1 (RS) Switch to 3,5mm hook, in second chain from hook; 1sc in each ch across, ch1, DON’T turn.
Stitch count here and throughout: 150 sc
R2 Form a loop by working a sc in the first sc of R1 {watch out that you don’t twist it}, 1sc in each sc across, close the round with a sl st in first st, ch1, turn.
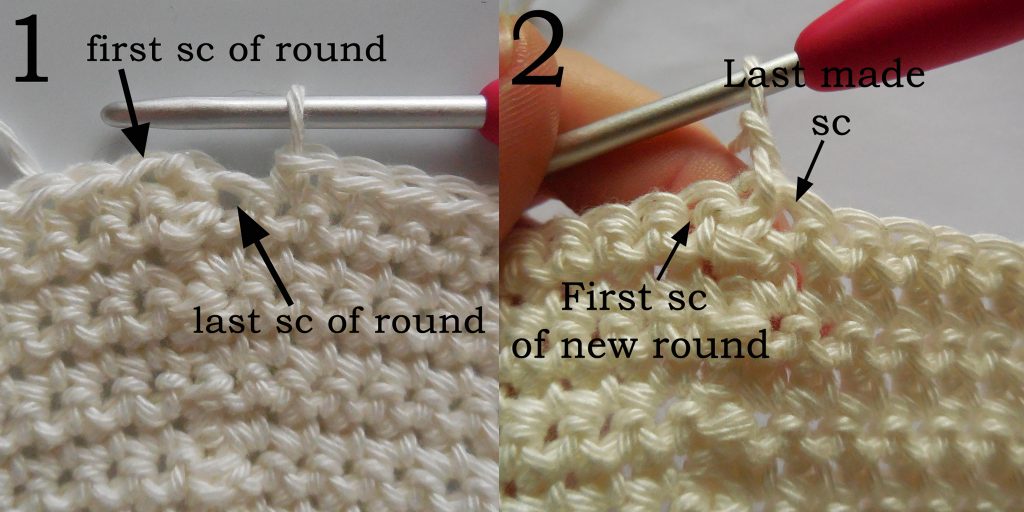
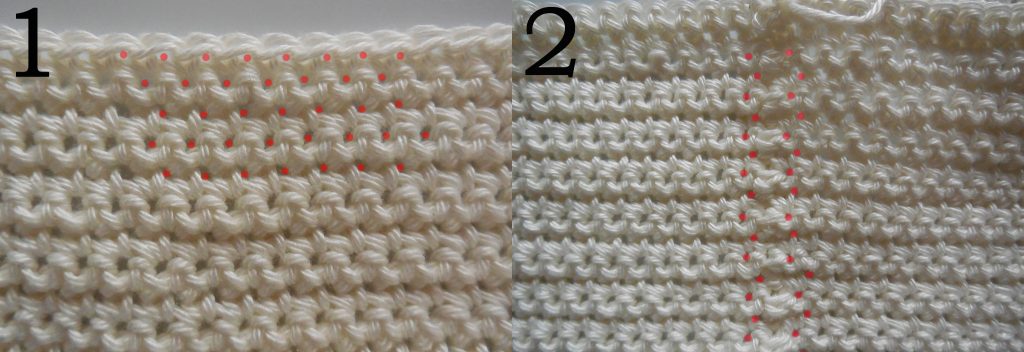
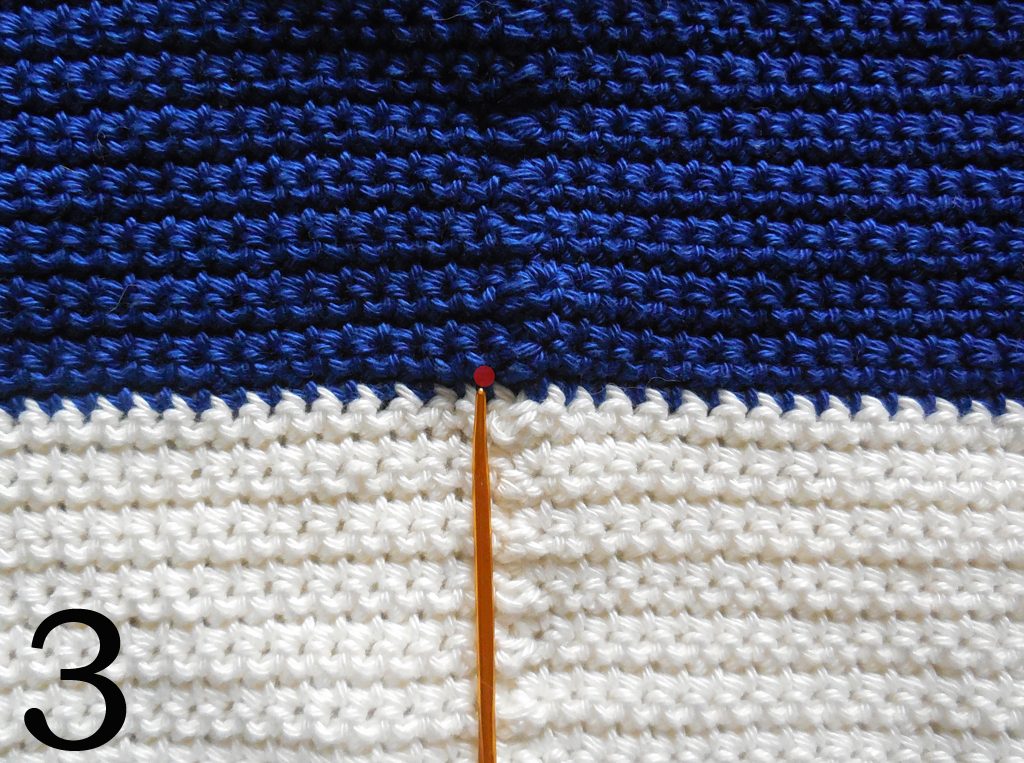
R3 1sc in each sc across {the last sc has the sl st in it, pic 1}, sl st in first st, ch1, turn. {See pic 2 for how to recognize the sts}
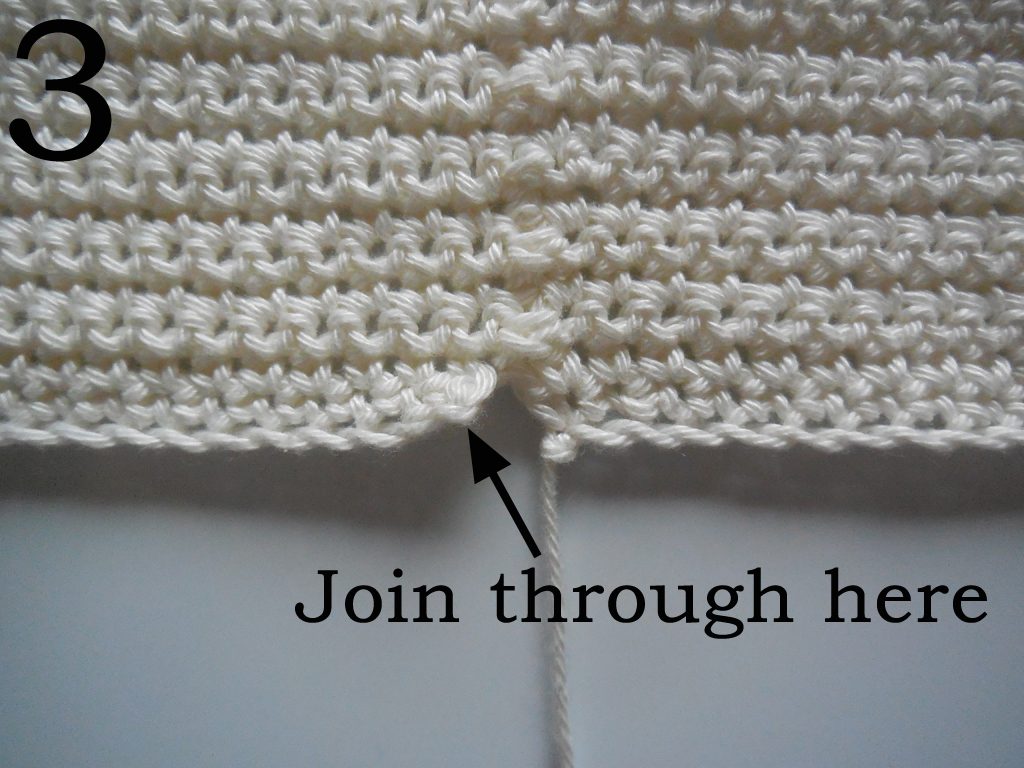
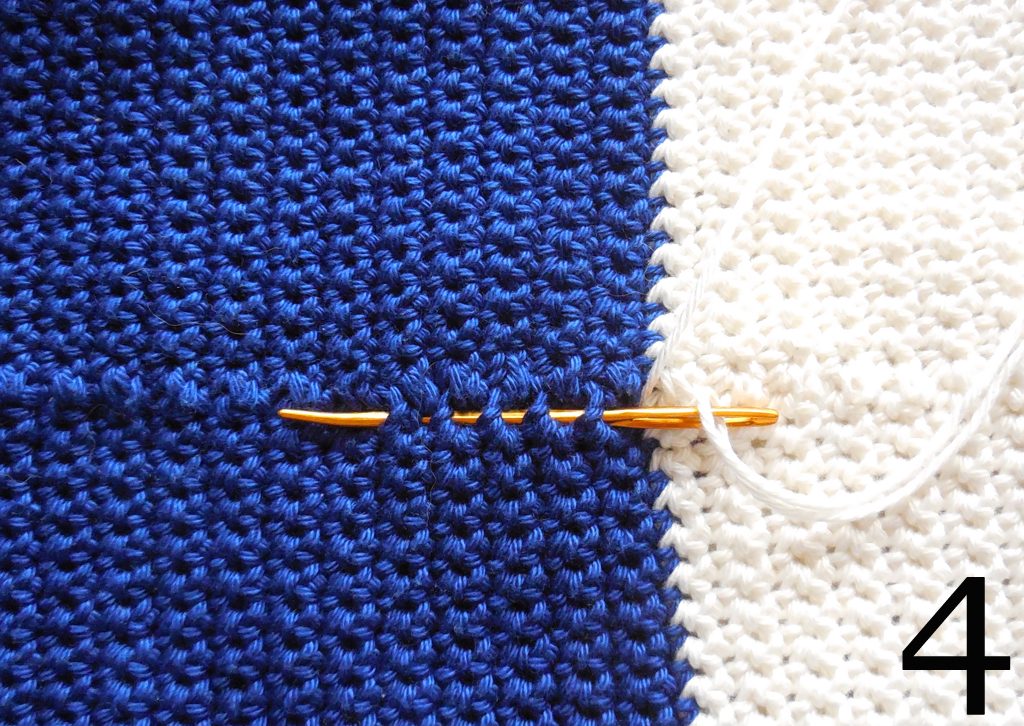
Rep R3 sixteen times more. Your work now has a total of 19 rounds. Count your stitches to make sure there are 150 sc. For the embroidery part it’s important that it’s the correct number. You can’t fudge anything from here on. Cut yarn and work away the ends. Sew the end tail to the other side, so the gap between the first and last stitch is properly closed {see pic 3}. Do not close the bottom of the bag yet, it needs to stay open until after the embroidery part is done.
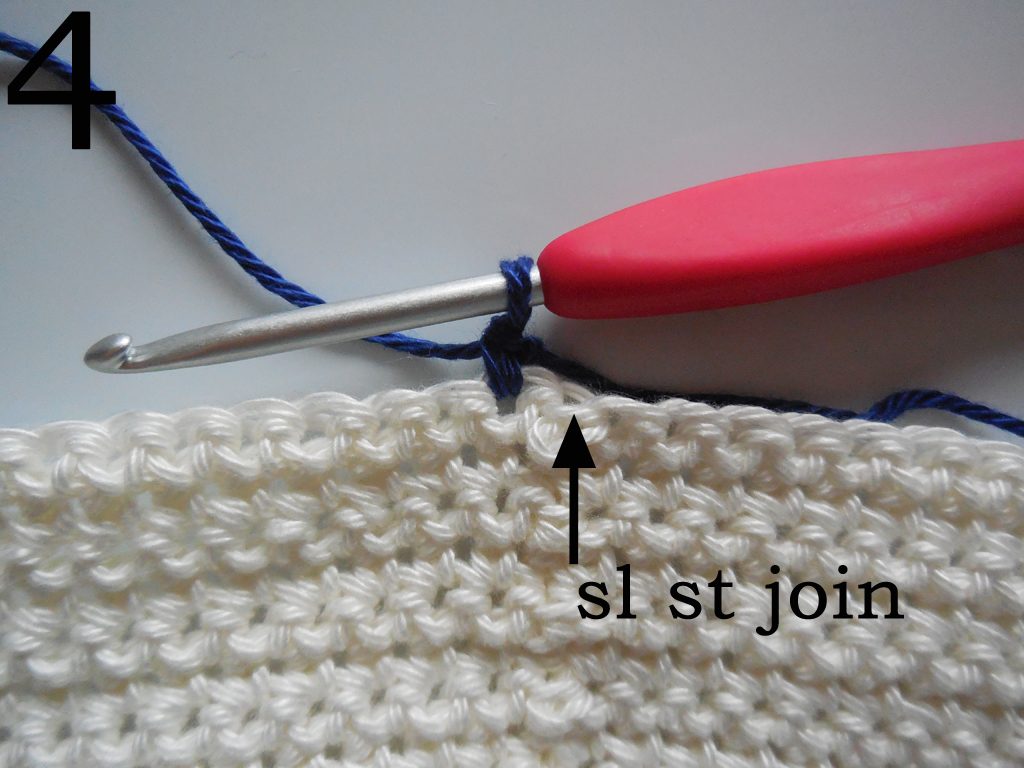
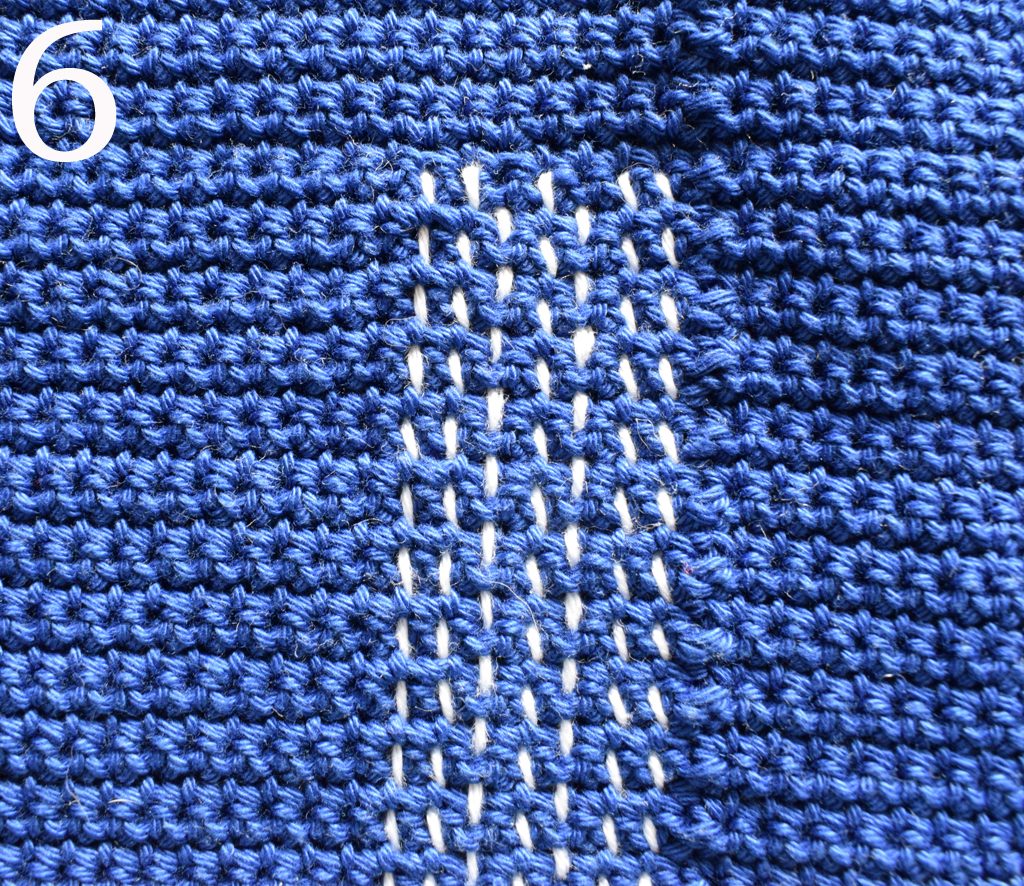
Next round (RS): With Main Color yarn; work a standing sc {or sl st, ch1, 1sc} in the first sc after the sl st join on the right side of your work, sc across, sl st in first st, ch1, turn. {see pic 4}
Rep R3 until you worked a total of 70 rounds in the Main Color yarn or until your work measures a total of 36,5 cm/14.6″ from starting edge.
Drawstring round: 4sc, [ch1, sk next st, 1sc, ch1, sk next st, 7sc] 2 times total, ch1, sk next st, 1sc, ch1, sk next st, [5sc, ch1, sk next st] 2 times total {place marker in those 2 skipped stitches, because these are the start and end holes for the drawstring}, 5sc, [ch1, sk next st, 1sc, ch1, sk next st, 7sc] 10 times total, ch1, sk next st, 1sc, ch1, sk next st, 3sc, sl st in first st, ch1, turn.
Stitch count: 30 ch1-sp, 120 sc
Next round: 1sc in each sc and 1sc in each ch1-sp across, sl st in first st, ch1, turn.
Stitch count: 150 sc
Rep R3 for a total of 8 times or until the bag measures 40 cm/16″ in total. Work away all ends.
The Sashiko Part
PLEASE READ THESE NOTES FIRST
- The embroidery is done with the Contrast Color yarn in the crochet part that’s made in the Main Color yarn.
- The running stitch is used to create the pattern. Each hole that’s made by a sc is a hole you’ll work into with your needle {see pic 1 below}. Make sure to not mistake the slip stitch join for a sc hole {see the red dots left and right of the join to see where you need to put your needle in, pic 2}.
- Here is a Moogly Video for the basic principles of doing the running stitch on crochet.
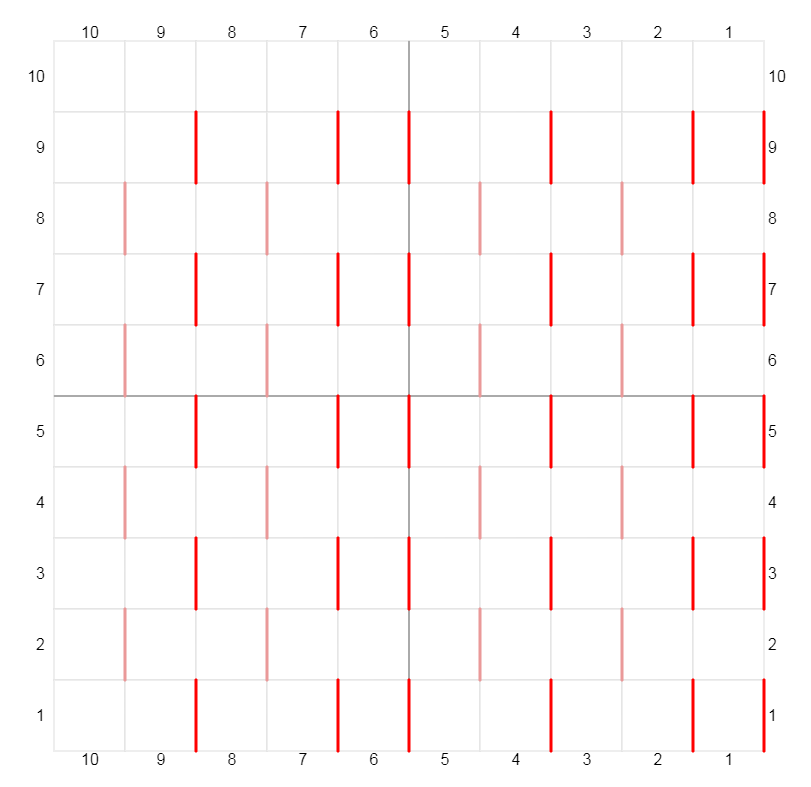
- Begin the line with the needle from the back of the fabric upwards and end the line with the needle from the front of the fabric downwards. This also means that the pink lines are begun one hole later and ended one hole sooner than the red lines.
- Note that the pink lines are always two stitches less than the red lines, because they begin one hole later and end one hole sooner.
- Do not tug too hard on your thread, just pull gently until the thread lies flat on the crochet fabric.
- Please pay attention you are getting the lines right in relation to each other, because this determines the pattern. To check: When two lines run parallel it’s very obvious, but when you have to look twice, the lines usually do not run parallel.
Vertical Sashiko pattern
The starting point is first hole left from the slip stitch join after the Contrast Color part {pic 3&4}.
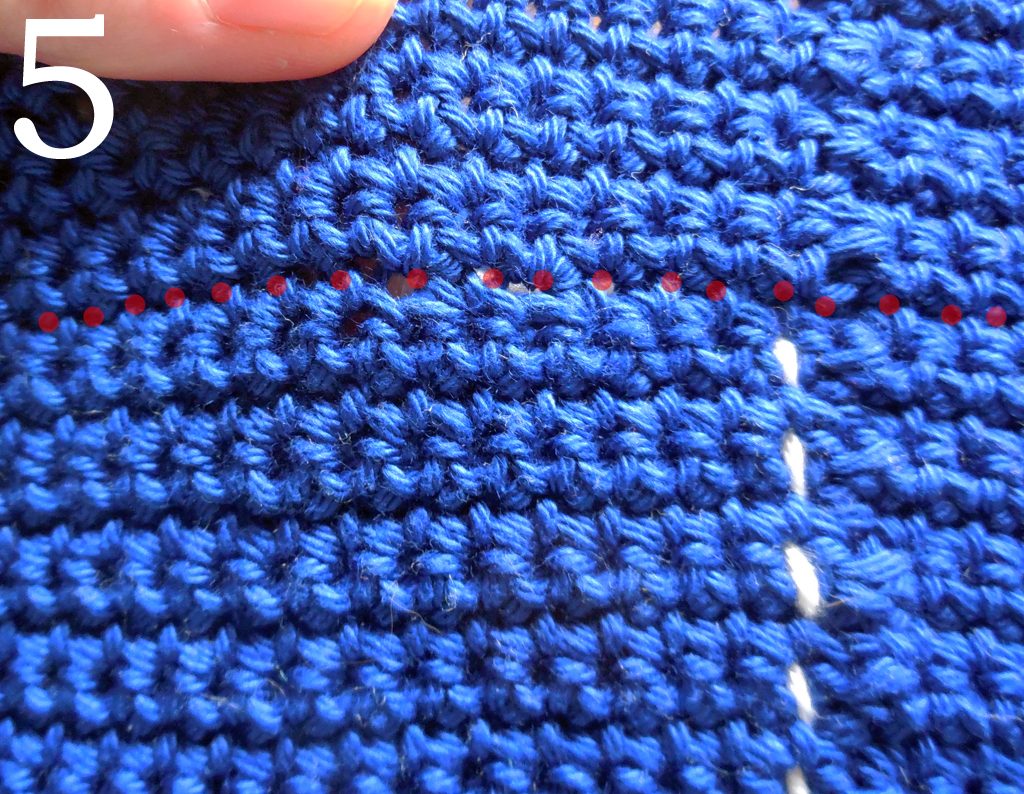
Work up to the last stitch before the drawstring round and then down again, like the pattern indicates {the red dots in pic 5 show the drawstring round}.
Follow the vertical pattern of the chart below. Work it from right to left, working from the bottom right upwards, then down again and when you’re at the bottom work up again. Repeat line 1-5 all the way around the bag. The pink lines run parallel to each other, and the red lines also run parallel to each other {see also pic 6}.
Horizontal Sashiko pattern
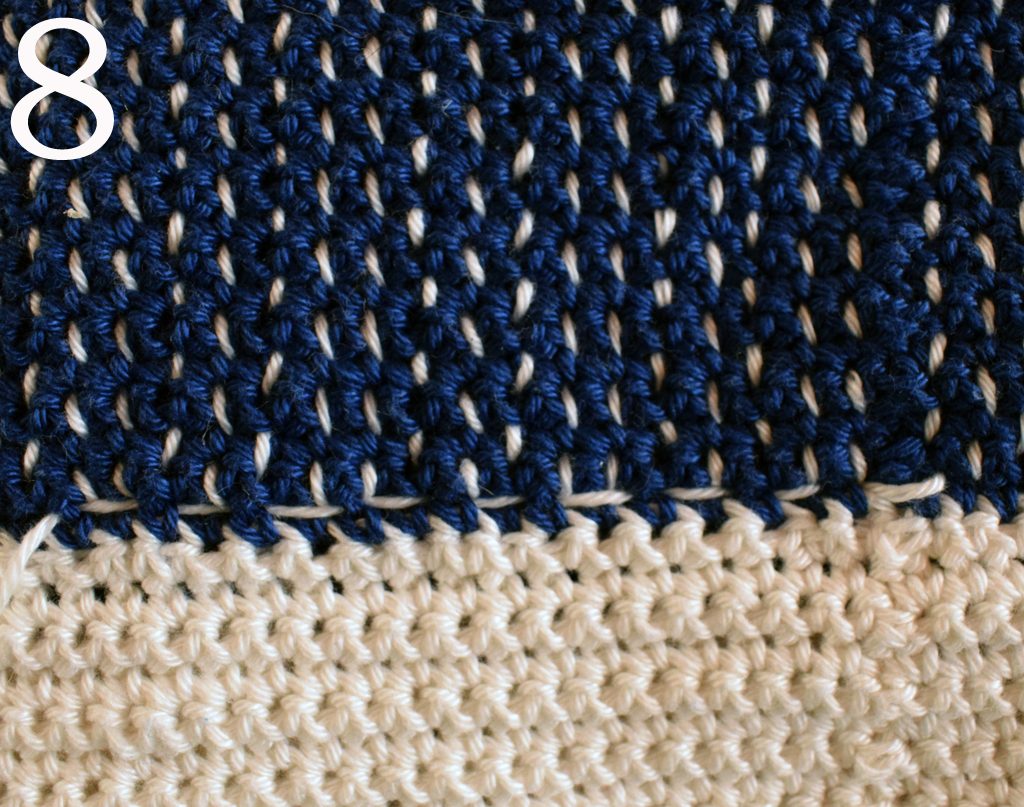
Start in the first hole right of the slip stitch join {pic 7&8}.

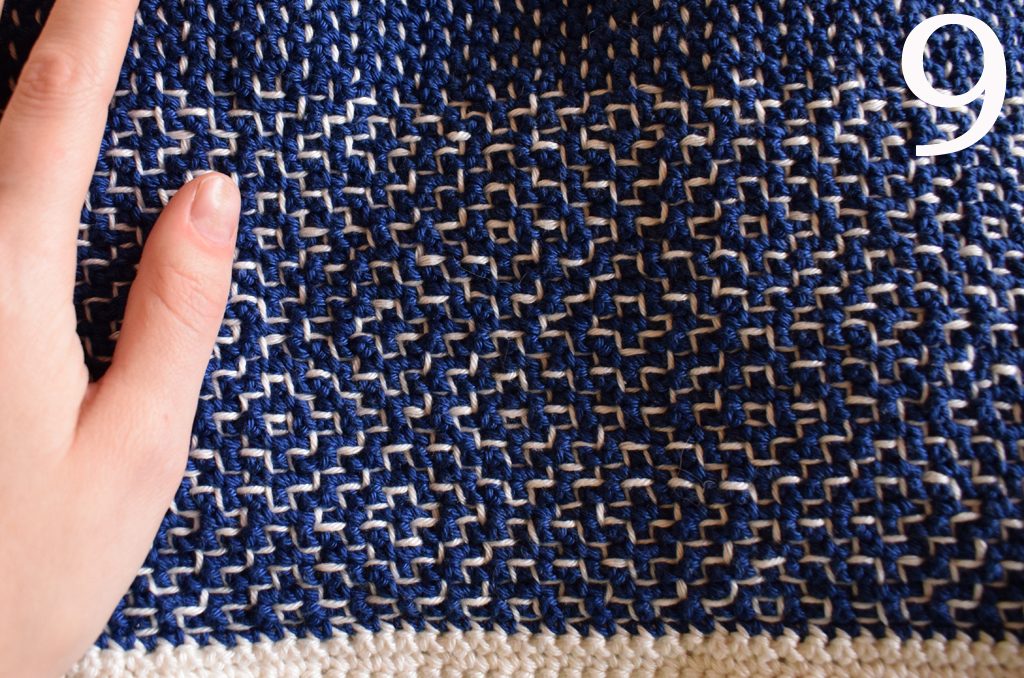
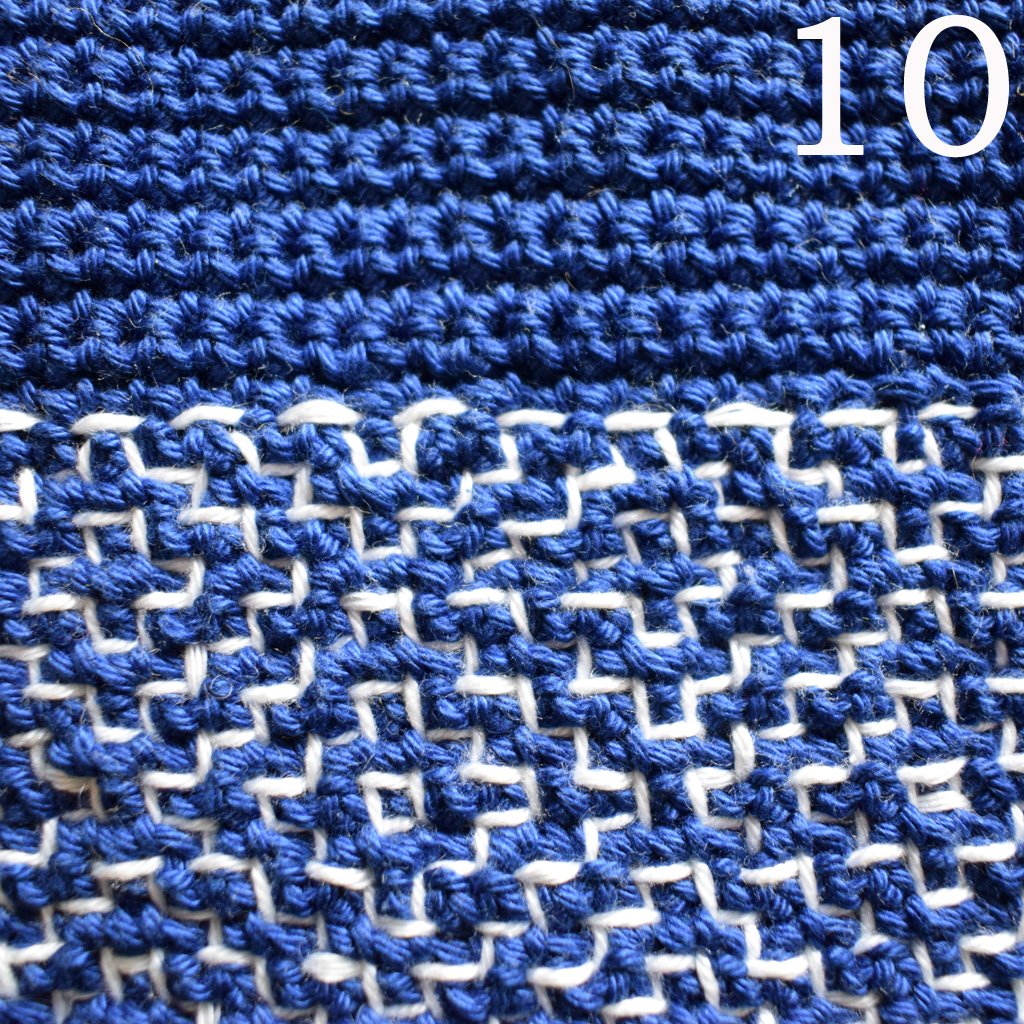
Follow the horizontal pattern of the chart below, starting from the bottom and working from right to left. The dark green lines run parallel to each other and the light green lines also run parallel to each other {also see pic 9}. Work in rounds; the slip stitch join is your beginning and endpoint of the round. Note that the stitch that’s worked over the slip stitch join is a bit longer than the other stitches, this is normal. Repeat line 1-5 until you have worked to the top of the vertical lines {see pic 10 for last horizontal line}.
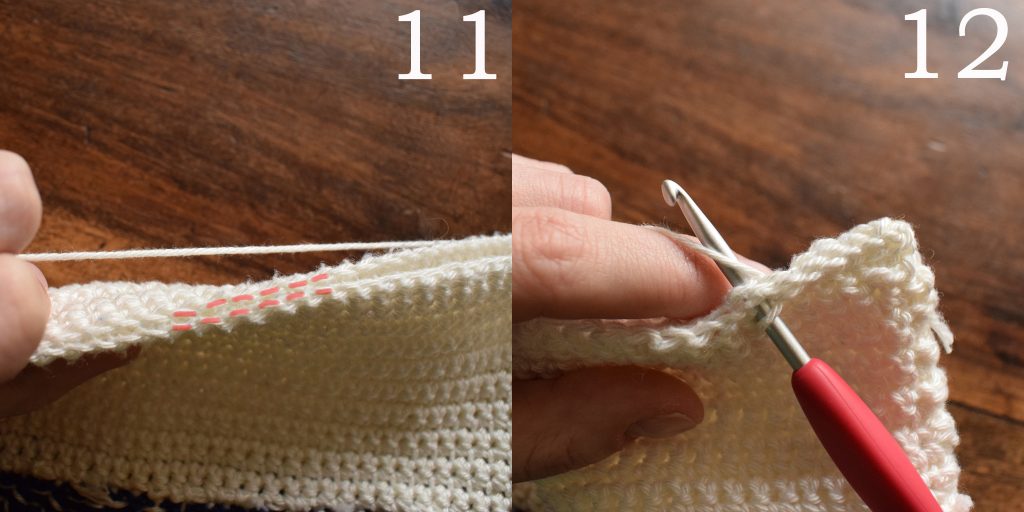
Closing the bottom of the bag: With your Contrasting Color yarn and a 3,5 mm hook; turn the bag inside out, so the wrong side is facing you, lay the bag flat so that the slip stitch join sits at the right side of the bag. Start at the side of the sl st join, work sl st along the bottom of the starting chain (through both loops) until the bottom of the bag is closed completely. {loops marked in red in pic 11 and closing is shown in pic 12}. Work away all ends. If necessary, you can block the bag to the right size.
The Drawstring & Lining Part
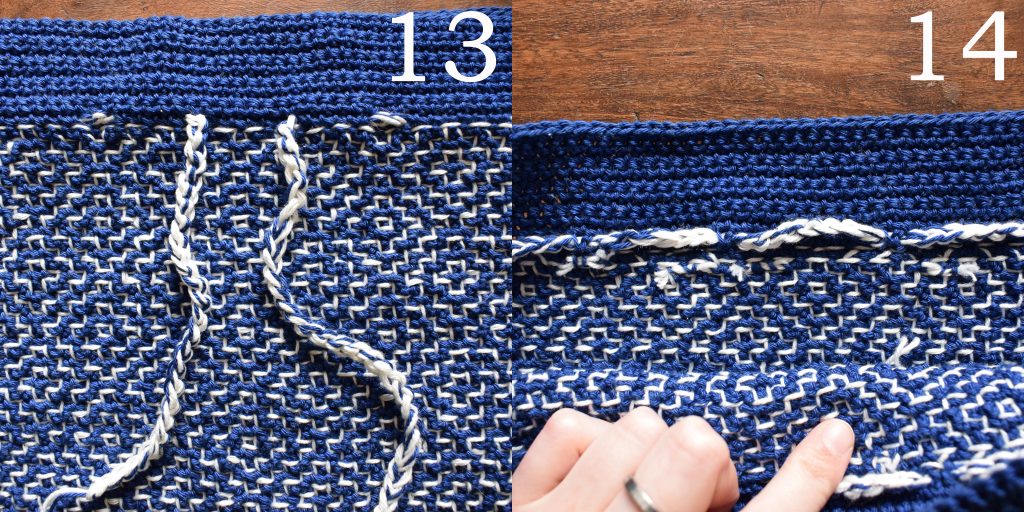
The drawstring: With 2 strands of the Contrasting Color yarn and one strand of the Main Color yarn and 4 mm crochet hook; chain until you have a string of 120 cm/48″ long. Thread the drawstring through the holes in the bag, starting at the left marked hole and ending in the right marked hole {see pic 13 for outside & pic 14 for the inside of the bag}.
Optional: Embellish the string at the ends if you wish with tassels or buttons. I used little golden colored buttons, which I just simply tied to the yarn ends of the drawstring.
The lining:
- Turn your canvas bag inside out, so you will see the wrong side of the bag.
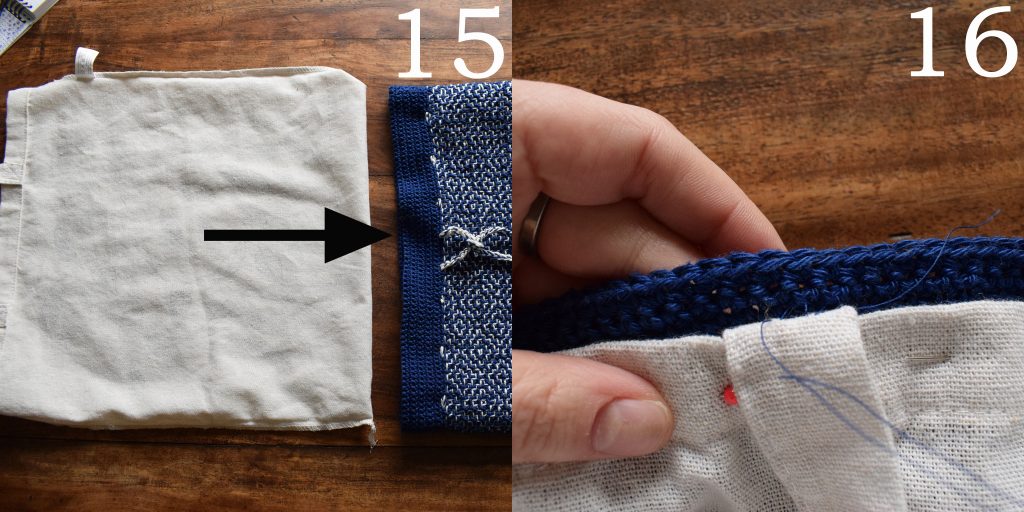
- Shove the canvas bag into your crochet bag, in a manner that the wrong sides will be put together {pic 15}. This way, when you look into the bag, you will see the right side of the canvas bag.
- Pin the canvas bag lining on your crochet bag, making sure that the lining will begin under the first two crochet rounds and that it’s spread out evenly along the bag {pic 16}.
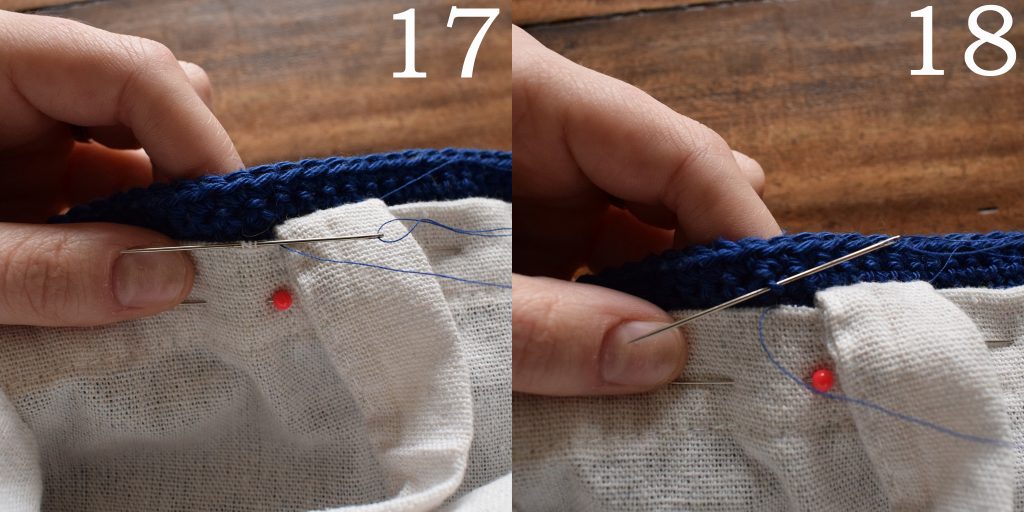
- Using a blind hem stitch {see video here (from 0:45)}; pick up a little bit of fabric of the top of the lining with your needle and then put the needle through the first leg of a single crochet in the second to last row of the bag {pic 17&18}. This will create little ‘v’s’. Each single crochet will get a stitch through it.
- When you’ve done a few stitches, pull gently at the thread and you’ll see that the stitches will ‘disappear’. This will give you a neat result.
- When you come to a handle, put the handle down so it won’t get in the way {also seen in pic 16}.
- Work the blind hem stitch all along the lining, removing pins when you come to them. Work away the last ends and enjoy your new project bag!
I would love to see your bags! Please share on Facebook or tag me on Instagram (@aspoonfulofyarn)! And if you have a question, please don’t hesitate to ask using the contact page.
*******************************************************************************************************************************************************************
*Affiliate disclaimer
This post contains affiliate links. When you click this link and purchase something, I will get a small commission, but it will not cost you extra money. This way you can support my blog and I can keep making free patterns.
Copyright
All patterns are for unlimited personal use. Do not reproduce, sell or publish (parts of) the patterns. Patterns may not be copied in any way (print or digitally), in part or in full, except for personal use. Items may of course be sold that are made from this pattern, but it would be nice to get some credit for the design.
10 Comments
Comments are closed.

Ik heb een paar jaar geleden eenn workshop sashiko borduren gevolgd en ben er sindsdien door gefascineerd. Dit is echt heel tof!
Dank je 🙂 Zo’n workshop klinkt ook erg leuk
Fantastic instructions! I didn’t think I’d be able to do it, but your instructions are so well done, I have to try. Thank you for this beautiful pattern.
ah thank you Judy ^^ I’m glad to hear you like it
Thank you for the exquisite pattern and well written instructions. You encourage me to challenge myself.
ah thanks! That’s very nice to hear as a designer 😀
Hi Christina, do you have any tips on where we could get the canvas bag? Thanks.
Hi Kim, I got mine from a national dutch store, so I don’t have any online recourses for you to check, sorry! I think google is your friend here 🙂
No worries, Christina! We have a Muji store here in Sydney and I think they might sell A3 sized blank canvas bags which according to their website, are 36.5cm wide *45cm tall.