
Klik hier voor de Nederlandse versie
Rather want a PDF pattern?
If you like to work from paper or if you want to support me as a designer you can buy the PDF version in English (US and UK terms) and Dutch on Etsy or Ravelry for a small fee. Thank you for your support <3
A note before you begin
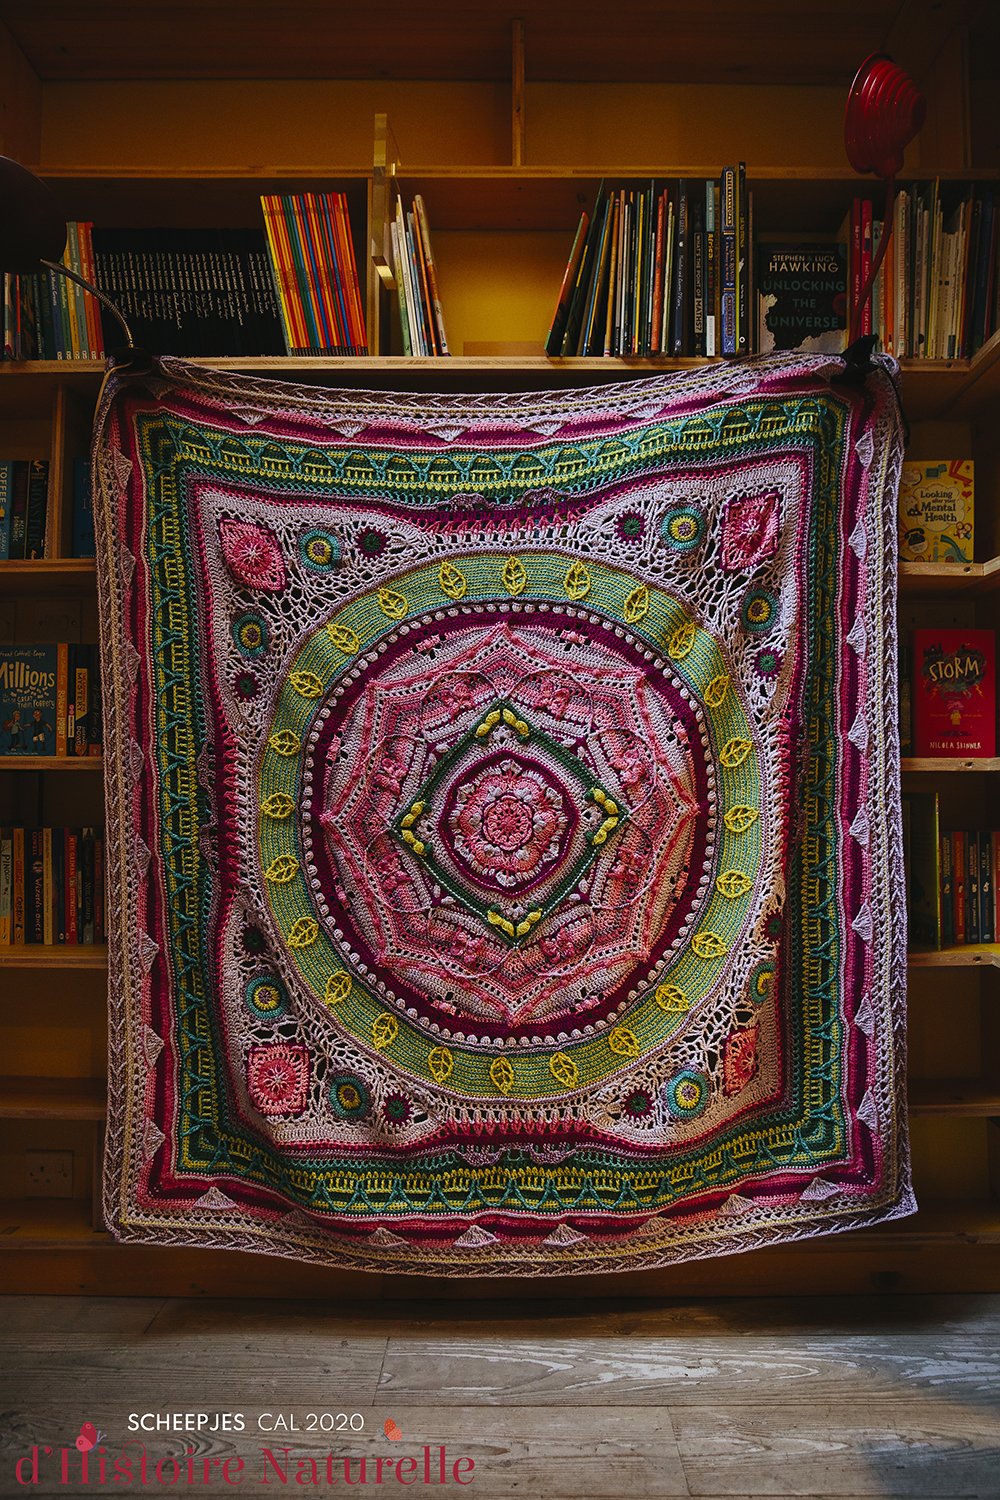
This pattern is designed as a bonus pattern for the 2020 Scheepjes CAL d’Histoire Naturelle. When you have bought an official kit, there usually is yarn left over, so this pattern is using the leftovers of the kits. But please note it can occur that you might not have a particular color left over.
If you are working this pattern without a kit, you will need small amounts of several colors in either Scheepjes Stone Washed/River Washed* or Scheepjes Colour Crafter*, usually less than 5 grams per color. It is therefore the perfect pattern to use up small amounts of leftover/stash yarn.
Start your own museum
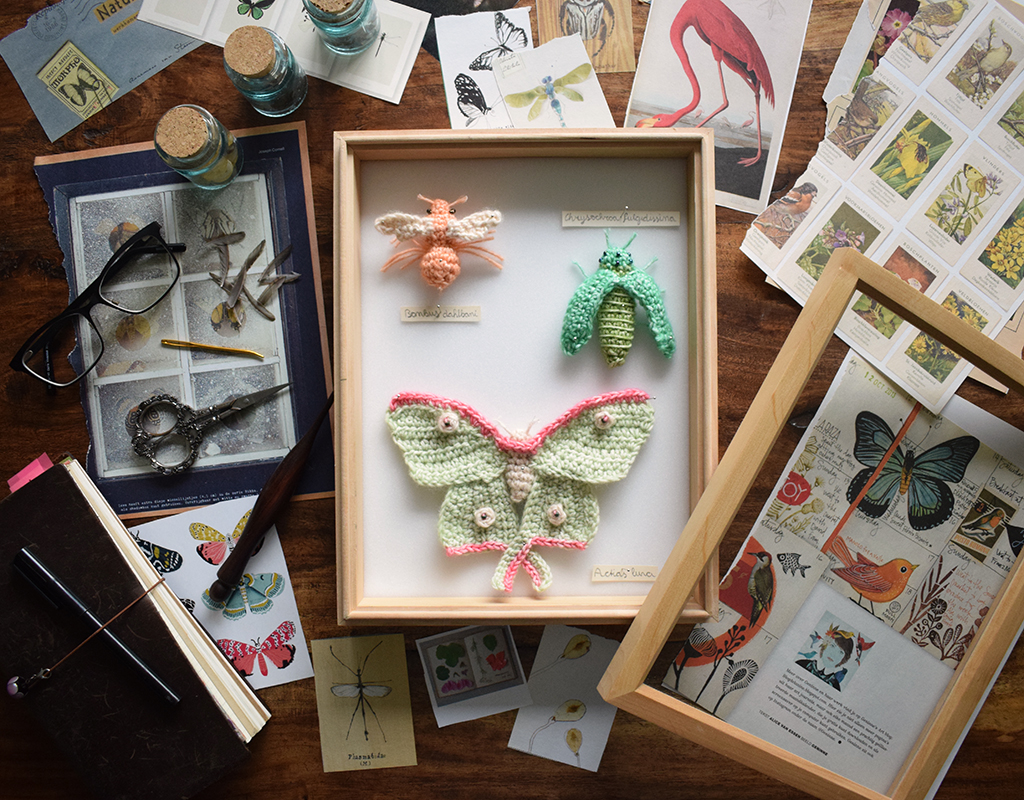
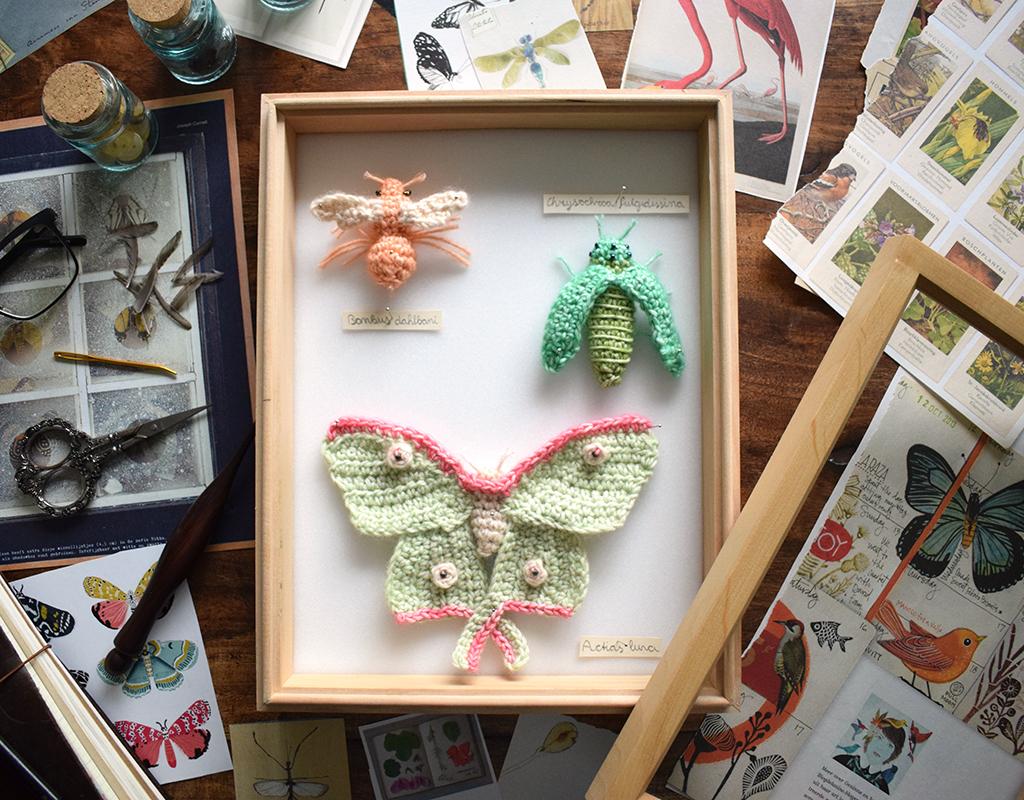
The blanket design is inspired by the National Natural History Museum of Paris and the book All The Light We Cannot See by Anthony Doerr*. Read more about the CAL here. As a bonus pattern, you can start your own museum collection by working three different insects; a beetle, a bee and a butterfly or moth, to be displayed in a picture frame with a foamboard inside. Of course you can mix and match colorways and insects as you wish, depending on what yarn you have left over. You can potentially make 10 different insects with this pattern. If you used a kit, please go to the yarn schedule below corresponding to your kit and see which specific colors you need to make the insects.

Yarn
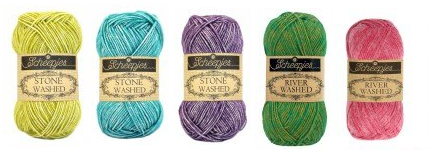
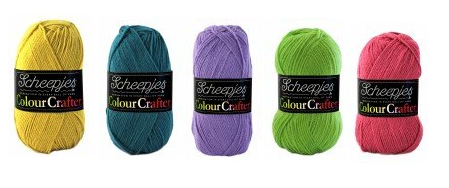
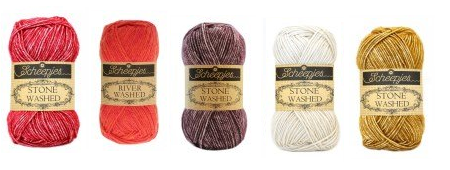
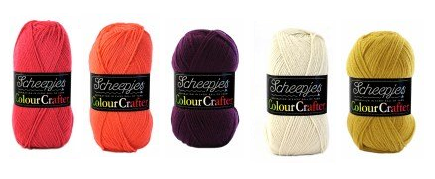
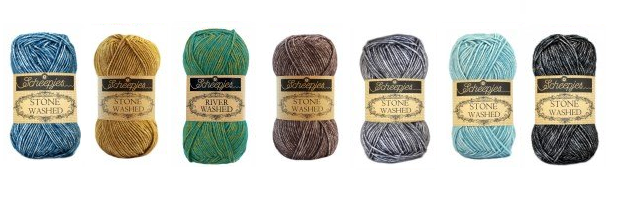
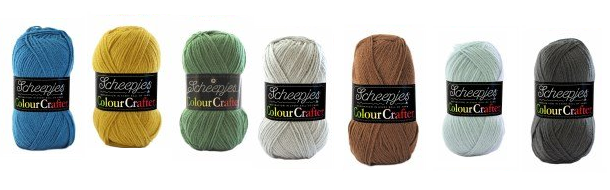
The pattern uses small amounts (no more than 5g per color) of yarn with the following color numbers, sorted by kit colorway, type of yarn and type of insect. When you see ‘RW’ behind a color, it indicates Scheepjes River Washed instead of Scheepjes Stone Washed. Below the color numbers you will see an image of the yarn colors you’ll use.
Herbarium kit
| Yarn type | Jewel beetle | Patagonian bumblebee | Luna moth |
| Scheepjes Stone Washed | 806 & 826 | 821, 834 & 831 | 821, 835 & 819 |
| Scheepjes Colour Crafter | 1316 & 1824 | 2017, 1026 & 1218 | 1218, 2013 & 1020 |


Mineralogy kit
| Yarn type | Jewel beetle | Peacock carpenter bee | Purple-bordered gold |
| Scheepjes Stone/River Washed | 812 & 815 | 811, 955 (RW) & 815 | 943 (RW) & 812 |
| Scheepjes Colour Crafter | 1712 & 1062 | 1277, 2016 & 1062 | 1023 & 1712 |
Conchology kit
| Yarn type | Red net-winged beetle | Large earth bumblebee | Albino luna moth |
| Scheepjes Stone/River Washed | 807, 946 (RW) & 830 | 801, 830 & 809 | 801 & 830 |
| Scheepjes Colour Crafter | 1083, 1132 & 2007 | 1218, 2007 & 1823 | 1218 & 2007 |
Entomology kit
| Yarn type | Jewel beetle | Common teddy bear bee | Blue moon butterfly |
| Scheepjes Stone/River Washed | 805, 832 & 958 (RW) | 829, 832 & 802 | 805, 813 & 803 |
| Scheepjes Colour Crafter | 1708, 1823 & 1824 | 2019, 1054 & 1823 | 1708, 1820 & 2018 |
Buy this Yarn
If you haven’t bought your yarn yet and you don’t have a Scheepjes retailer nearby, please consider buying your Scheepjes yarn via one of the links below. It will give me a small commission, but it won’t cost you anything extra. That way I can keep making free patterns : ) Thank you for your support <3
Scheepjes Stone Washed/River Washed
UK/International: Wool Warehouse, Black Sheep Wools or The Knitting Network
Benelux: Caro’s Atelier
Scheepjes Colour Crafter
UK/International: Wool Warehouse, Black Sheep Wools or The Knitting Network
Benelux: Caro’s Atelier
List of all Scheepjes retailers: Scheepjes website
Of course you can also still purchase an official CAL kit to crochet the blanket and make this bonus patttern : ) If you buy a kit through one of the links below, I will get a small commission. This won’t cost you anything extra.
UK/International: Wool Warehouse
Benelux: Caro’s Atelier
List of all Scheepjes retailers:Scheepjes website
Notions
To crochet
- 3mm hook or other size to obtain gauge
- Leftover scraps of yarn or stuffing to stuff the insects where needed
- Darning needle and thread clipper
- Markers, if needed to attach parts to body
To attach beads
- Split eye beading needle or sewing thread and sewing needle
- Toho beads size 8/0: 6 beads in color 83 (brownish gold), 6 beads in color 86 (oil slick) and 4 beads in color 710 (iridescent green) or any other beads of your choosing
To display your insects
- Display case or frame with foam inside with minimum measurements of 21x30cm/8.4x12in. I bought mine here (Dutch website)
- 13 or more stainless steel headless pins
- A small piece of (thick) paper, a pencil to write the insect names and scissors to cut out the names
Stitches & Abbreviations (US terms)
The pattern is written in US terminology. But behind the US terms below, you will find the UK terms written in cursive between parentheses.
ch chain
sk skip
sl st slip stitch
st stitch
sc single crochet (UK dc – double crochet)
sc2tog single crochet two sts together: (insert hook in st, yo, pull up loop) twice, yo and draw through all 3 loops. (UK dc2tog – double crochet two sts together)
hdc half double crochet (UK htr – half treble)
hdc2tog half double crochet two sts together: (yo, insert hook in st, yo, pull up loop) twice, yo and draw through all 3 loops. (UK htr2tog – half treble two sts together)
MR magic ring
rep repeat
RS right side of your work
WS wrong side of your work
Yo yarn over
[…] stitch counts are given within these brackets
(…) work between parentheses for the number of times indicated in the pattern
*…; work from the asterisk for the number of times indicated in the pattern
{abc} notes and references to pictures are given between these brackets in cursive
Gauge
Because you want your insects to fit inside a frame of at least 21x30cm/8.4x12in, it is important to check your gauge by making a gauge square.
10x10cm/4×4” = 19 sc and 22 rows using a 3mm hook and Scheepjes Stone Washed/River Washed or Scheepjes Colour Crafter yarn.
Measurements
Beetle: 7cm/2.8” long body
Bee: 5cm/2” long body x 8cm/3.2” wingspan
Butterfly/Moth: 4.5cm/1.8 long body x 16.5cm /6.6” wingspan at its widest point x 10cm/4” high at its tallest point, measured from the upper wing across to the lower wing (not including the tails).
Notes
- Turning chains never count as a stitch, so you will not skip the first stitch of the row.
- When the instructions indicate which color to use, it will first give the color number for Scheepjes Stone Washed/River Washed and then the color number for Scheepjes Colour Crafter.
- As the insects are designed to display, not to play with, the instructions do not specify to secure your yarn ends, so if you’d rather make them as toys, it is advised to secure them.
- Please note the insects are not true to size and some shaping or coloring might be a bit different than the actual insect.
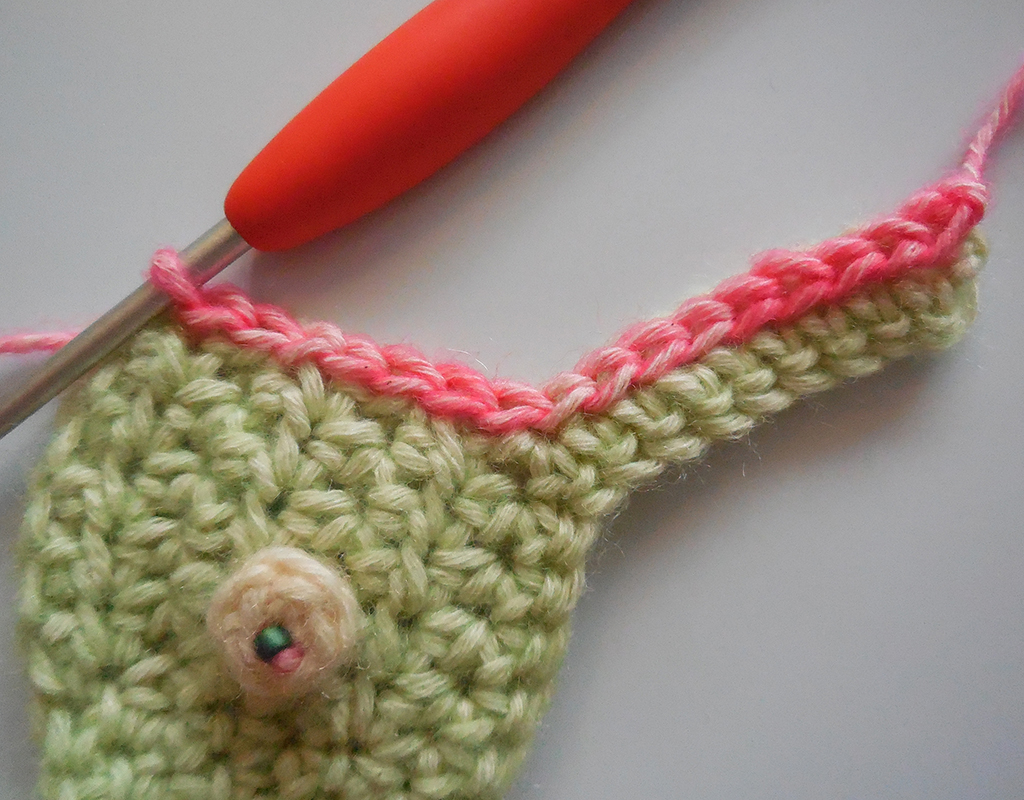
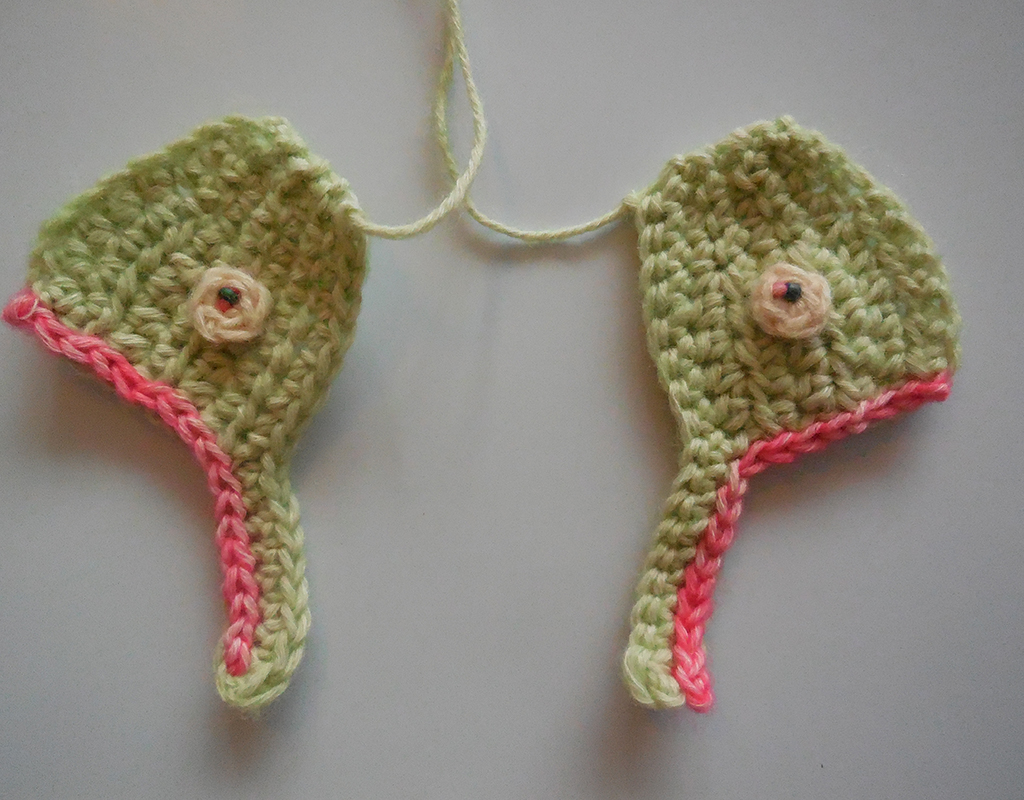
- All tutorial pictures are made for the Herbarium colorway, but the principle is the same for most insects. Otherwise you can look at the picture of the finished insect as your reference.
- Most of the pictures of the finished insects are made by testers, using either Stone Washed/River Washed or Colour Crafter yarn. The insects you see might use differently colored beads than stated in the pattern or French knots instead of beads.
Tips & techniques
To make a magic ring
1. Place yarn over your left index finger with the yarn end towards you and hold it in place.
2. Wrap the other end of the yarn (the working yarn) clockwise over your index finger, just like you would make a slip knot.
3. Remove the loop from your finger and hold it with your thumb and index finger.
4. Insert your hook into the loop, grab the working yarn with your hook and pull it through the loop, ch1 to secure the loop.
You can now work into the loop. When you are done with the first round, pull the yarn end to close the magic ring.

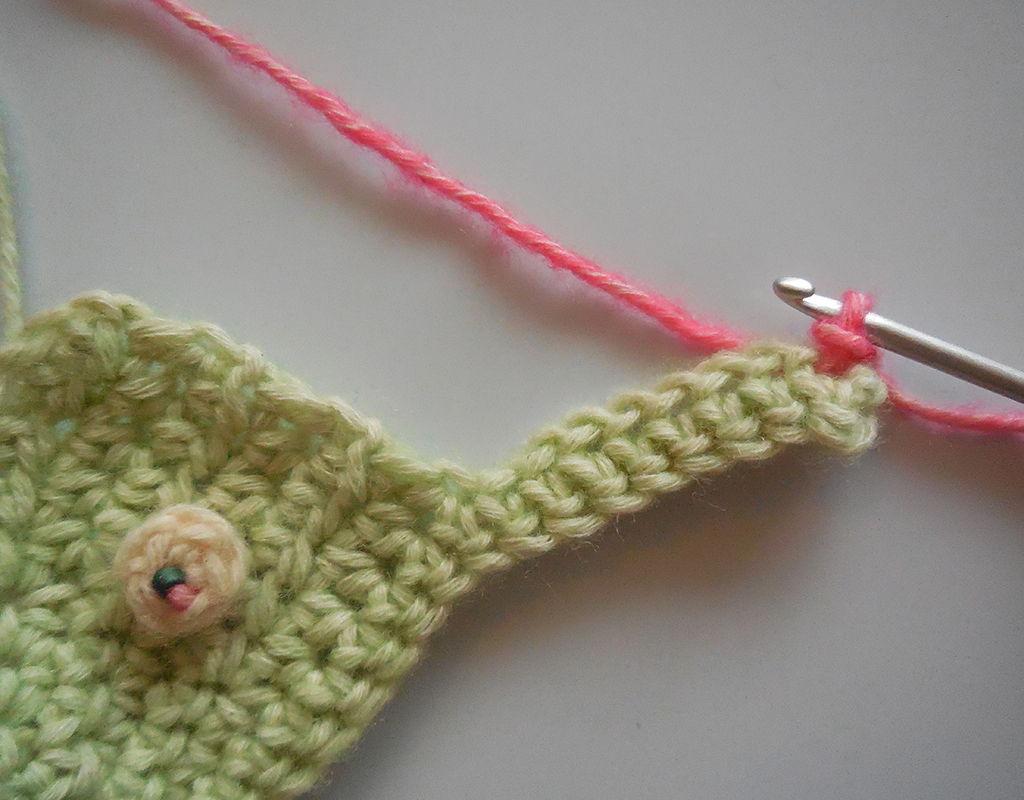
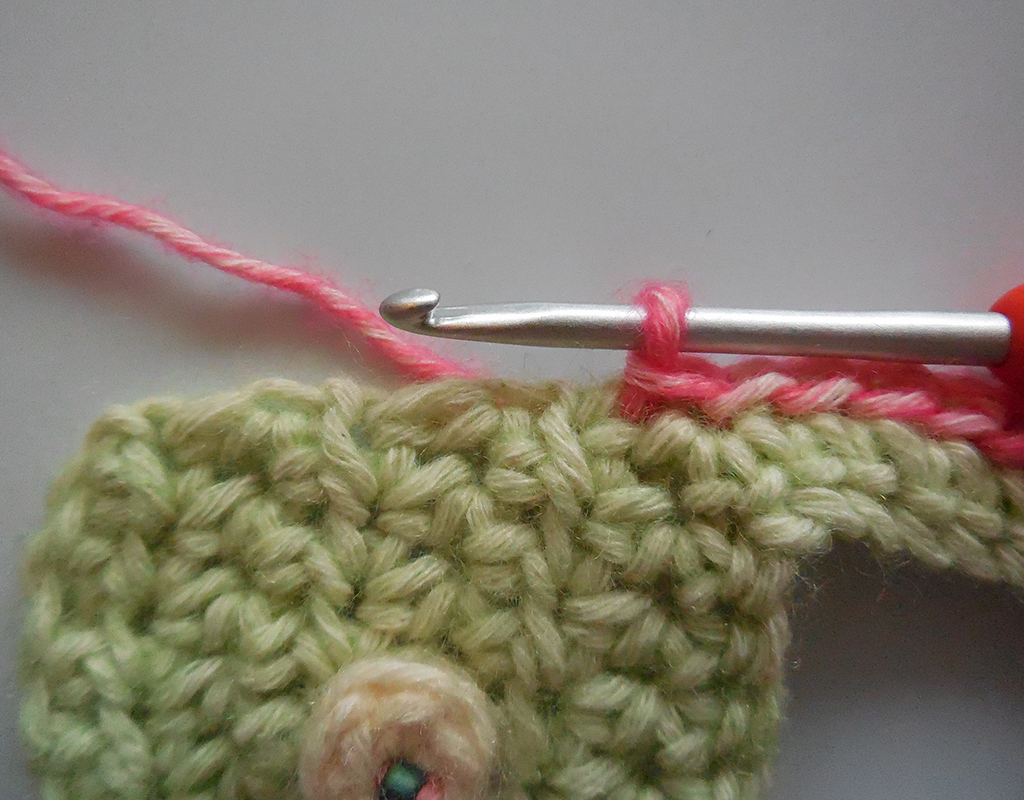
Changing colors {tutorial photo’s are from another pattern, but the principle is the same}
Change colors in the last st before the next round which you need to work in a different color as follows:
1. Work the last sc of the round until two loops remain on your hook;
2-3. Pick up the new color by pulling it through the remaining two loops on your hook, this finishes the sc, fasten off the old color and continue;
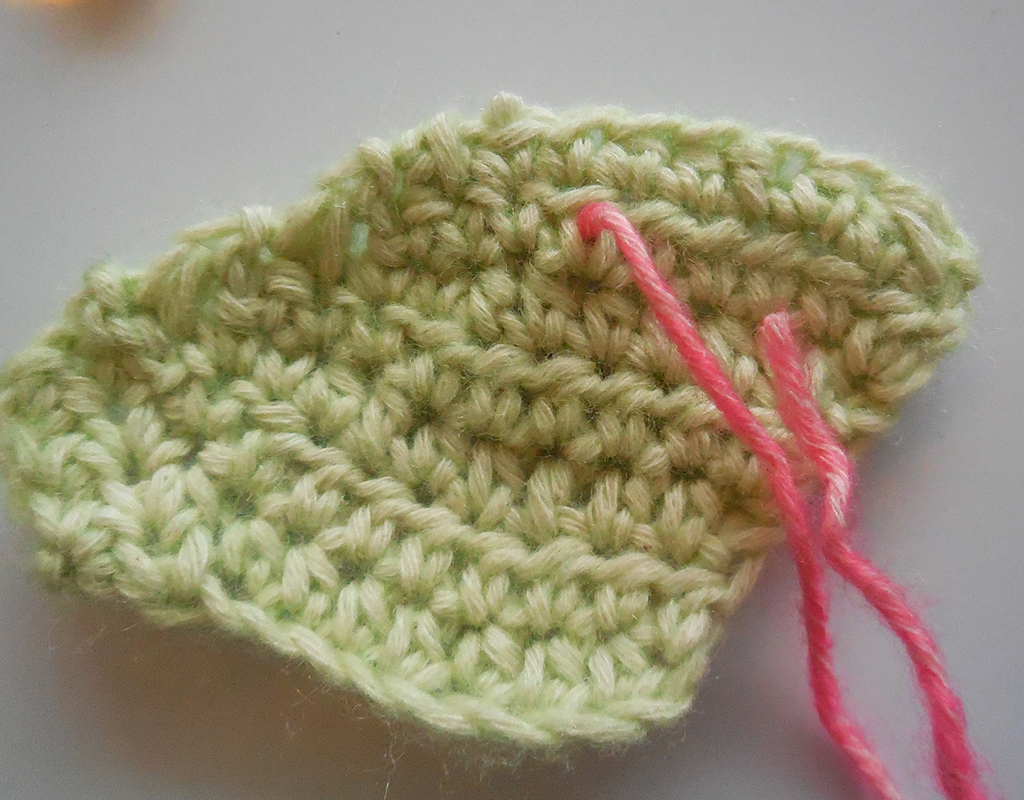
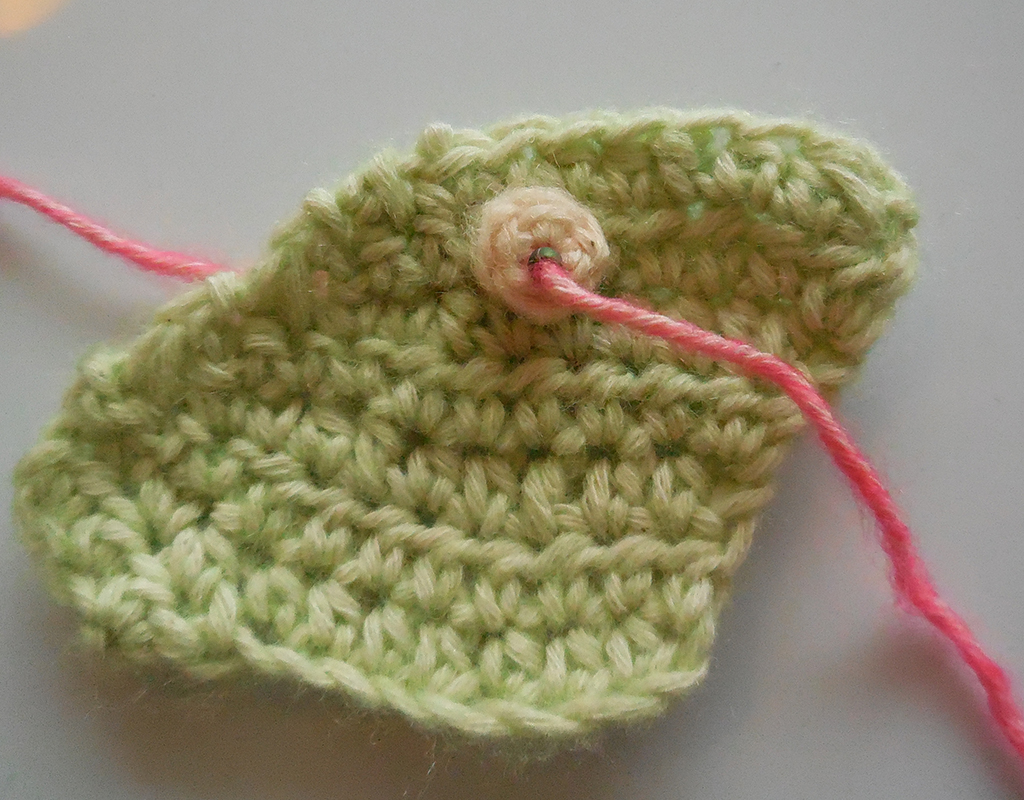
French knots {tutorial photo’s are from another pattern but the principle is the same}
Thread a length of yarn of about 10-15cm/4-6in through your darning needle.
– Weave the yarn through sts at the back of the wing of where you are to be working a couple of times to secure it;
– Insert your needle from back to front, pull the yarn through, place the tip of your needle in front of the bottom of the yarn strand, and wrap the yarn around the needle twice;
– Insert the needle back through from front to back, making sure the yarn is kept wrapped tightly around the needle, and pull the yarn through;
– Weave the yarn through the back of the wing and fasten off.
Attaching parts to the body
Attach part of the pattern to the main body using a whip stitch or any other stitch of your preference. Use the holes between the sc of the body to attach the parts to. It can help to use markers to first determine where to attach the parts to.
The Pattern
Beetle pattern
Instructions contain four different beetles corresponding to your kit/colorway. Go to the header corresponding to your colorway and follow the instructions.
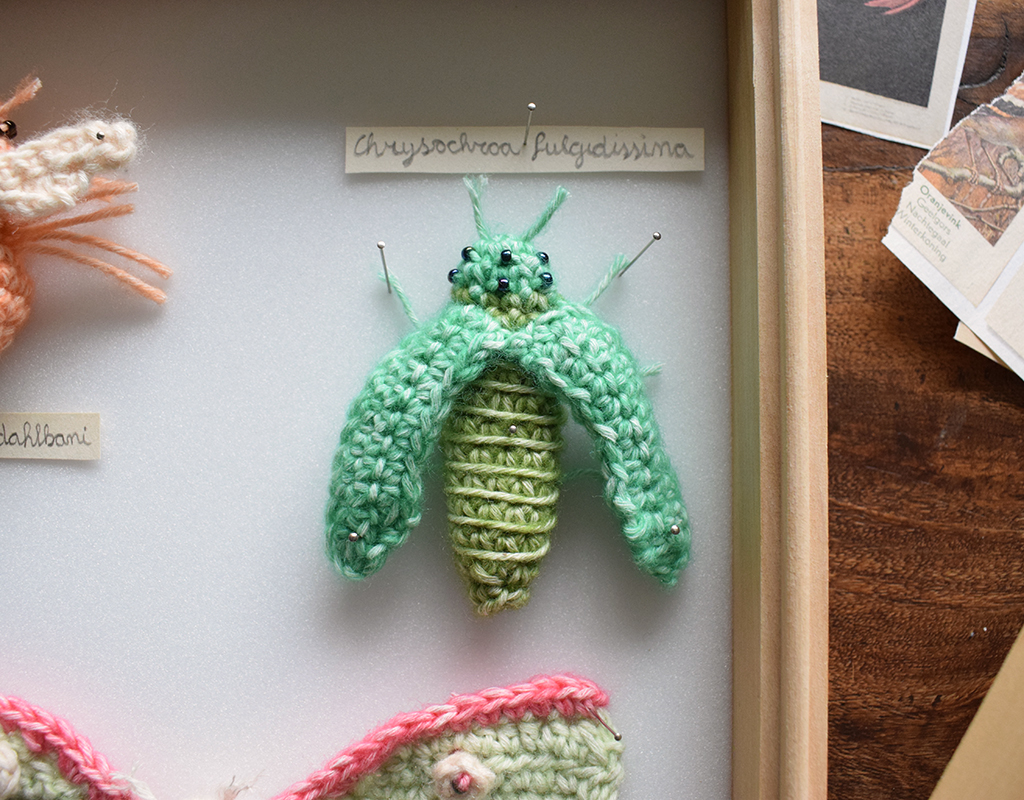
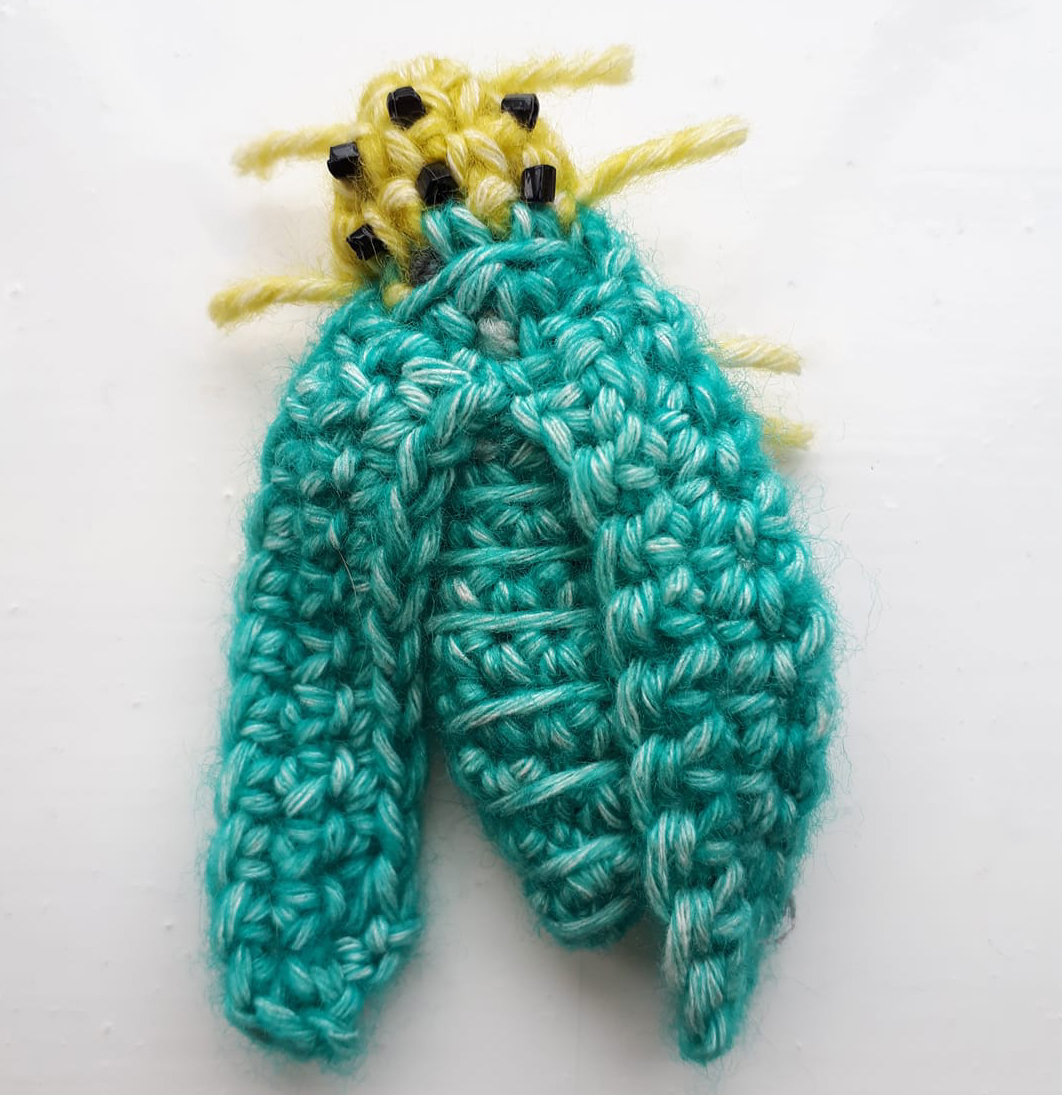
~Herbarium colorway – Jewel beetle – Chrysochroa fulgidissima~
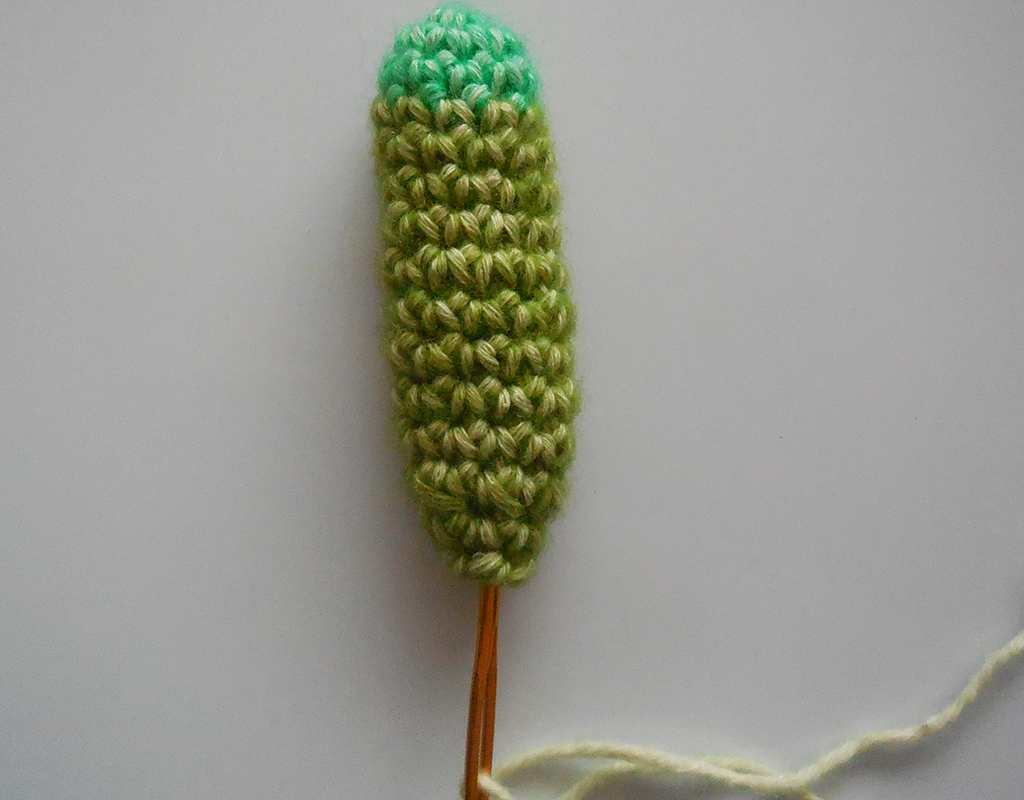
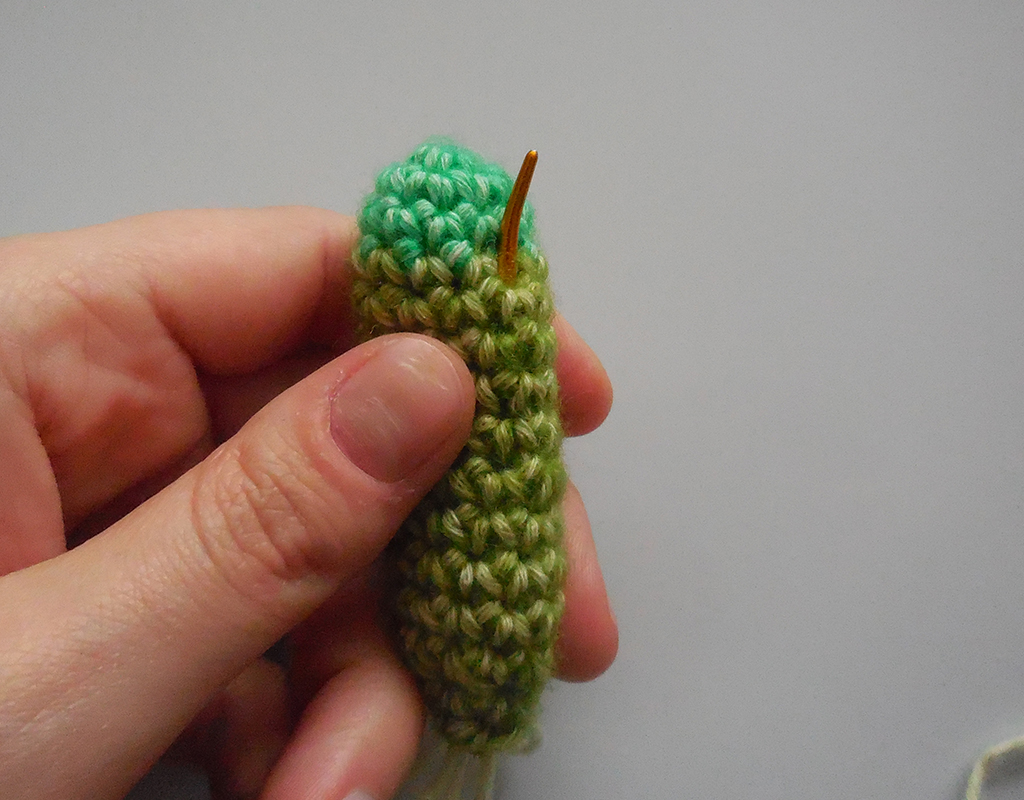
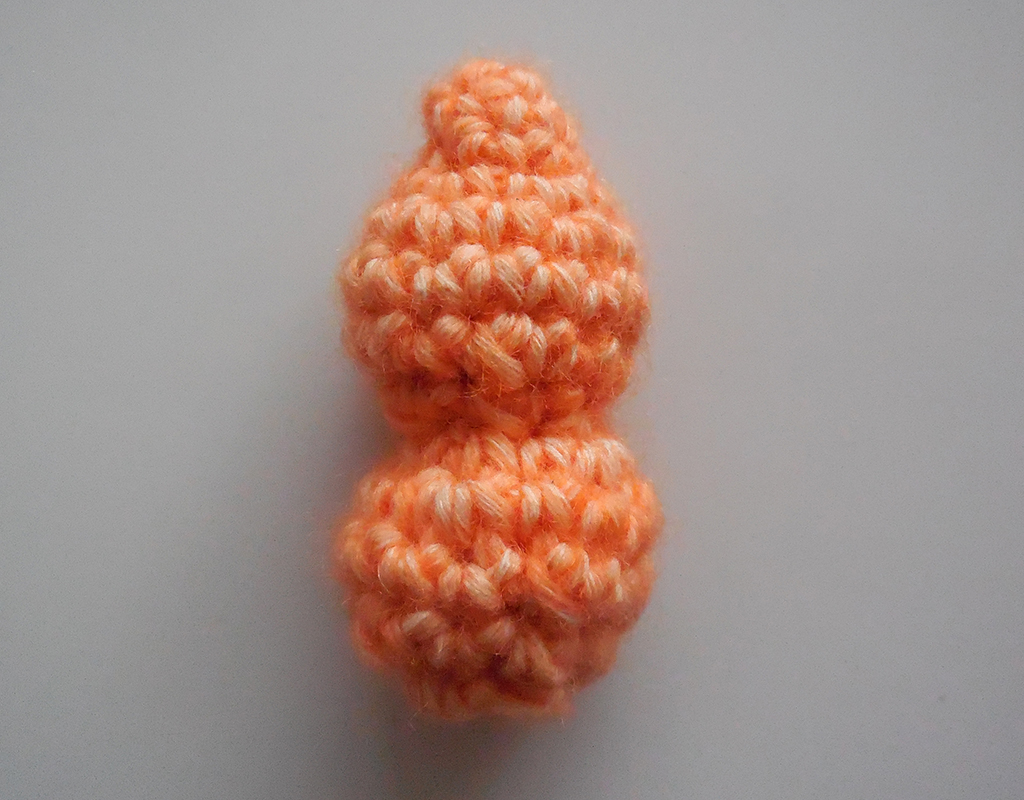
Head and body
Notes: You work the body seamlessly from the head to the tail in a spiral, so you will not close the round with a sl st. The first three rounds form the head, R4-14 form the body.
R1 Using color 826/1824, in MR; work 5sc in MR, close ring. [5 sc]
R2 2sc in each sc around. [10 sc]
R3 1sc in each sc around, change to color 806/1316 in the last st {see Tips & Techniques}. [10 sc]
R4 Using color806/1316 from here to end;1sc in each sc around. [10 sc]
R5-12 Rep R4 for 8 more times. [10 sc]
Stuff body lightly, using stuffing or scraps of yarn.
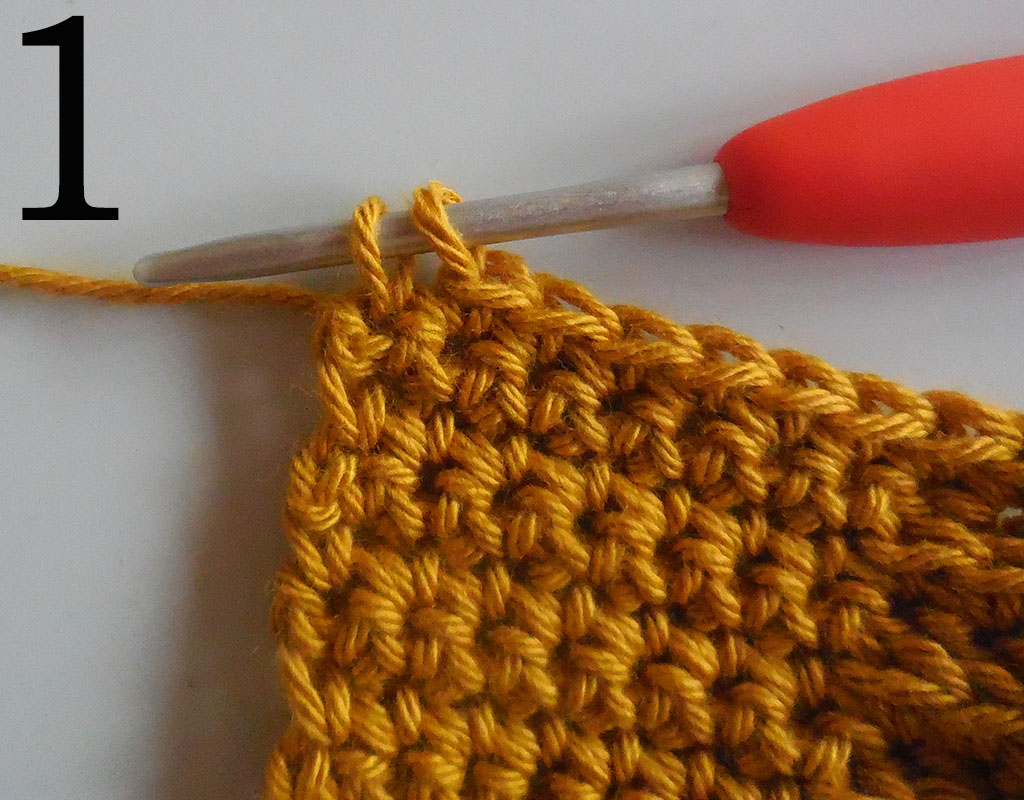
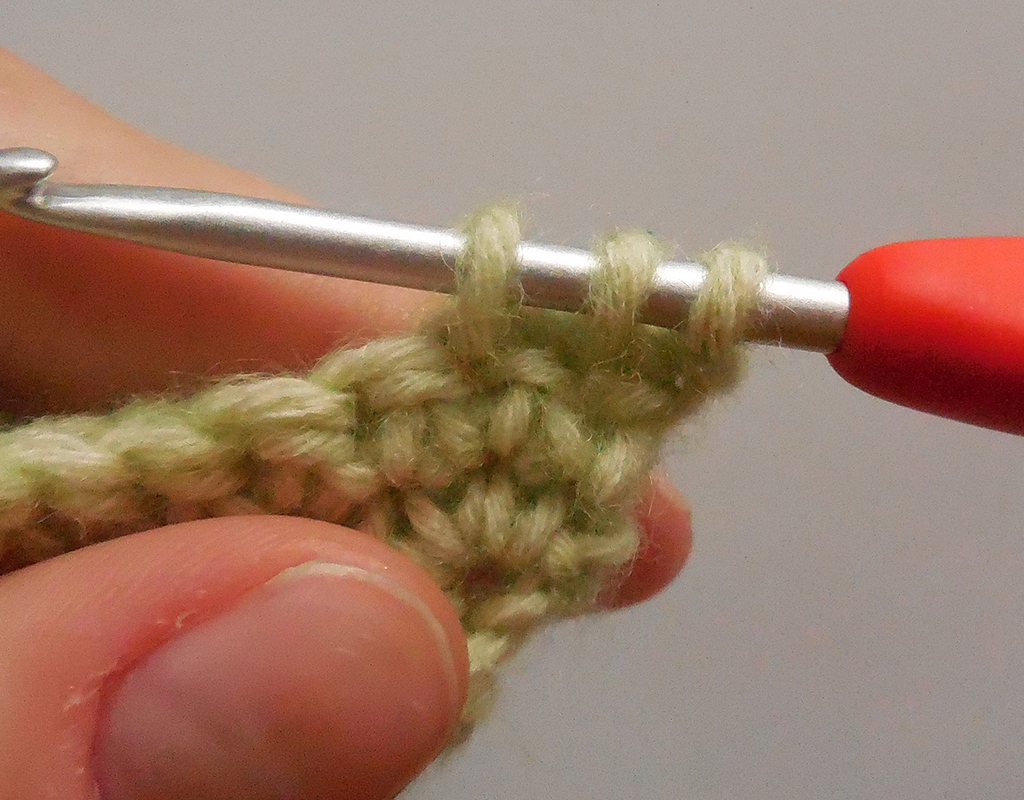
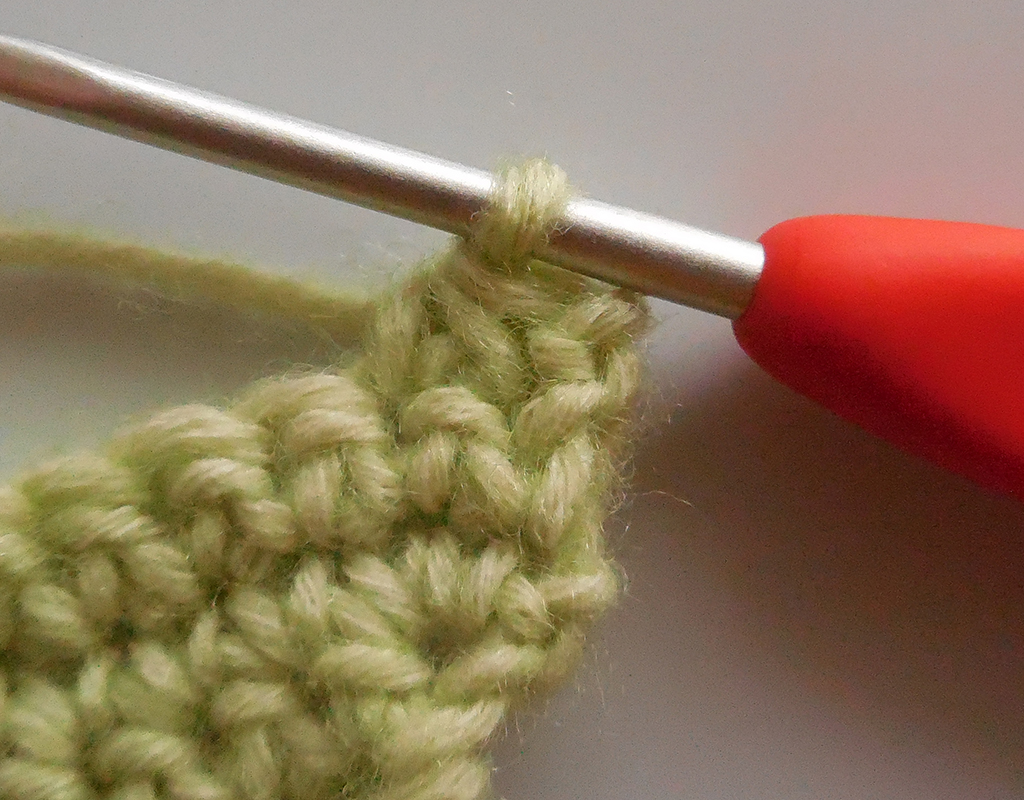
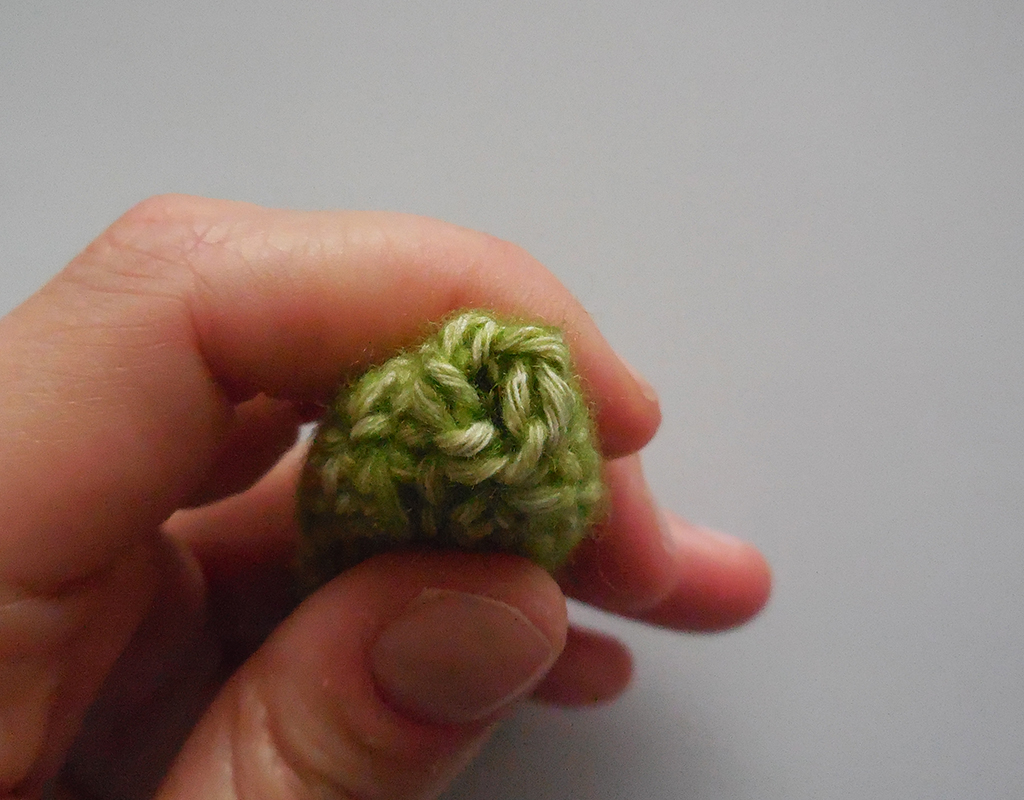
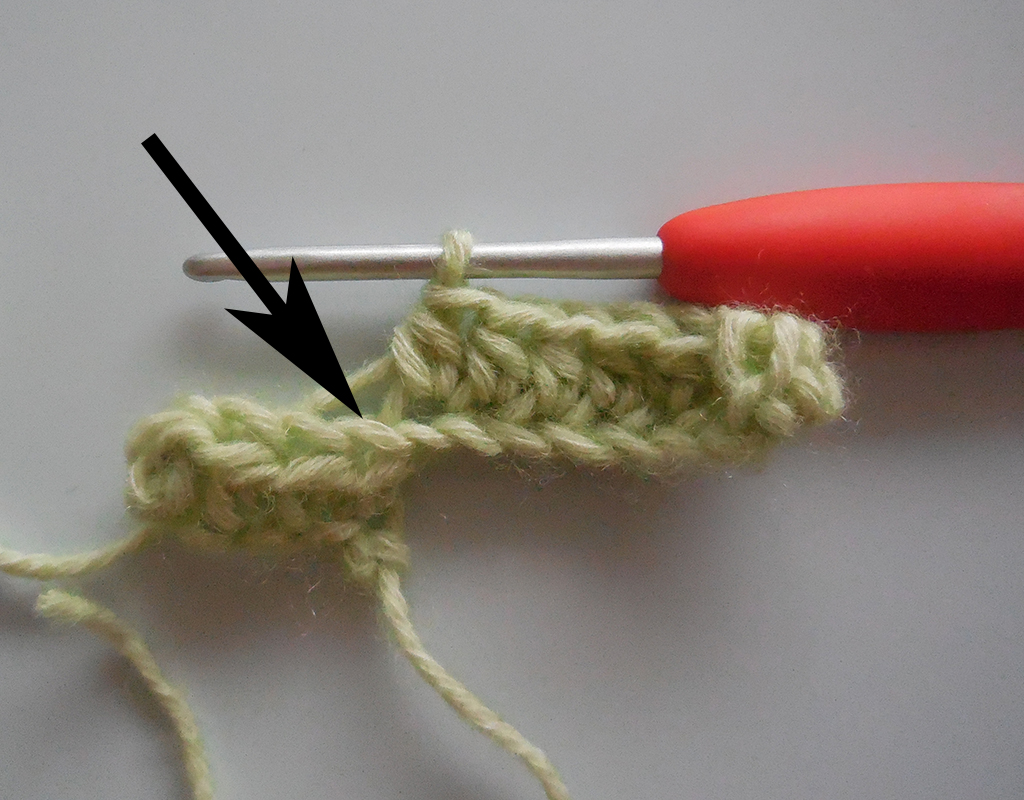
R13 (sc2tog over next 2 st) 5 times {see pics below for how to work a sc2tog, shown on a flat piece of crochet, but principal is the same}. [5 st]
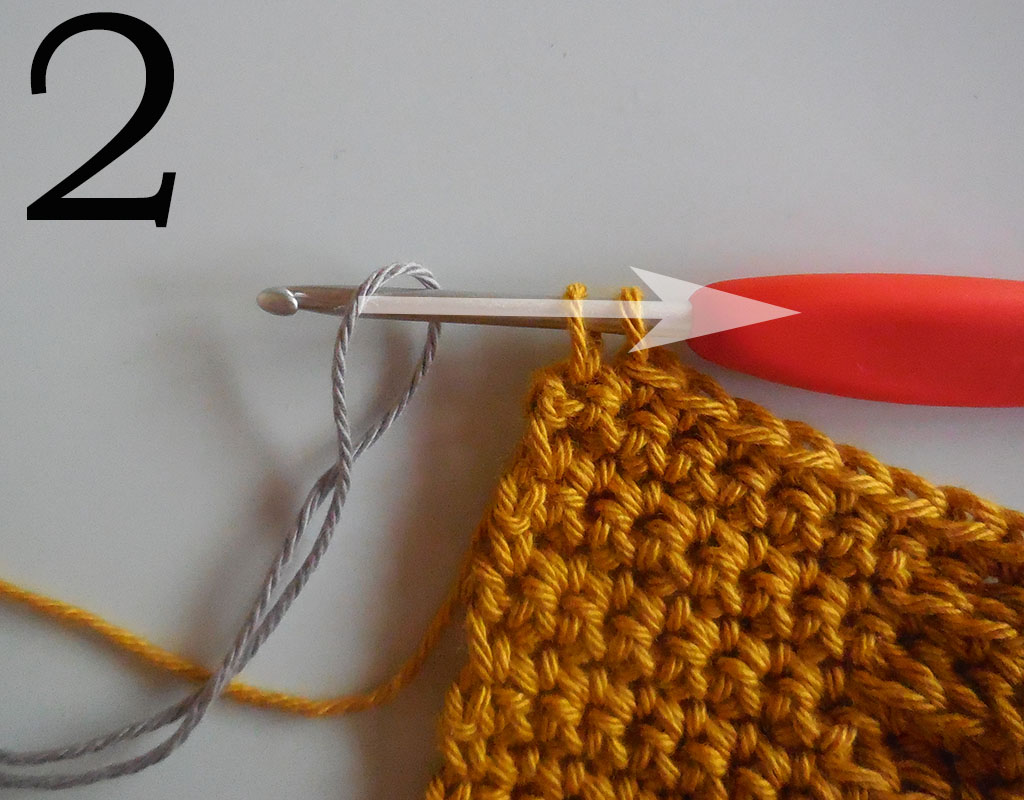
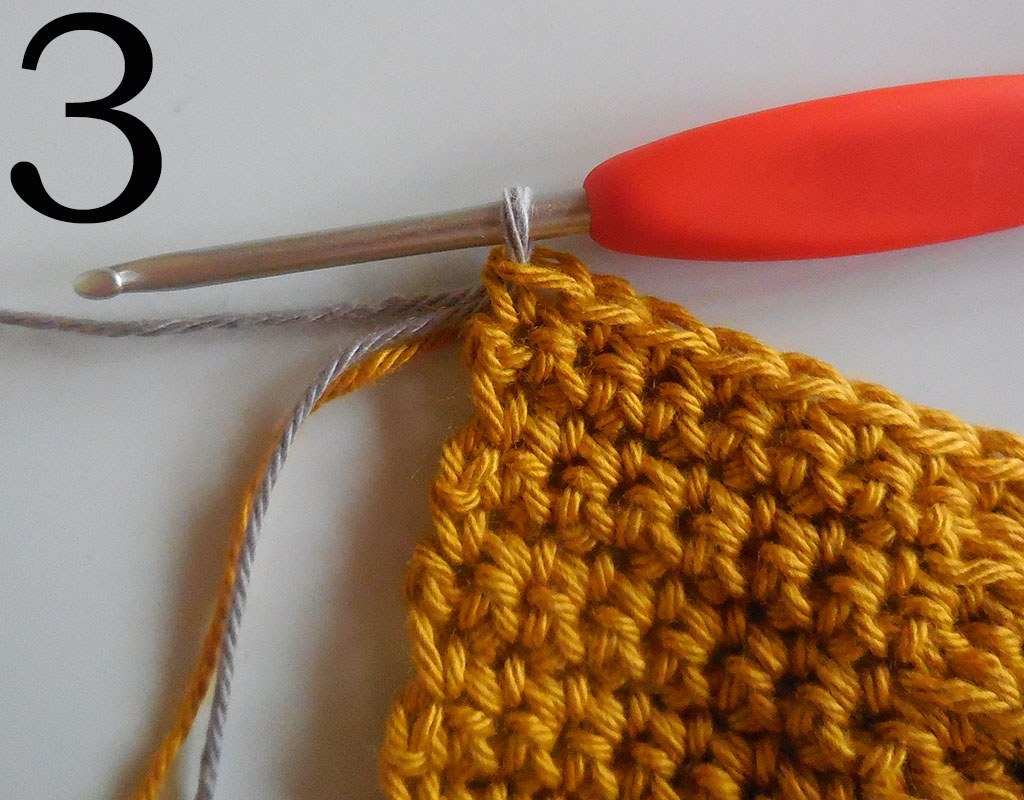
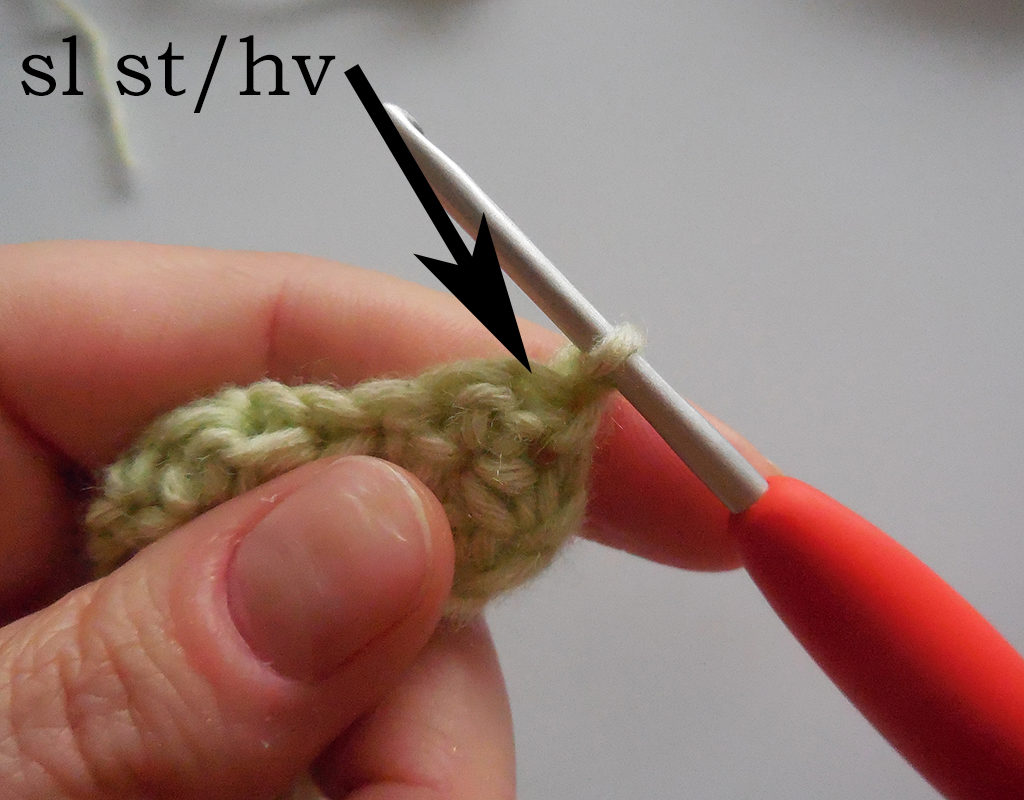
R14 1sc in each st around, draw a loop and cut yarn, sew hole shut and work away yarn end through inside of body {see pics below}.


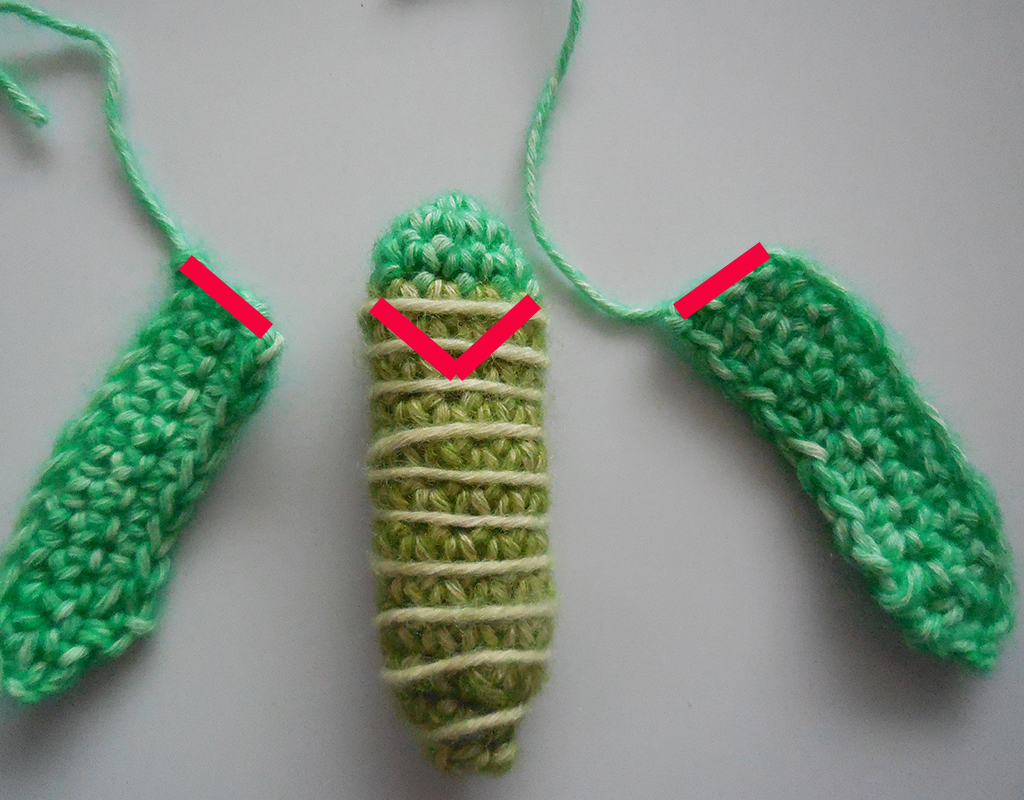
Abdominal segments
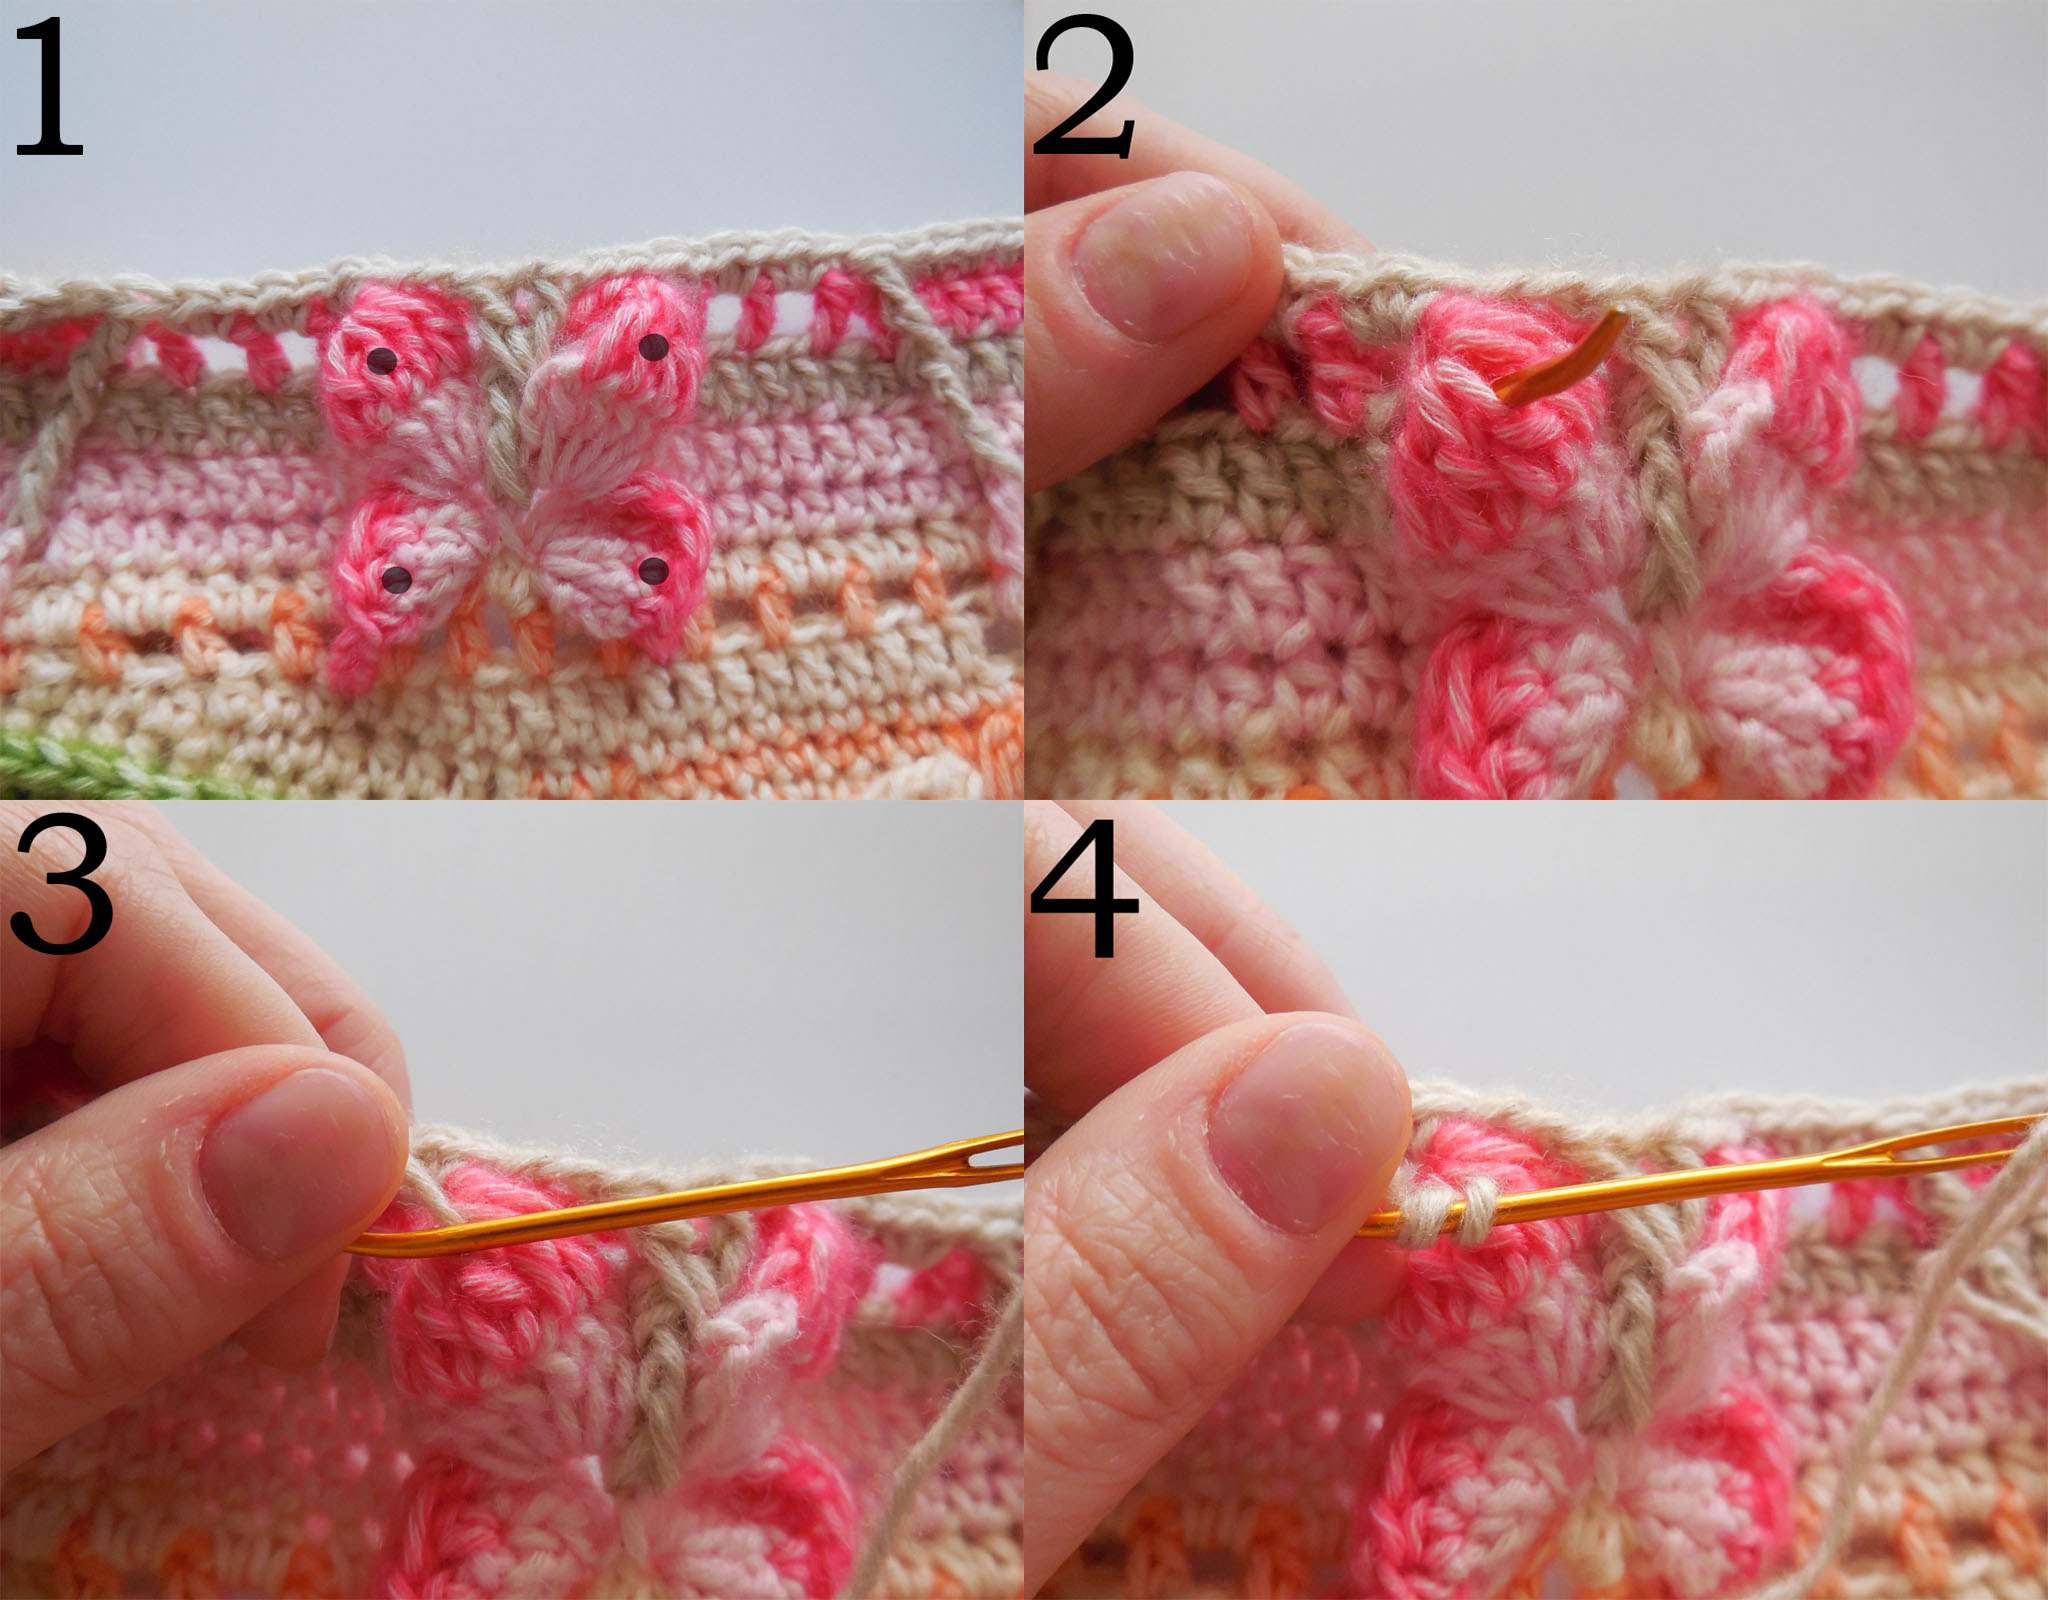
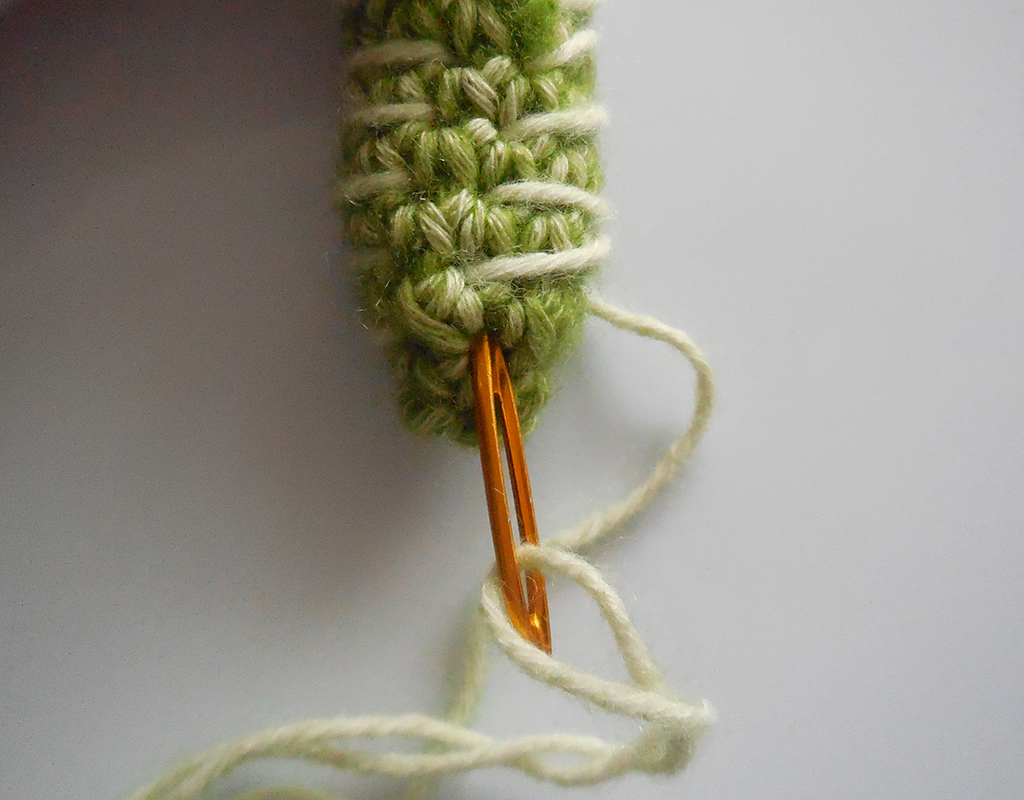
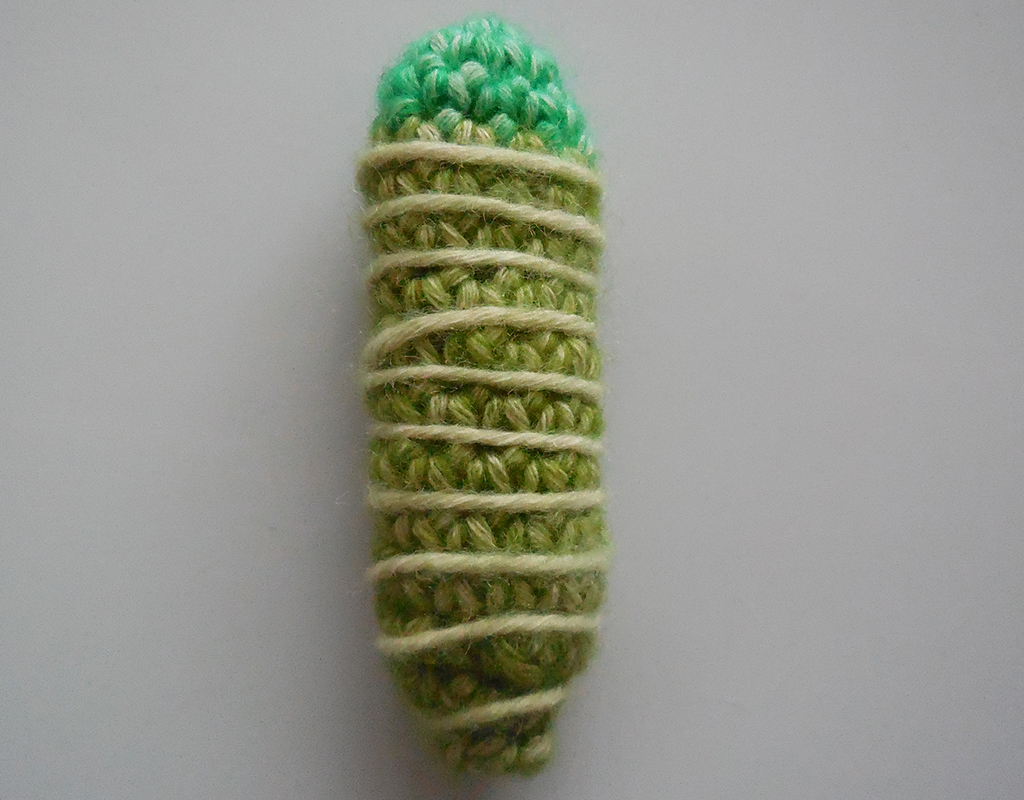
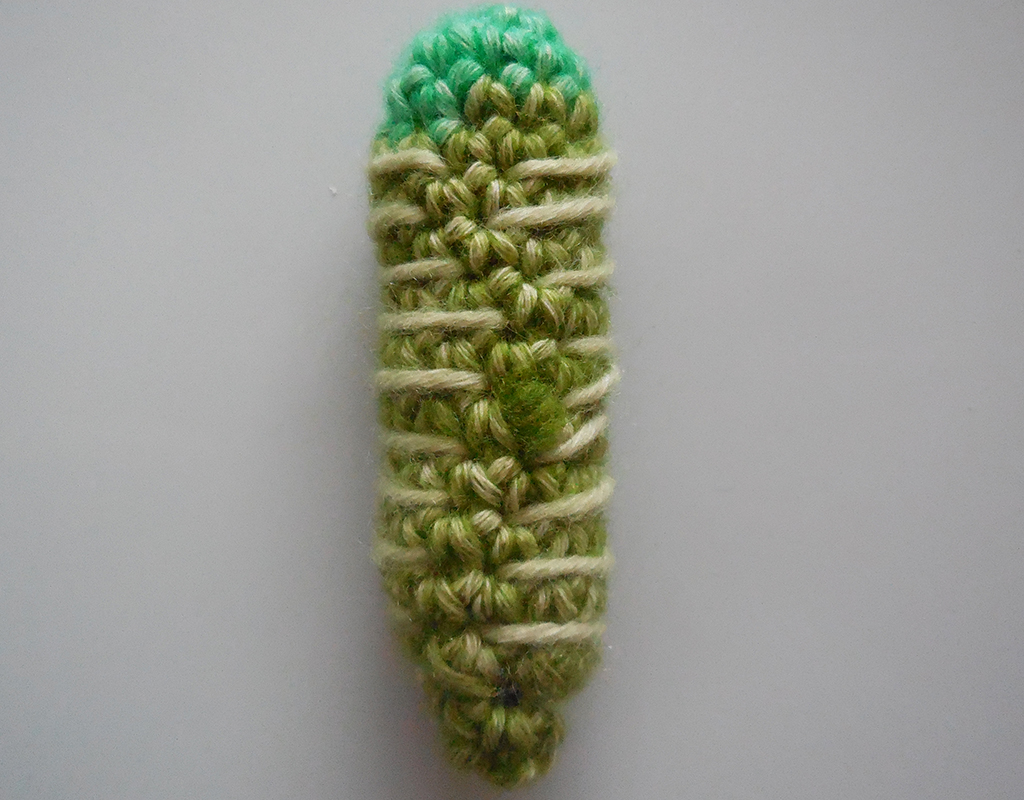
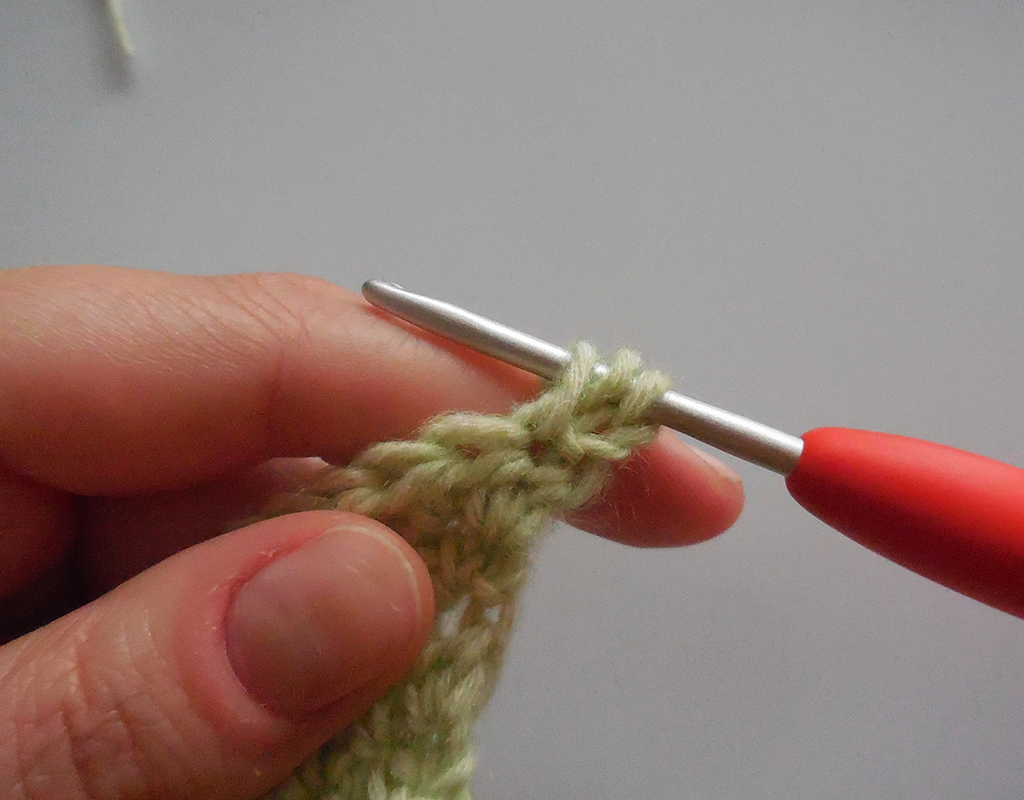
Cut a length of yarn color 806/1316 of approximately 80cm/32in. Thread yarn through darning needle and insert needle in bottom and thread through the length of the body coming out in any st of round 4 {first round of the second color you’ve used, see pics below}. This will be your center back.
Note that color used in pics below is not the color indicated in the pattern.
Step 1: Wrap the yarn around the body counterclockwise;
Step 2: Insert needle in st left of previous st and draw through;
Step 3: Insert needle in st one below of previous st and draw through. Pull tight, but not too tight.
Step 4: Wrap the yarn around the body clockwise;
Step 5: Insert needle in st right of previous st and draw through;
Step 6: Insert needle in st one below and to the left of previous st and draw through. Pull tight, but not too tight.
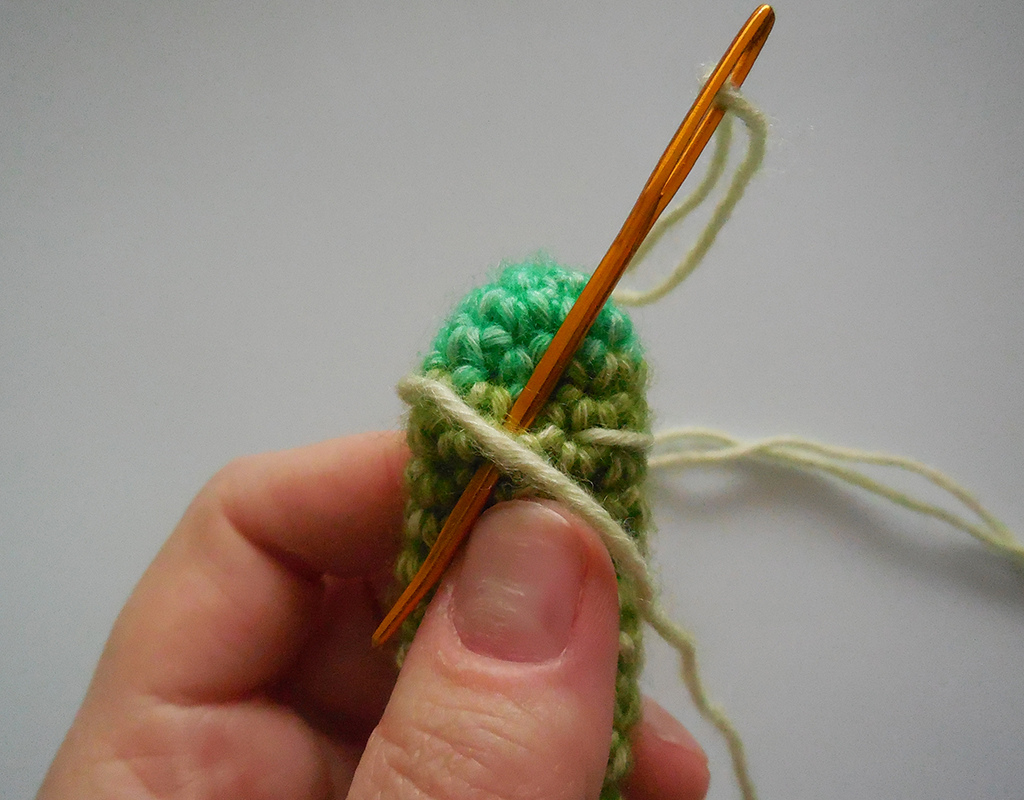
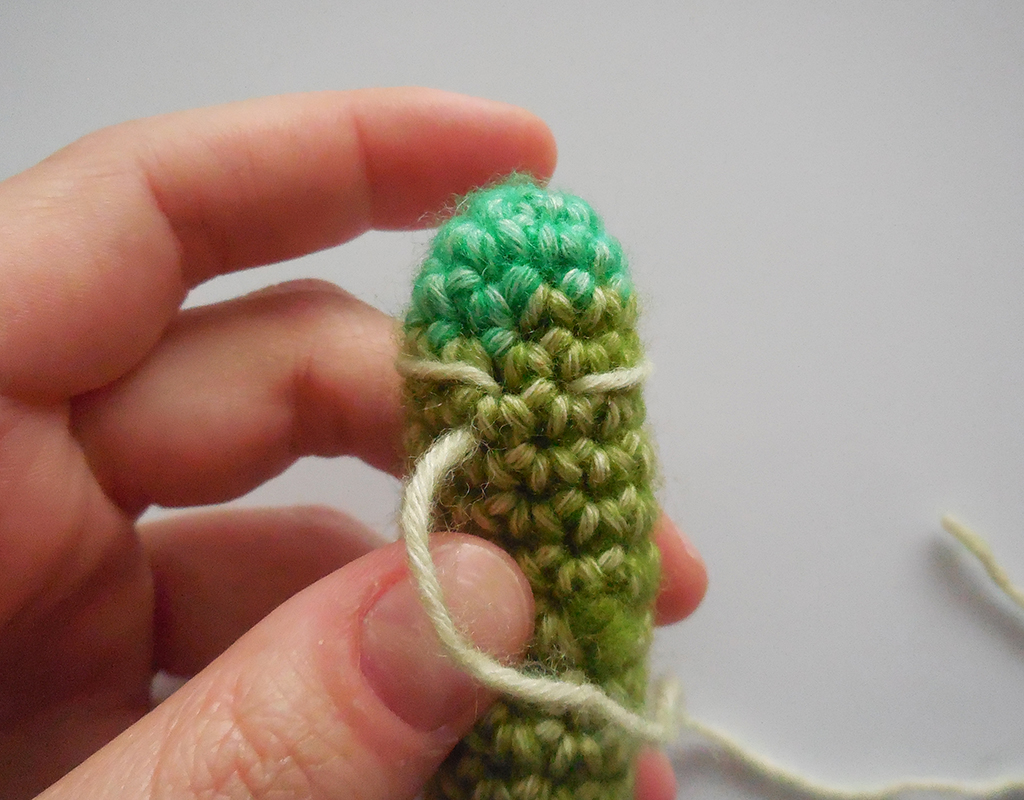
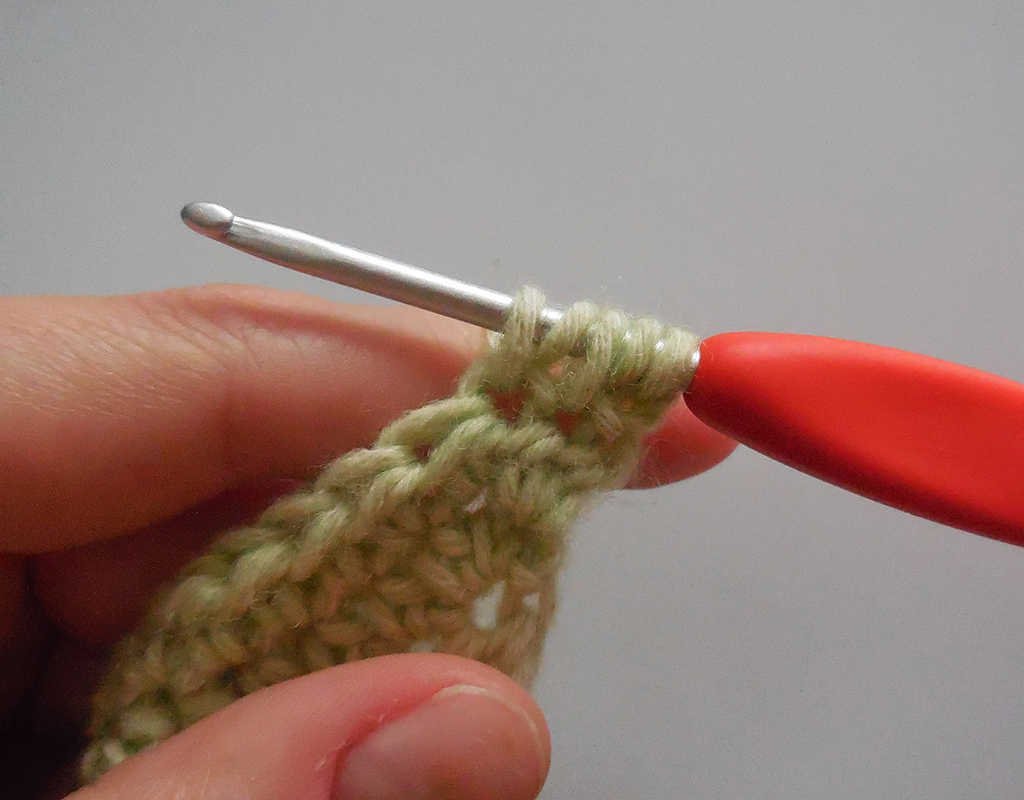
Rep step 1-6 until you have formed 9 lines/‘abdominal segments’ ending with a step 2 and work away the yarn end through inside of body {see pic below}. Push the lines neatly in order.
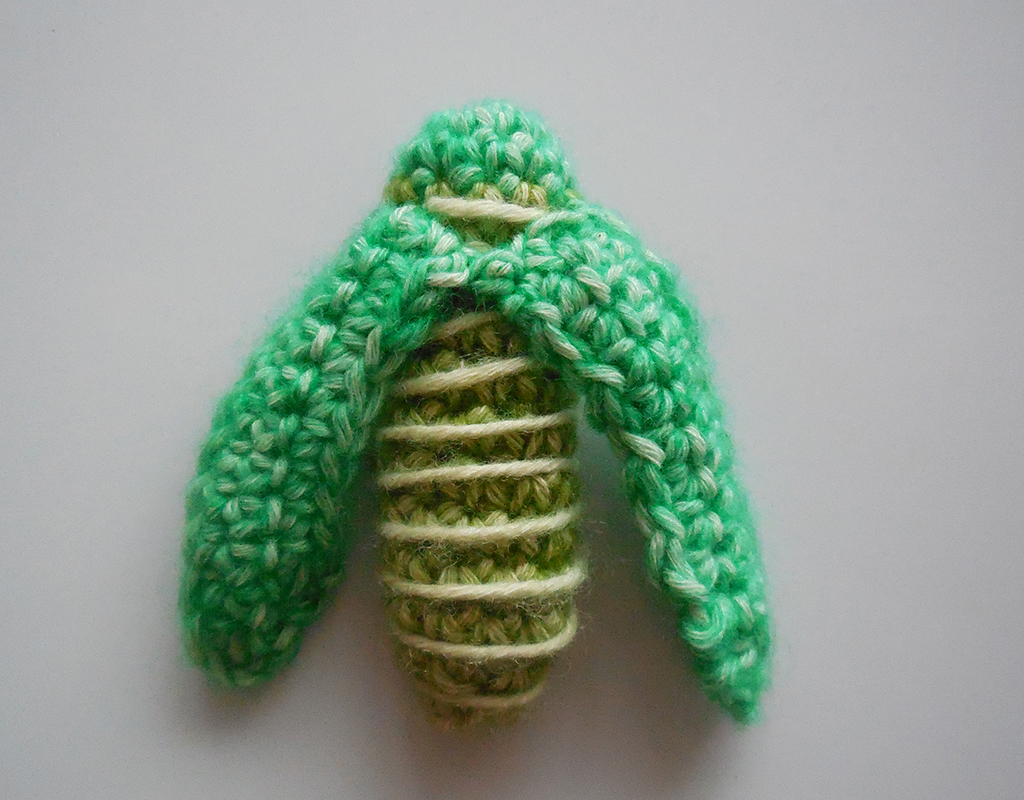
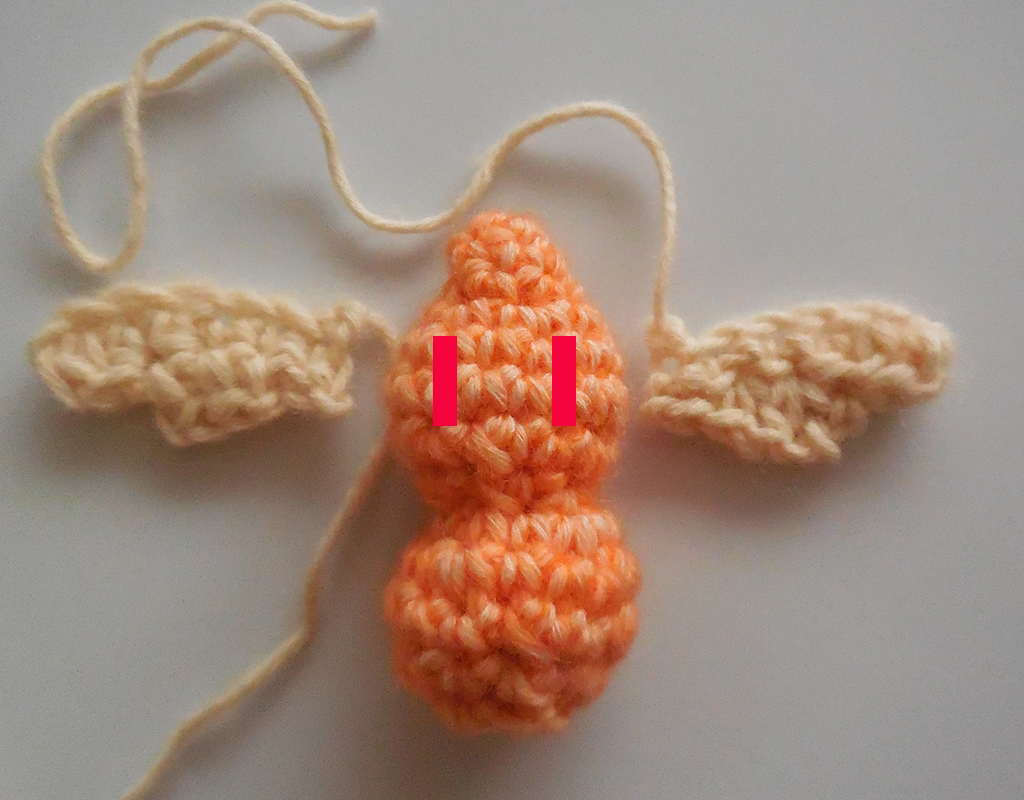
Wings
Left wing
R1 Using color 826/1824; ch13, work sc2tog over second and third ch from hook, 1sc in last 10 ch, ch1, turn. [10 sc, 1 sc2tog]
R2 1sc in first 9 sc, sc2tog over last 2 st, ch1, turn. [9 sc, 1 sc2tog]
R3 Sc2tog over first 2 st, 1sc in last 8 st, fasten off one yarn end, leaving the other yarn end for assembly. [8 sc, 1 sc2tog]
Right wing
R1 Using color 826/1824, ch13, starting in second ch from hook; 1sc in next 10 ch, sc2tog over last 2 ch, ch1, turn. [10 sc, 1 sc2tog]
R2 Sc2tog over first 2 st, 1sc in last 9 st, ch1, turn. [9 sc, 1 sc2tog]
R3 1sc in first 8 st, sc2tog over last 2 st, fasten off the yarn end, work the other yarn end back to the beginning of the row so you can use it for assembly. [8 sc, 1 sc2tog]
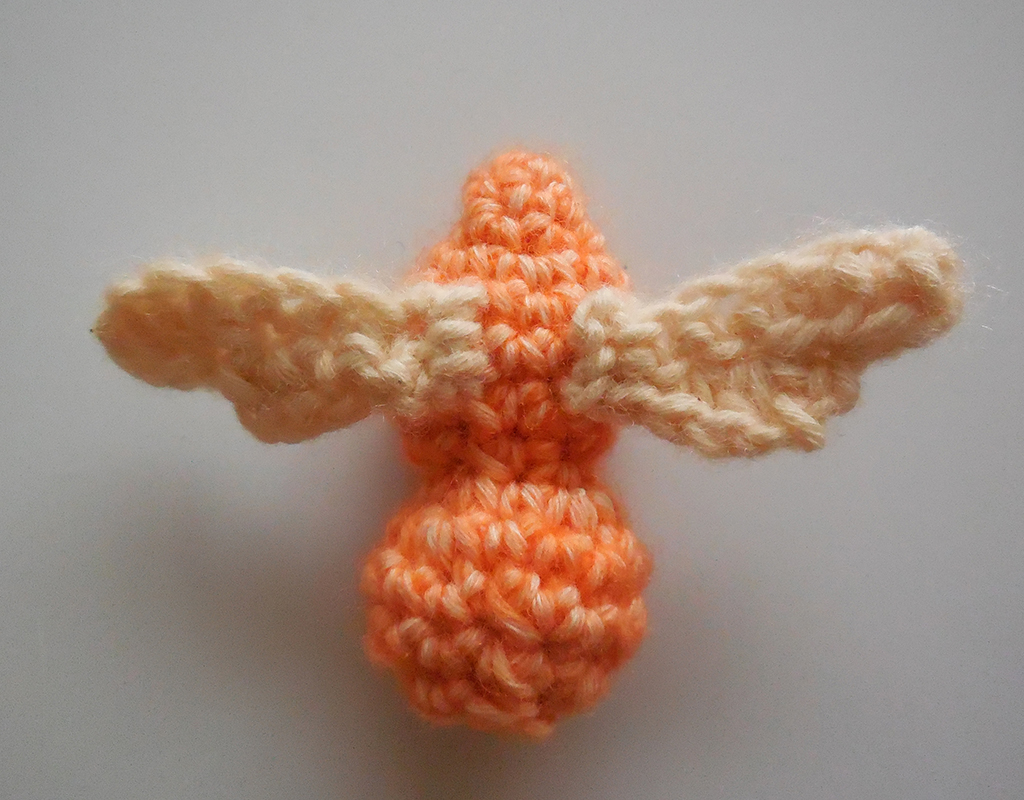
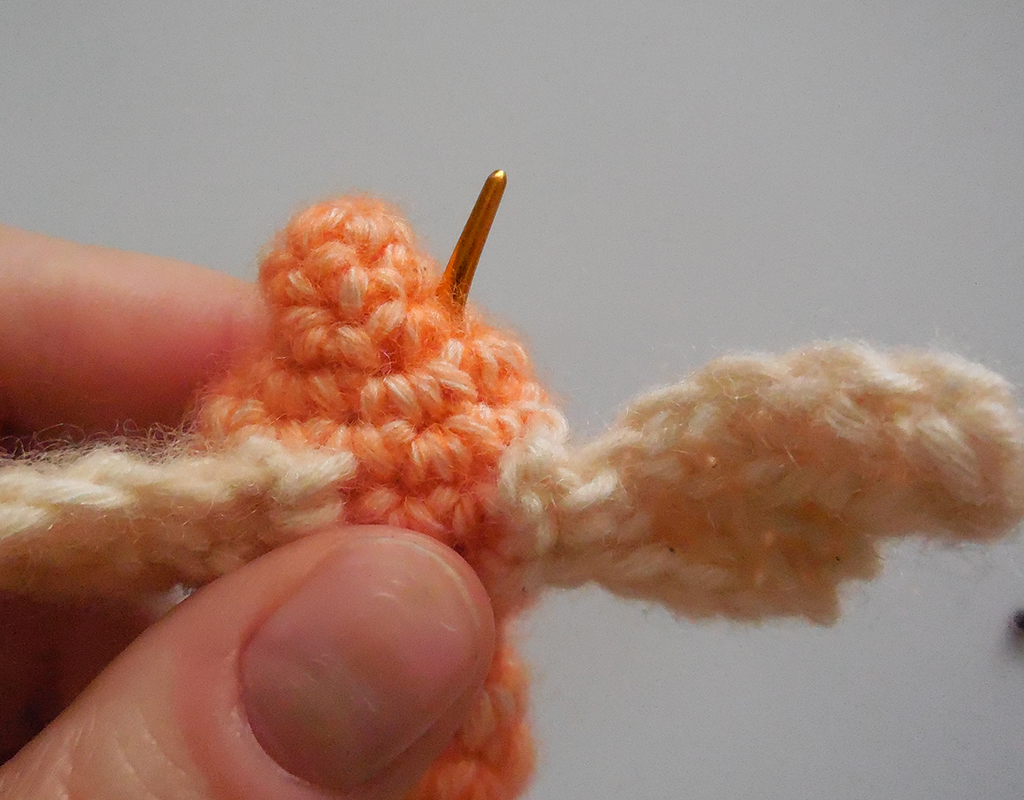
Attaching the wings to the body
Sew the wings on the body using the yarn ends of the wings in a diagonal line from the center front stitch three rounds from the top of the body{see pics below}. The wings will come together in the same st in the middle. Fold both wings lengthwise to create an arch.
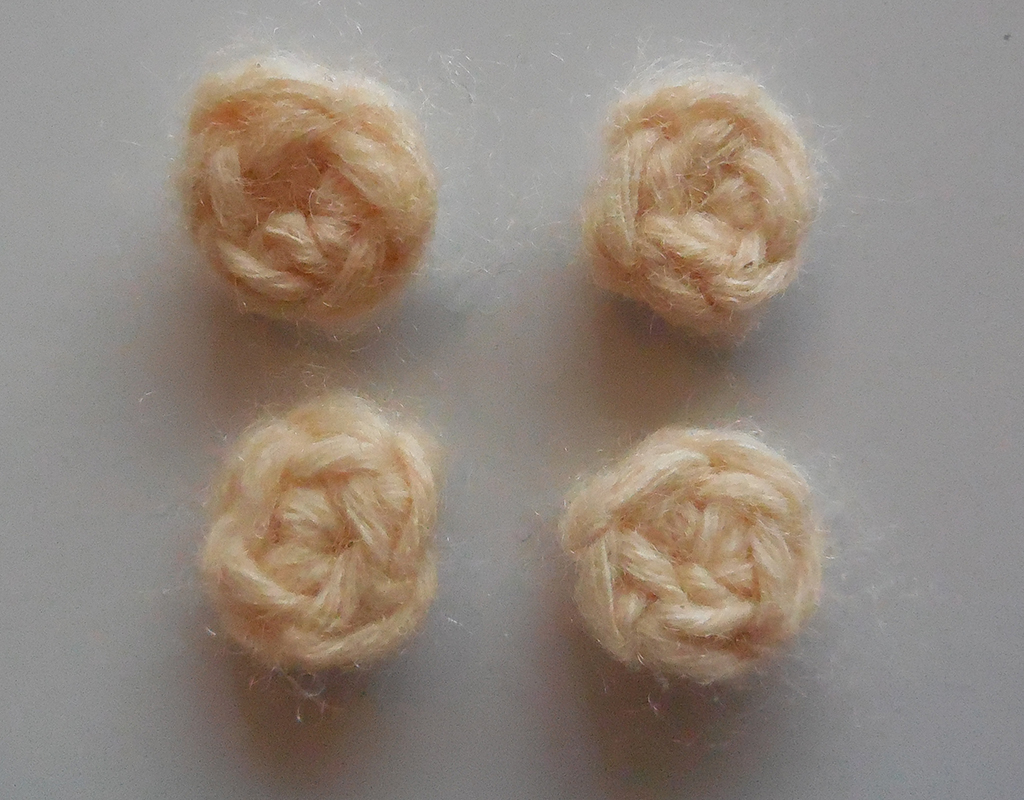
Beading on the head
Note: If you don’t have a split eye beading needle, you can also attach the beads with sewing thread and a sewing needle. Or use a French knot instead.
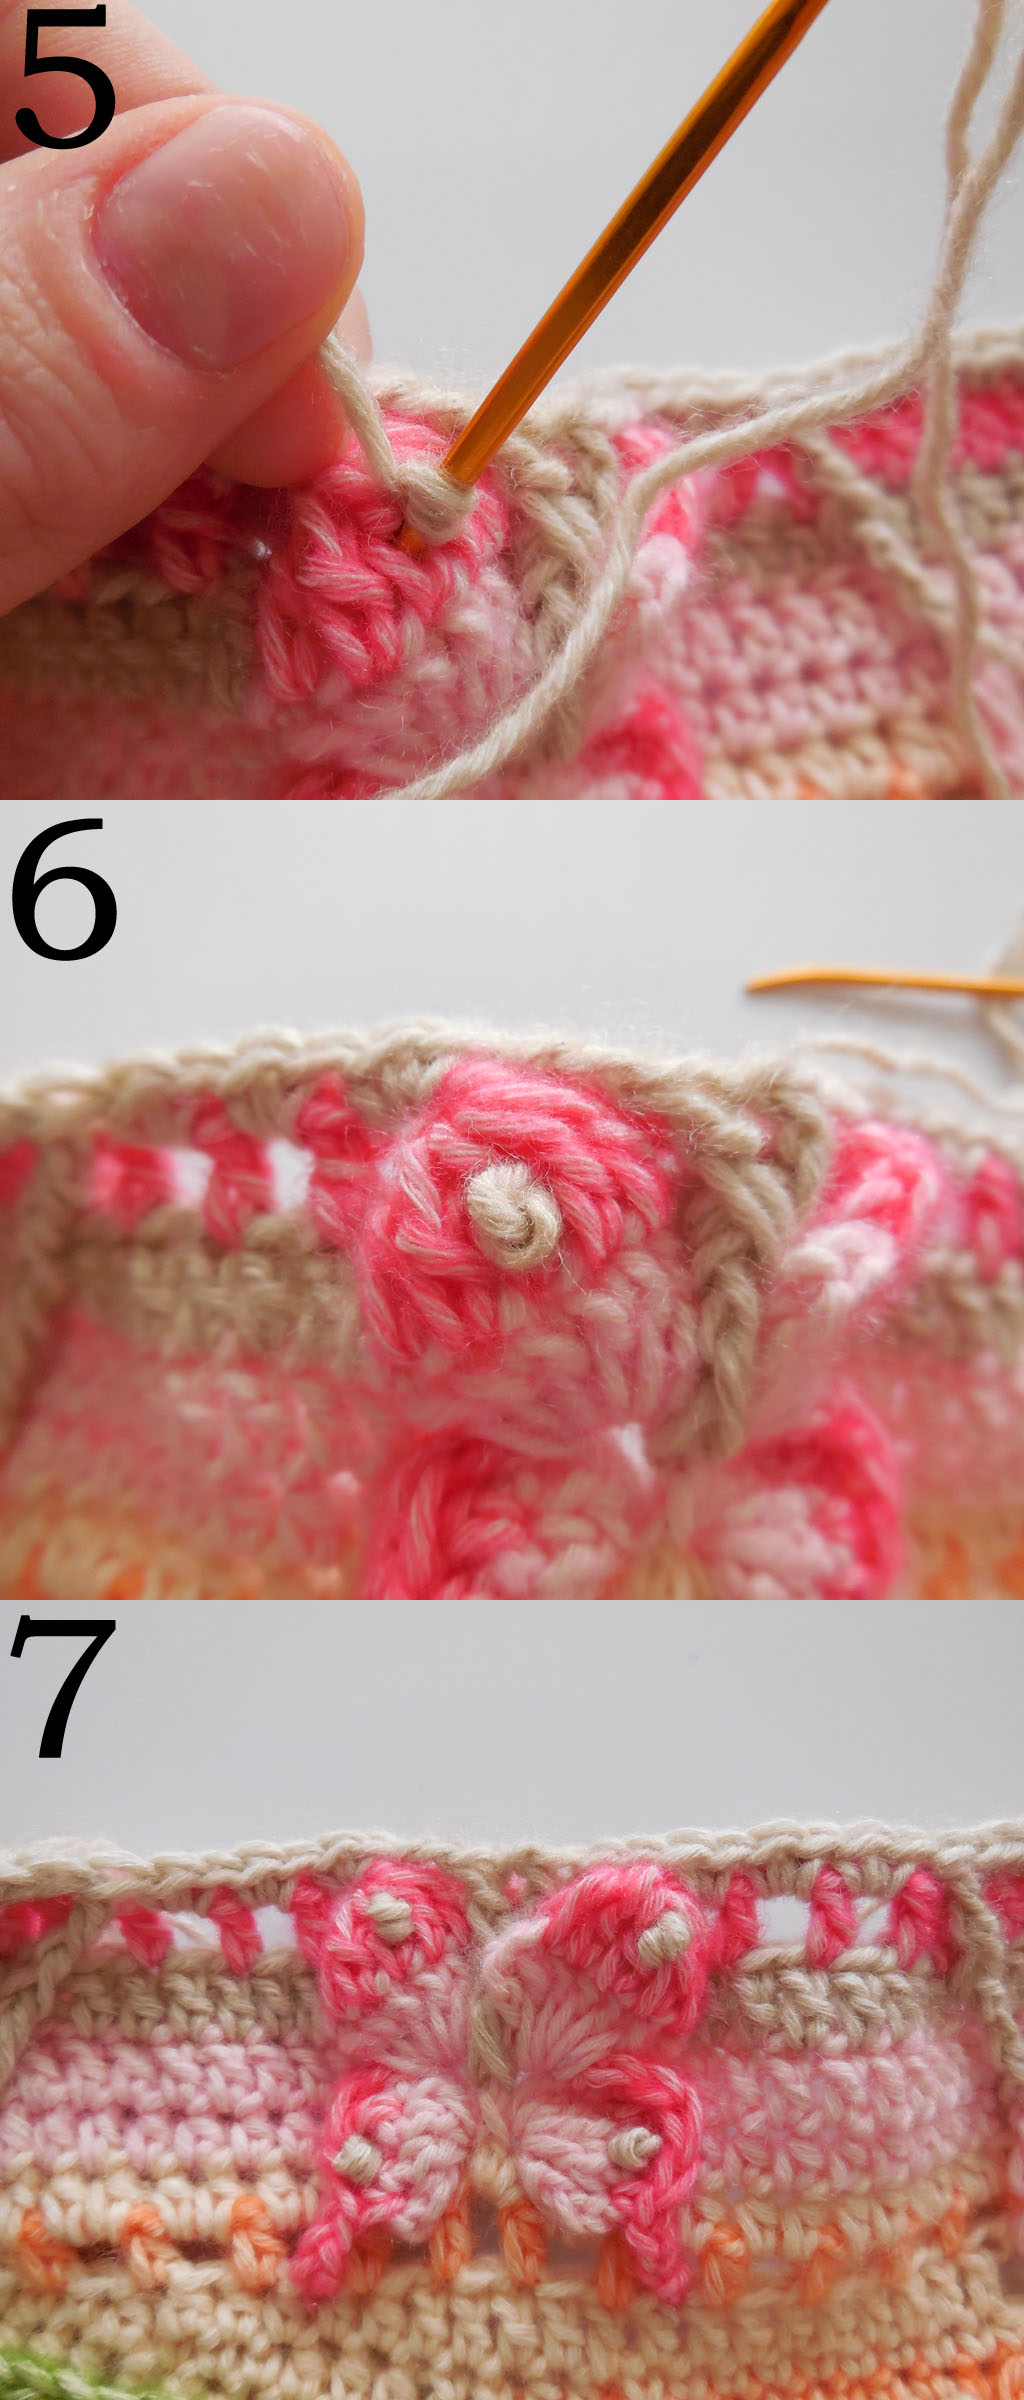
Cut a length of yarn color 826/1824 of approximately 30cm/12in. Thread yarn through darning needle and insert needle from the back of the head coming out in the st above where right point of the right wing is attached to the body. Secure the end by inserting the needle in the next st from left to right going into the previous st again.
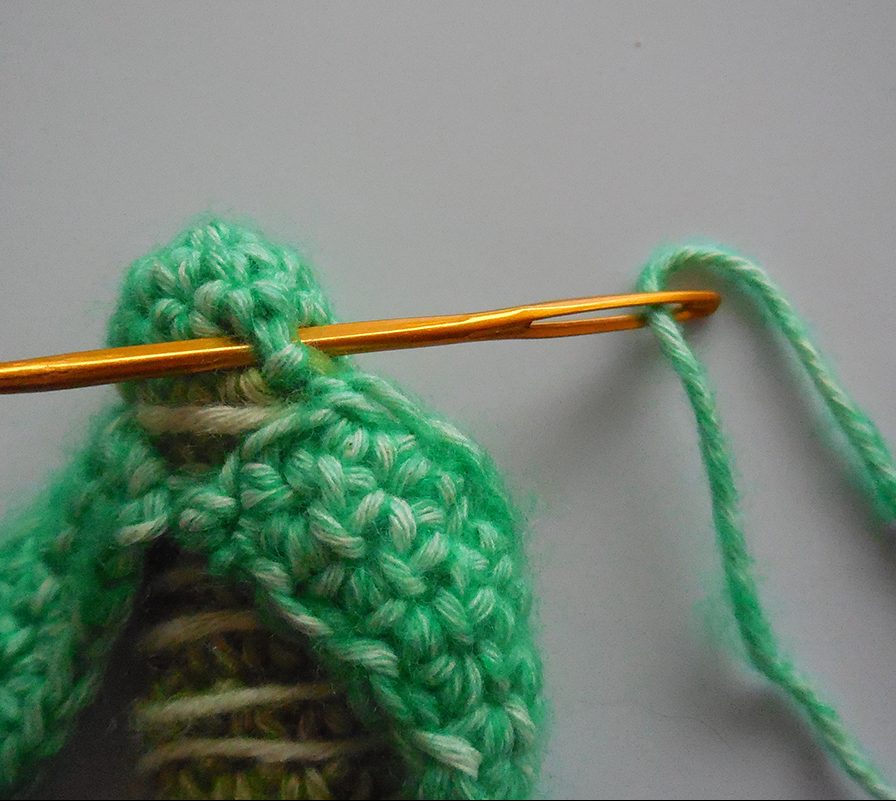
Step 1: remove darning needle and insert yarn in beading needle, thread one bead with color number 86 onto yarn and insert yarn into darning needle again;

Step 2: push the bead to base of yarn and insert needle in next st to your left, draw yarn through, making sure the bead isn’t pulled through the st.
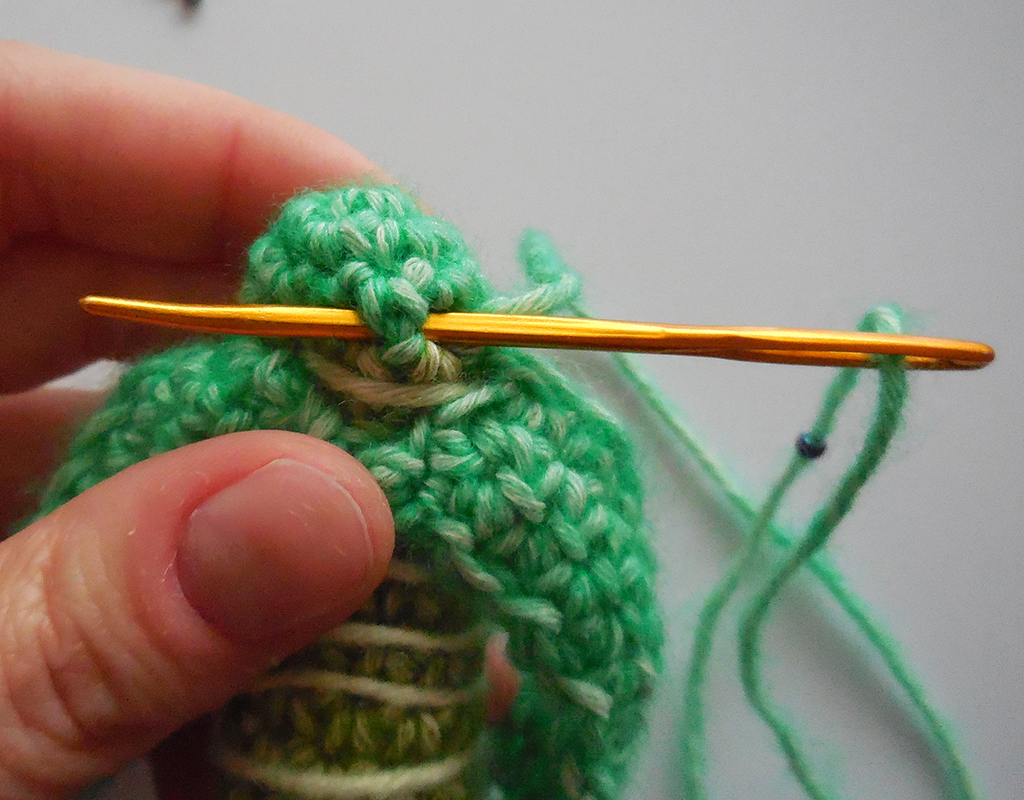
Rep Step 1-2 for two more beads.

Insert the needle in the round right above where you ended the last st and rep Step 1-2 to attach 3 more beads, now working from left to right instead from right to left, work away yarn end through inside of body.
Antennae and legs
Antennae
Cut a length of yarn color 826/1824 of approximately 3cm/1.2in. Draw through the top of the head with a darning needle, while pinching one end of the yarn, so you don’t pull it all through.

Legs
Cut three pieces of yarn color 826/1824 of approximately 6cm/2.4in. Draw one piece through round 4 across the width of the body, draw the second piece across the width of the body two rounds below, do the same for the third piece.
~Mineralogy colorway – Jewel beetle – Endelus cupido ~
Work all the instructions of the jewel beetle of the Herbarium colorway, but using the following colors:
Body R1-3: 812/1712
Body R4-14: 815/1062
815/1062 for the wings and abdominal segments. 812/1712 to attach the beads on the head and for the antennae and legs.
~Conchology colorway – Red net-winged beetle – Dictyoptera aurora~
Work all the instructions of the jewel beetle of the Herbarium colorway, but using the following colors:
Body R1-3: 830/2007
Body R4-14: 946/1132
946/1132 for the abdominal segments.
807/1083 for the wings. 830/2007 to attach the beads on the head and for the antennae and legs.
~Entomology colorway – Jewel beetle – Chrysochroa fulgidissima~
Work all the instructions of the jewel beetle of the Herbarium colorway, but using the following colors:
Body R1-3: 958/1824
Body R4-14: 805/1708
958/1824 for the wings and 805/1708 for the abdominal segments. 958/1824 to attach the beads on the head. 832/1823 for the antennae and legs.
Bee pattern
Instructions contain four different bees corresponding to your kit/colorway. Go to the header corresponding to your colorway and follow the instructions.
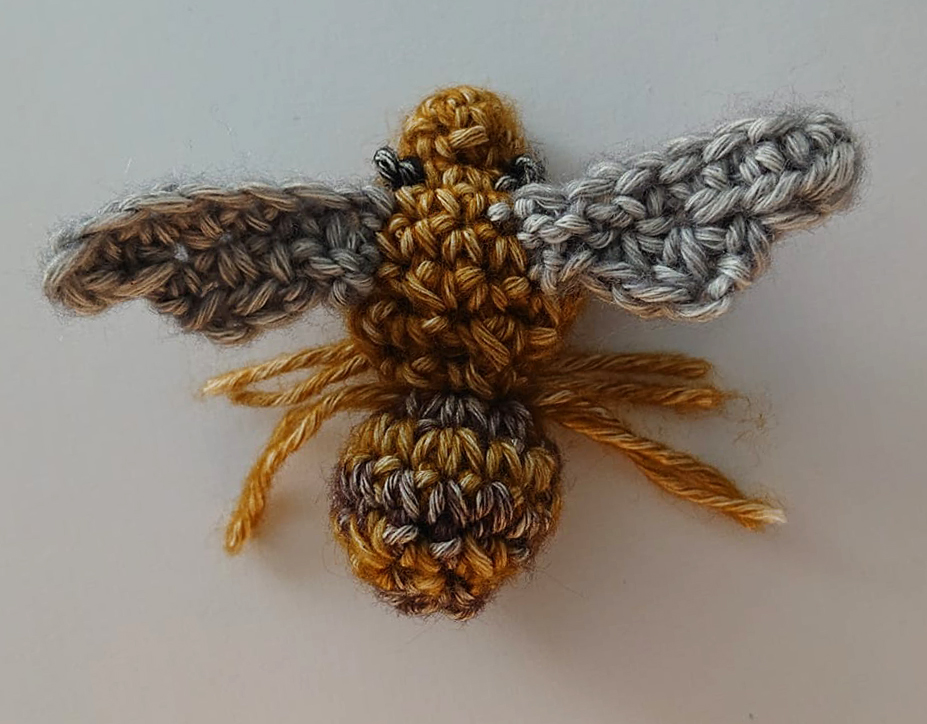
~Herbarium colorway – Patagonian bumblebee – Bombus dahlbomii~
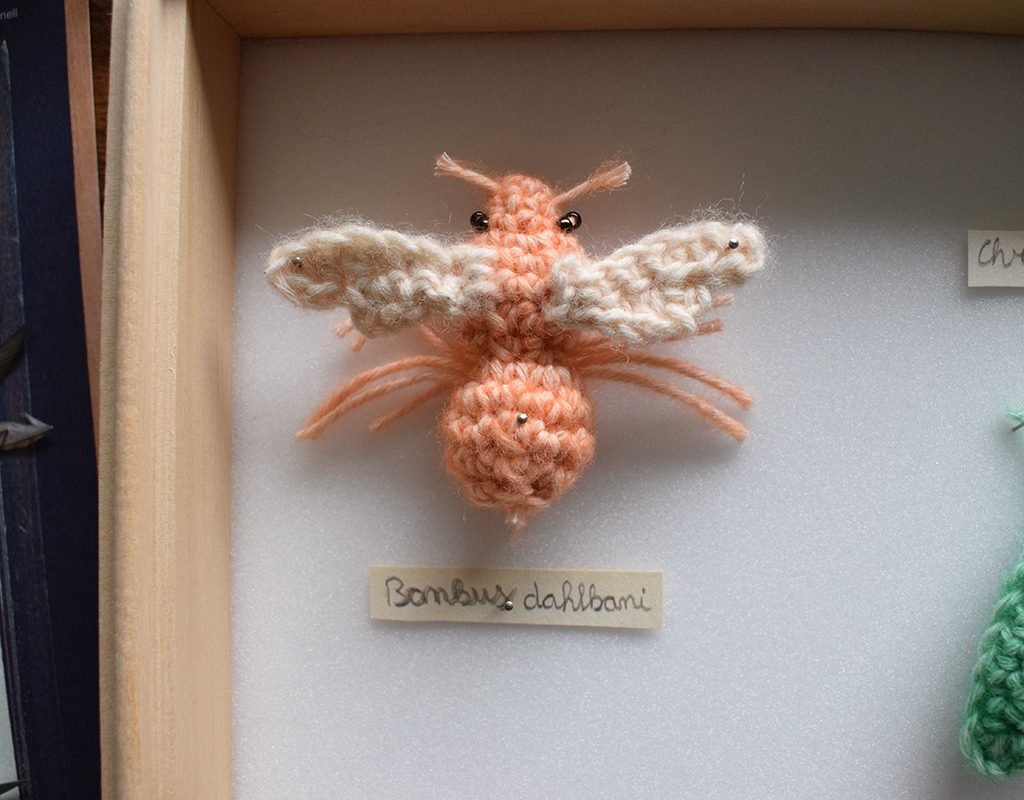
Head and body
Notes: You work the body seamlessly from the head to the tail in a spiral, so you will not close the round with a sl st. The first three rounds will form the head, R4-13 form the body.
R1 Using color 834/1026, in MR; work 5sc in MR, close ring. [5 sc]
R2 1sc in each st around. [5 sc]
R3 Rep R2. [5 sc]
R4 2sc in each st around. [10 sc]
R5 (1sc in sc, 2sc in next sc] 5 times. [15 sc]
R6 1sc in each st around. [15 sc]
Stuff body lightly, using stuffing or scraps of yarn.
R7 (sc2tog over next 2 st, 1sc in next st) 5 times. [10 st]
R8 (sc2tog over next 2 st) 5 times. [5 st]
Note that it’s rather fiddly to work into the sts on R9.
R9-13 Rep R4-8 once more, draw a loop and cut yarn, sew hole shut and work away yarn end through inside of body.
Wings – make two
R1 Using color 821/2017, ch7, starting in second ch from hook; 1hdc in next 3 ch, 1sc in next 2 ch, sl st in last ch, ch1, turn. [3 hdc, 2 sc]
R2 Sl st in sl st {see pic below}, 1sc in next st, 1hdc in next 2 st, fasten off. {Two sts remain unworked}.
Rep R1-2 for second wing, fastening off at the other side, so your yarn ends will not show.


Attaching wings to body
Sew the wings on the body with R1 facing upwards, between rounds 5-7 of the body (with the head facing upwards), leaving two sts between wings.
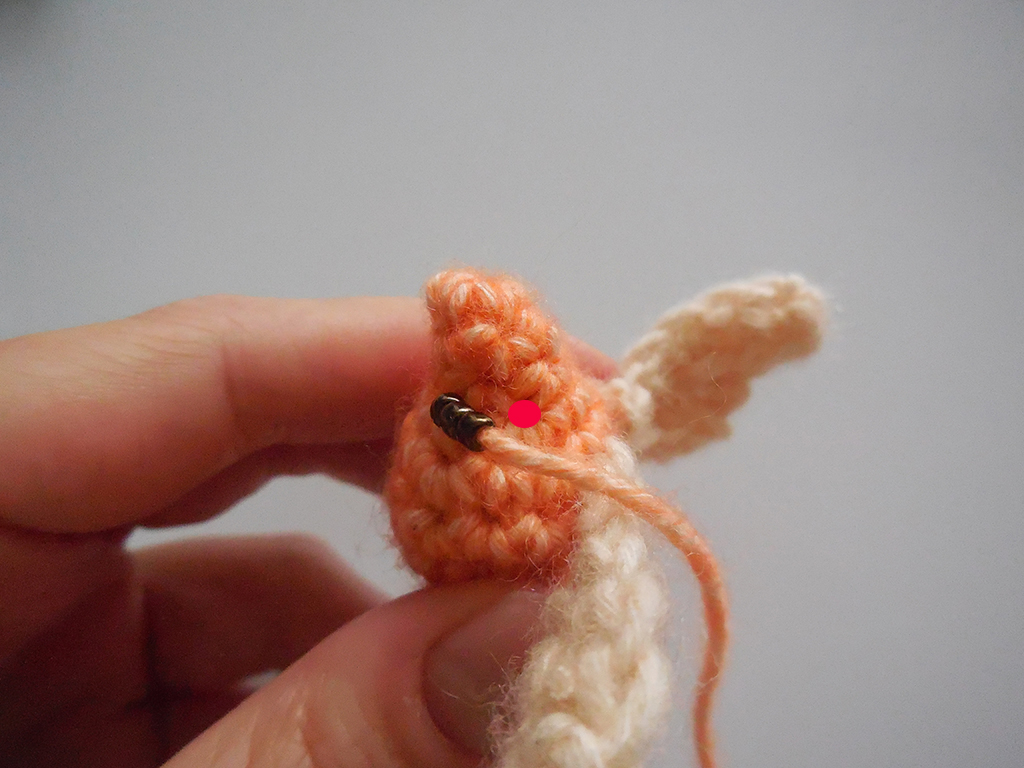
Eyes
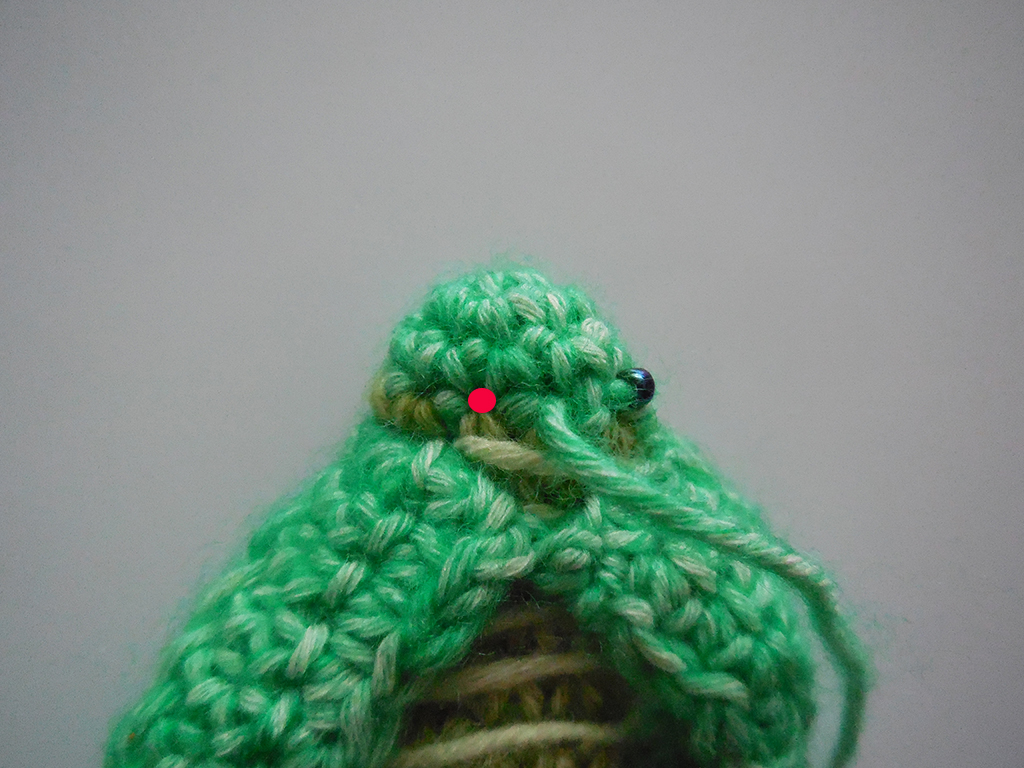
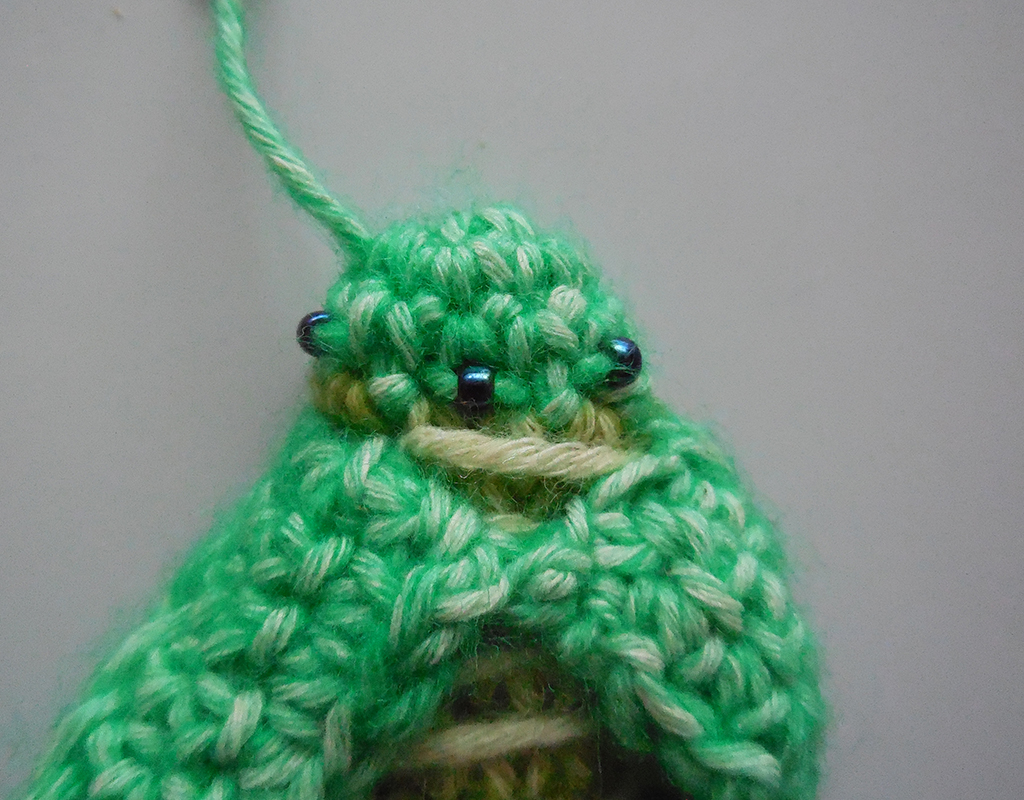
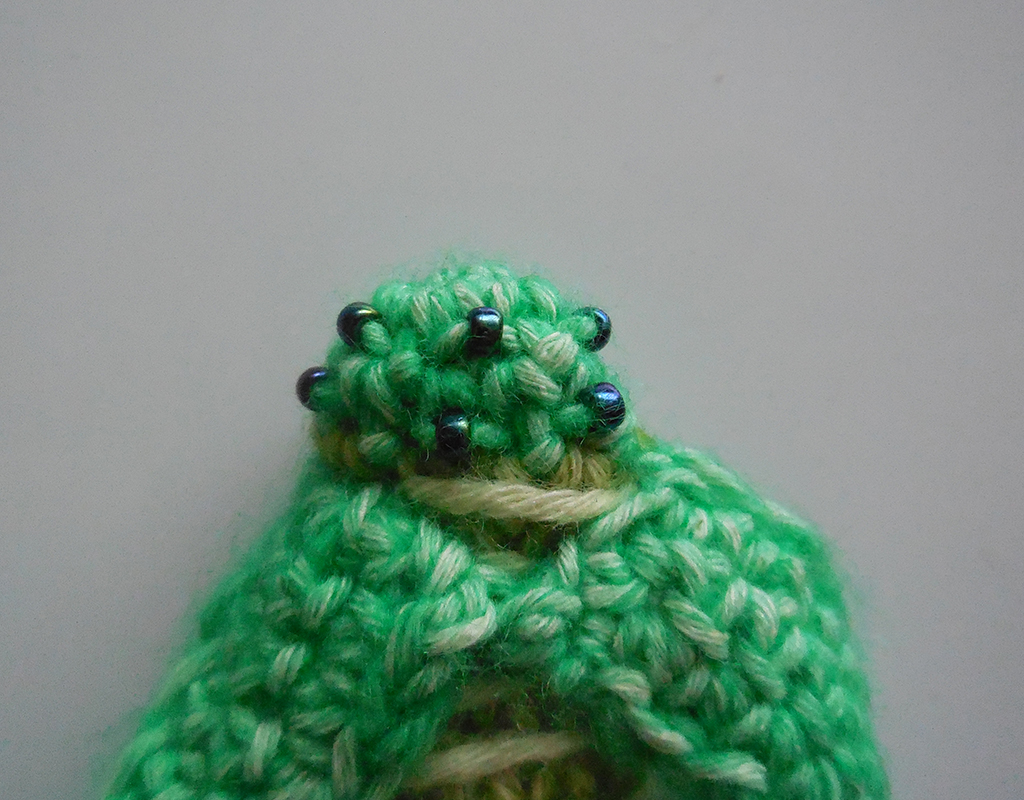
Cut a length of yarn color 834/1026 of approximately 20cm/8in. Thread yarn through darning needle and insert needle from the bottom of the body to the back of the head coming out in round 3 of the body at the side of the head shape. Pull yarn through until yarn end disappears inside body.
Step 1: Remove darning needle and insert yarn in beading needle, thread three beads with color number 83 onto yarn and insert yarn into darning needle again;

Step 2: Push beads to base of yarn and insert needle in st behind previous st and straight across the width of the head. Draw yarn through.
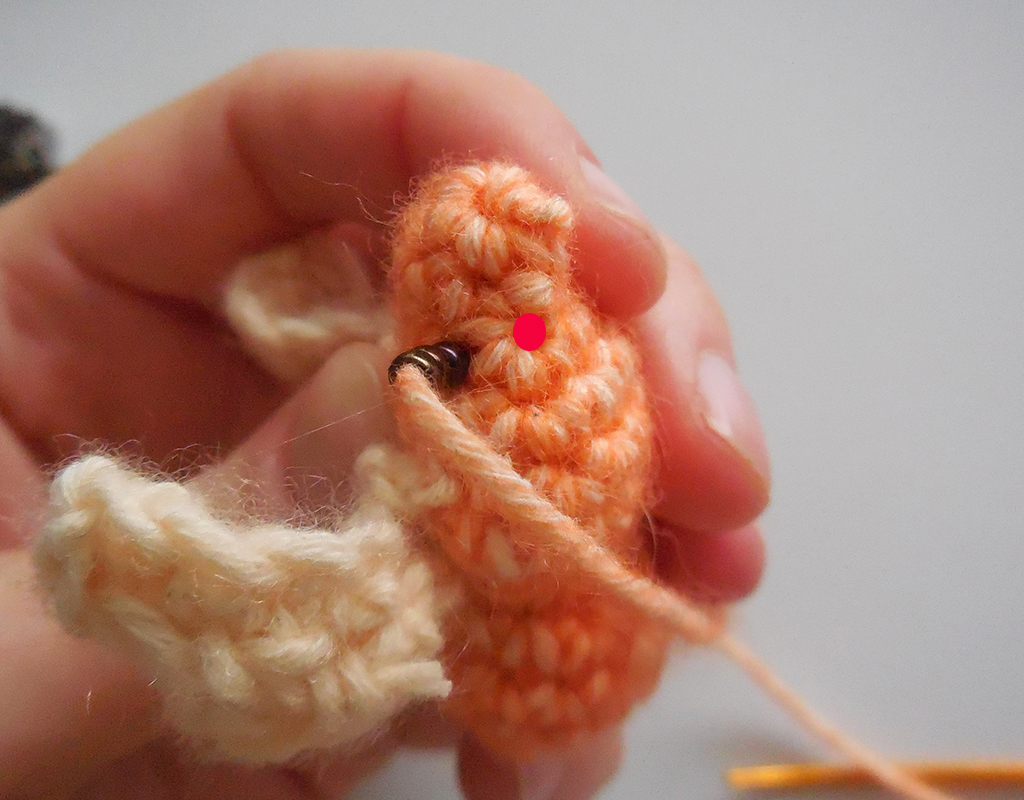

Step 3: Repeat step 1. Push beads to base of yarn and insert needle in st in front of previous st and straight down the body to the bottom of the body. Draw yarn through body and cut yarn, leaving the tiniest stinger poking out of the bottom.

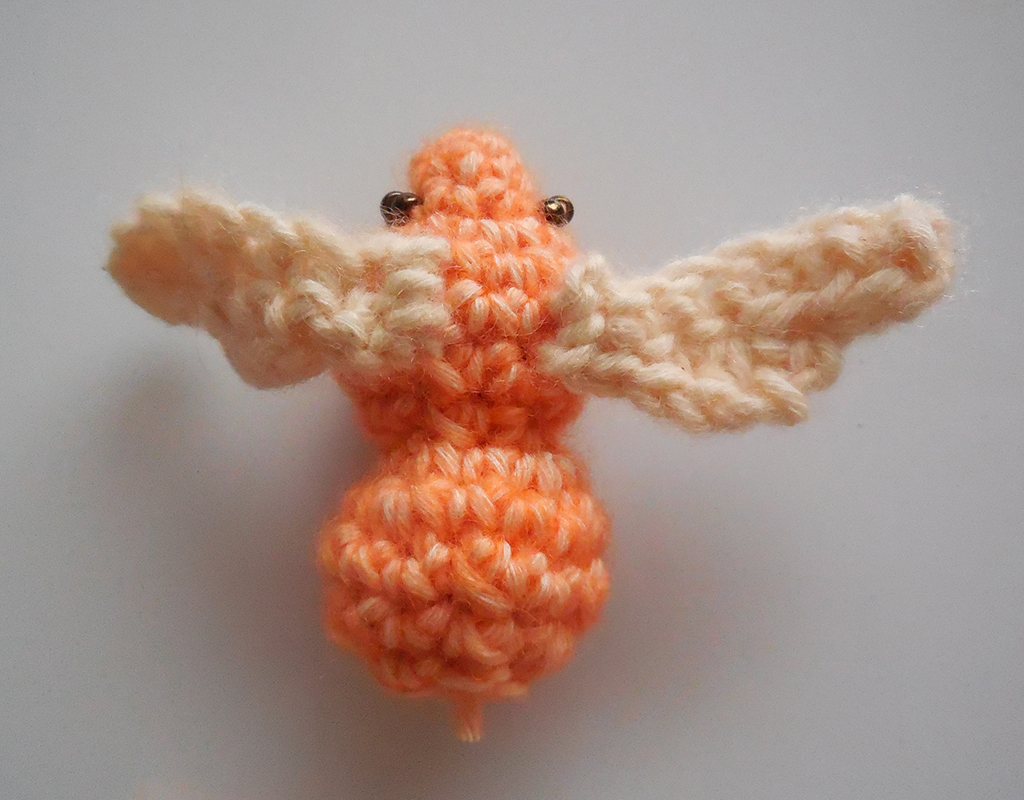
Antennae and legs
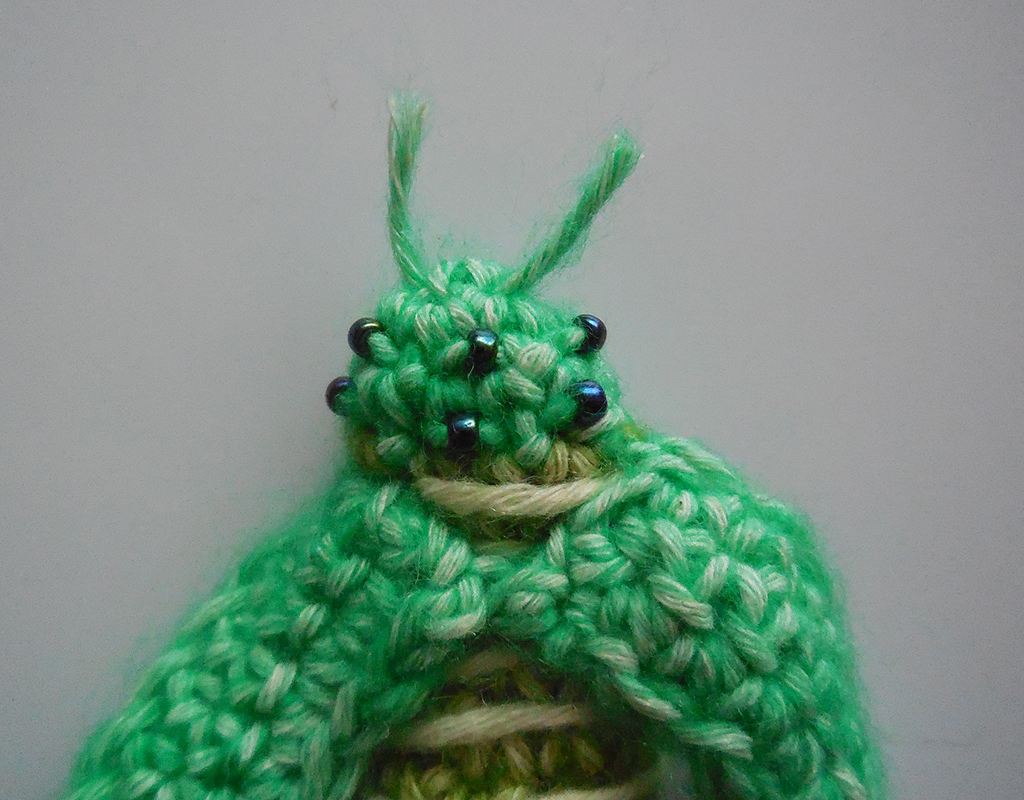
Antennae
Cut a length of yarn color 834/1026 of approximately 3cm/1.2in. Draw through the top of the head with a darning needle, while pinching one end of the yarn, so you don’t pull it all through.
Legs
Cut four pieces of yarn color 834/1026 of approximately 6cm/2.4in. Draw two pieces through round 5 across the width of the body, draw two pieces through round 8. Cut two more pieces of approximately 8cm/3.2in. Draw these two pieces through round 9.
Finishing
Gently but firmly roughen up the fibers of the body with a comb or with your fingers, to make it look hairy like a proper bumblebee.
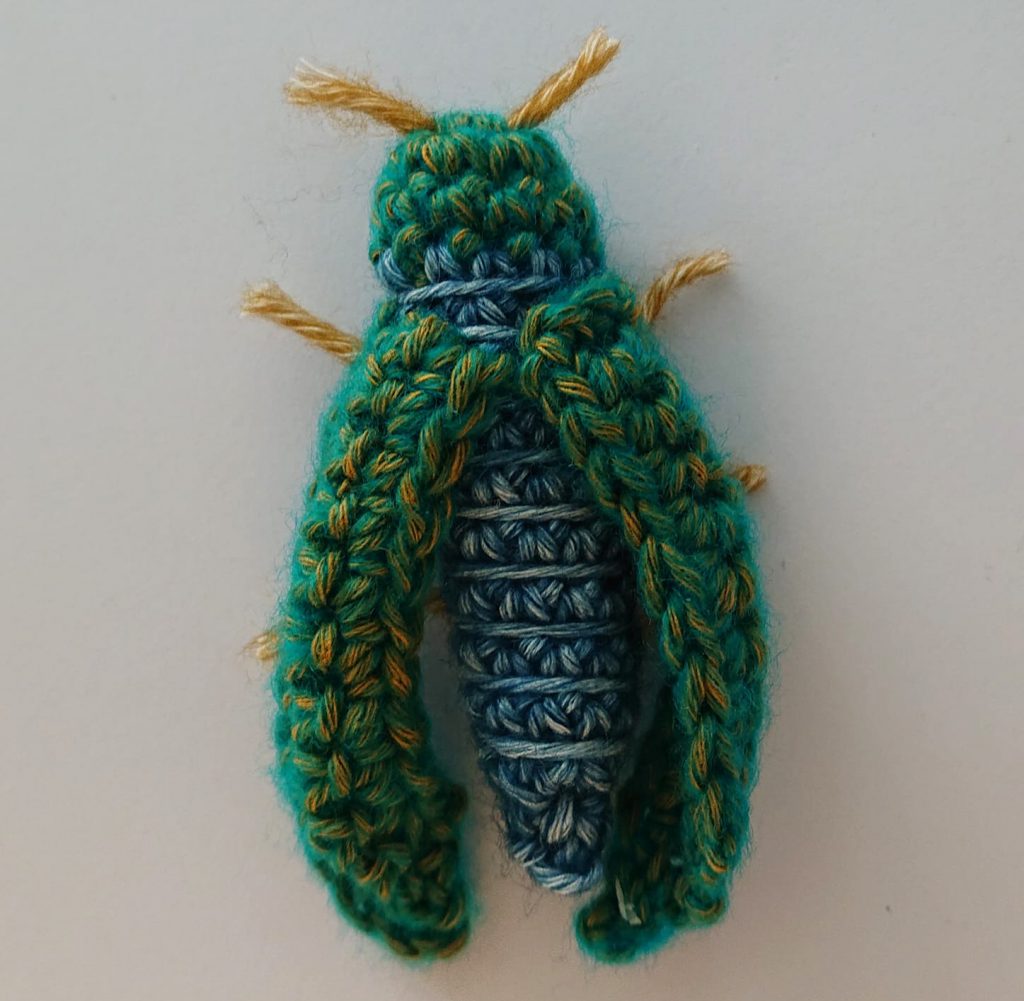
~Mineralogy colorway – Peacock carpenter bee – Xylocopa bombylans~

Work all the instructions of the Patagonian bumblebee of the Herbarium colorway, but using the following colors:
Body R1-8: 815/1062
Body R9-13: 955/2016
811/1277 for the wings. 815/1062 to attach the beads on the head and for the antennae and legs.
~Conchology colorway – Large earth bumblebee – Bombus terrestris~
Work all the instructions of the Patagonian bumblebee of the Herbarium colorway, but using the following colors:
Body R1-2: 830/2007
Body R3-4: 809/1823
Body R5-7: 830/2007
Body R8-9: 809/1823
Body R10-11: 830/2007
Body R12-13: 801/1218
801/1218 for the wings. 830/2007 to attach the beads on the head and for the antennae and legs.
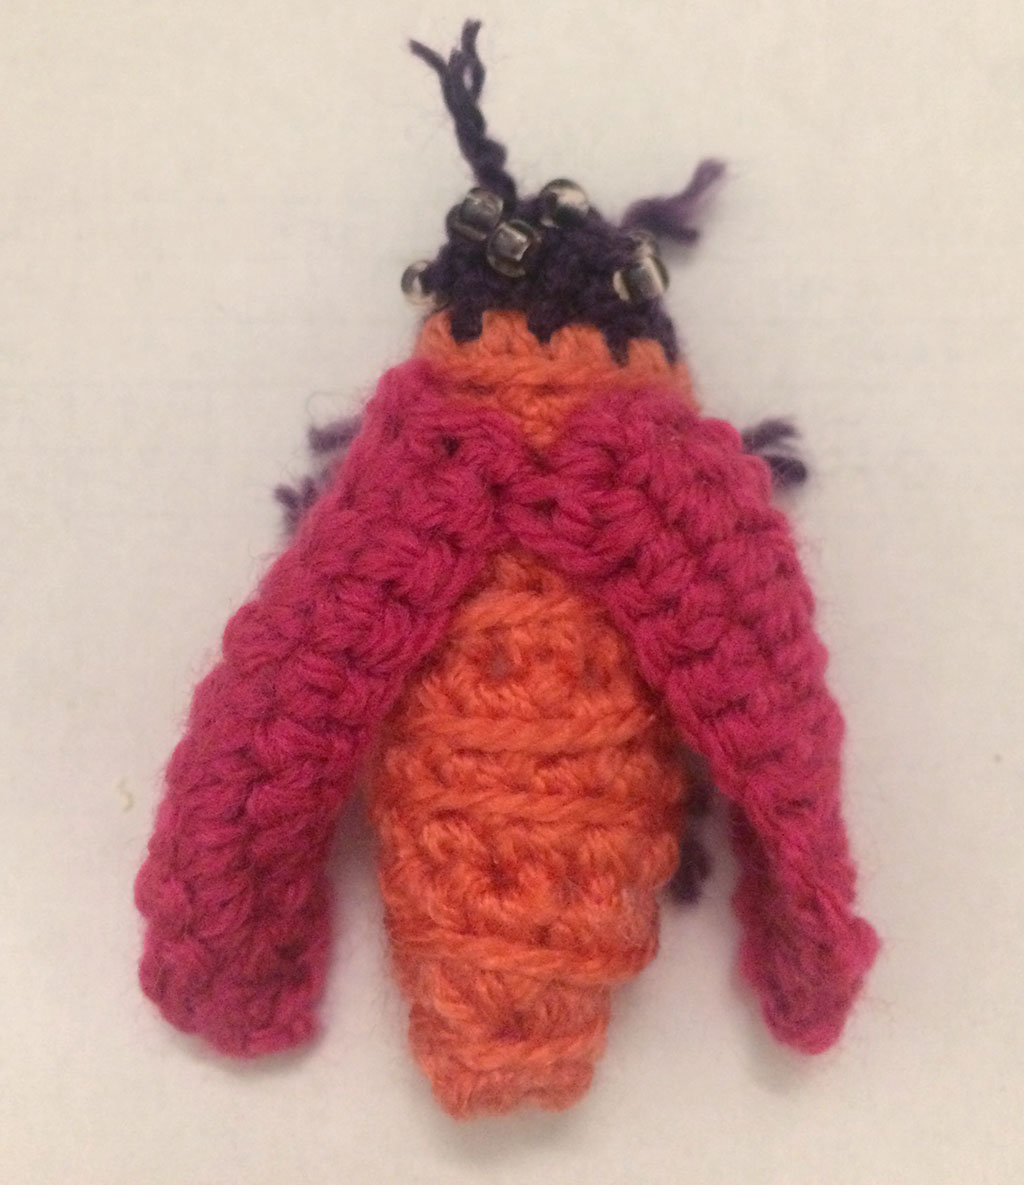
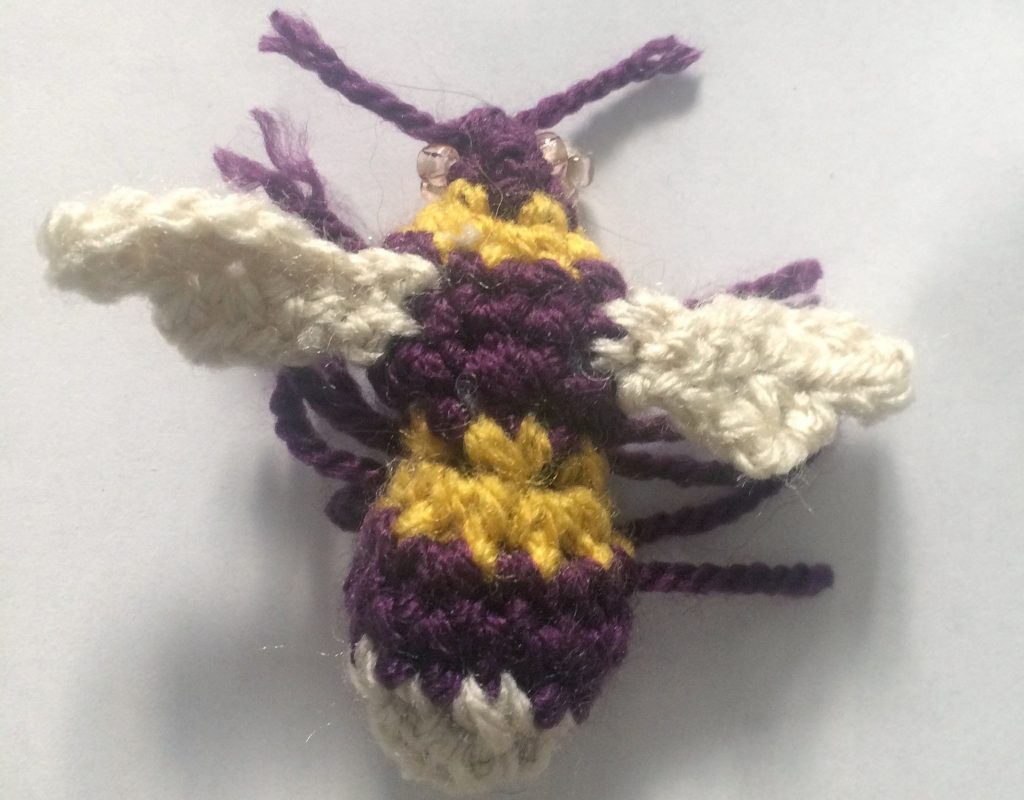
~Entomology colorway – Common teddy bear bee – Amegilla bombiformis~
Work all the instructions of the Patagonian bumblebee of the Herbarium colorway, but using the following colors:
Body R1-8: 832/1823
Body R9: 829/1054
Body R10: 832/1823
Body R11: 829/1054
Body R12: 832/1823
Body R13: 829/1054
802/2019 for the wings. 832/1823 to attach the beads on the head and for the antennae and legs.
Butterfly or moth pattern
Instructions contain four different butterflies or moths corresponding to your kit/colorway. Go to the header corresponding to your colorway and follow the instructions.
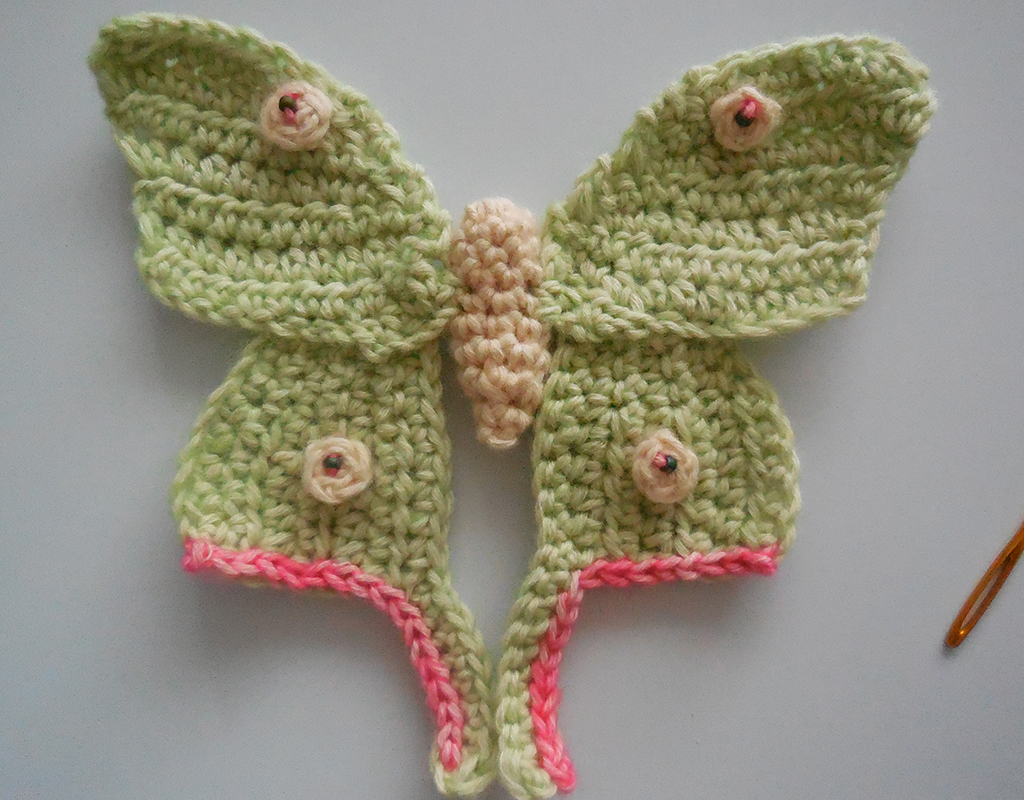
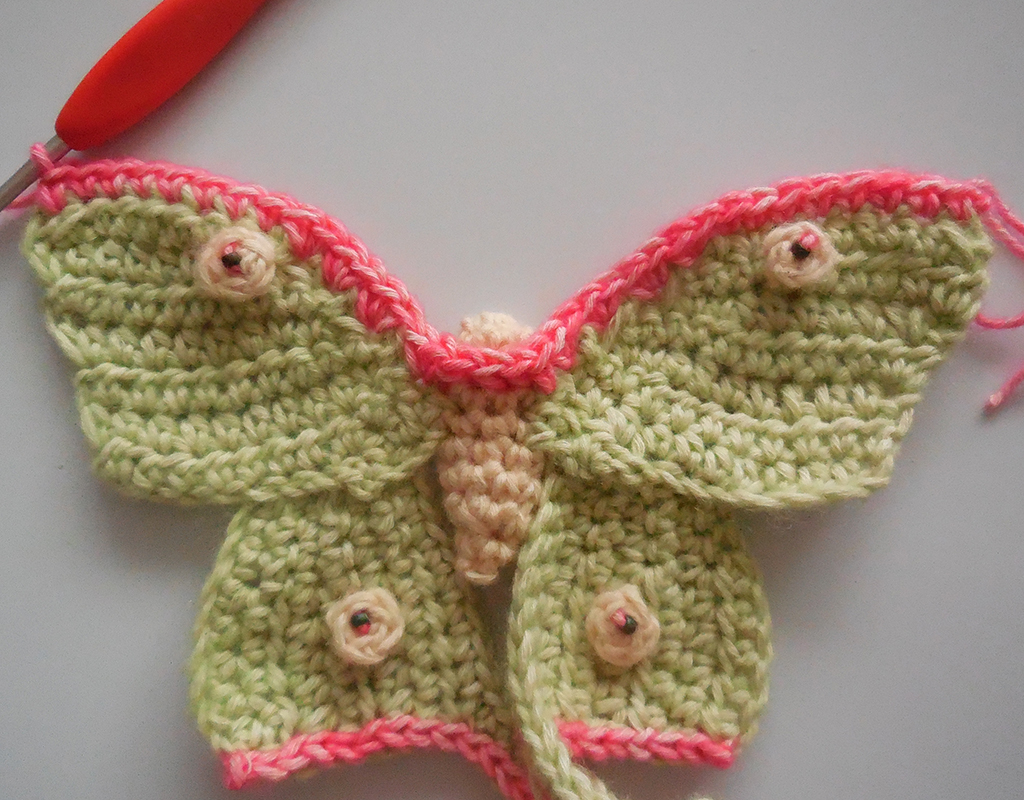
~Herbarium colorway – Luna moth – Actias luna~
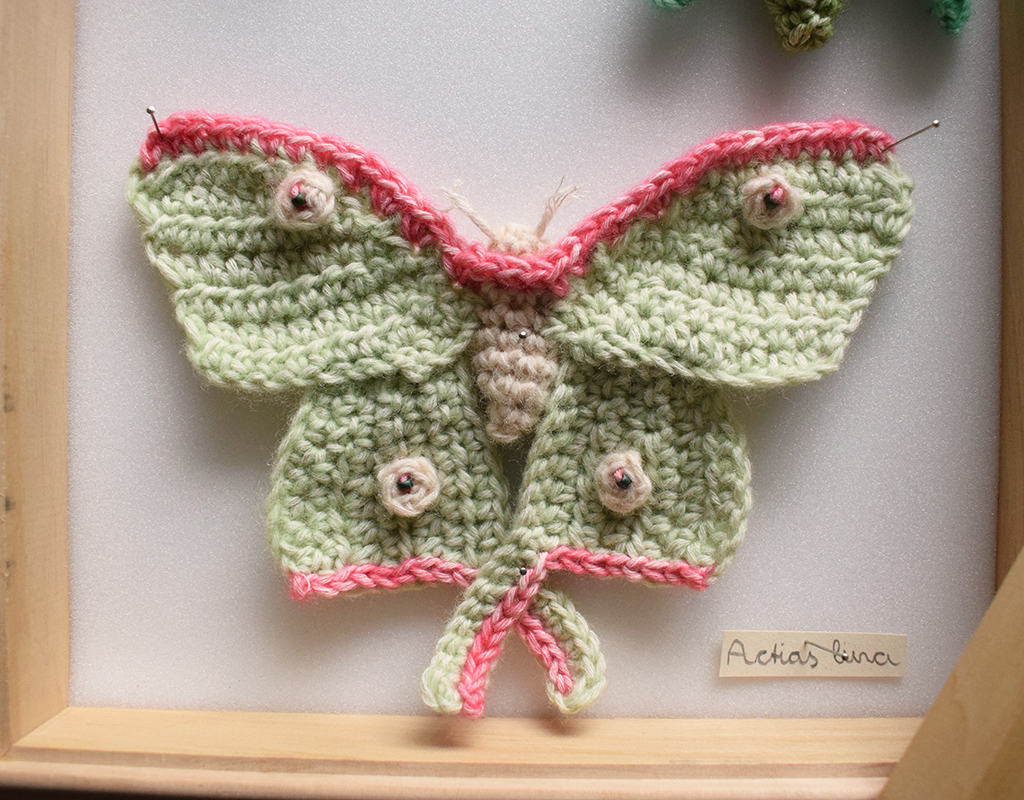
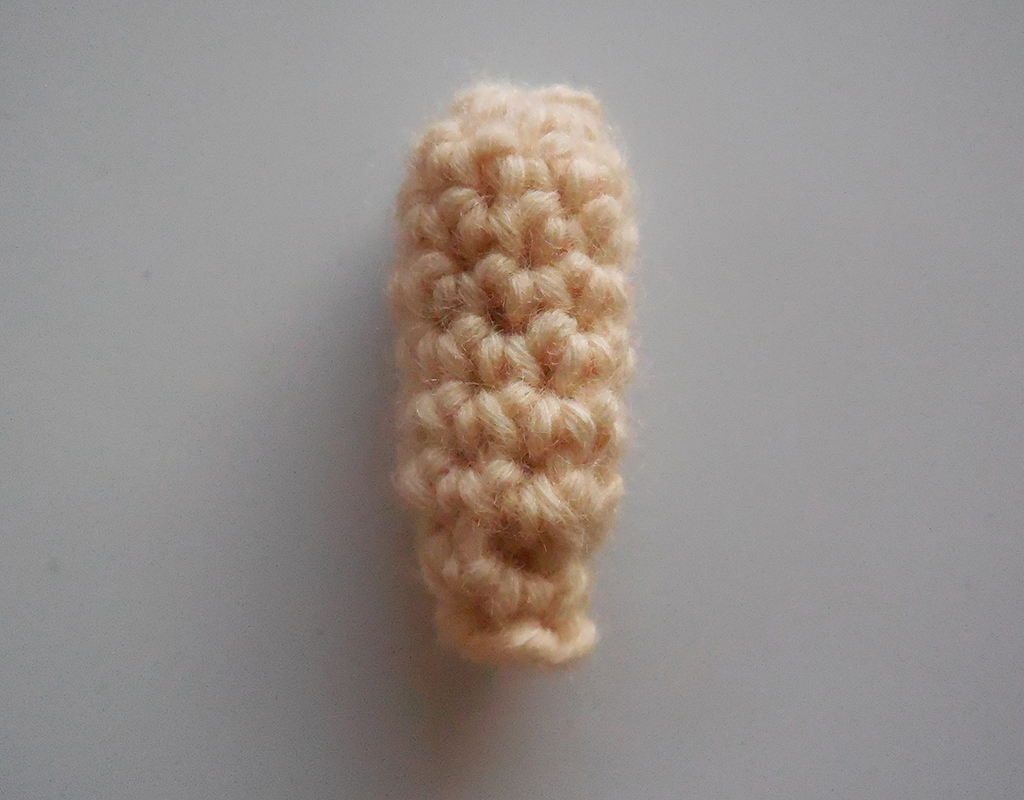
Head and body
Notes: You work the head and body seamlessly from the head to the tail in a spiral, so you will not close the round with a sl st.
R1 Using color 821/1218, in MR; work 8sc in MR, close ring. [8 sc]
R2 1sc in each st around. [8 sc]
R3-7 Rep R2 for five more times. [8 sc]
Stuff body lightly, using stuffing or scraps of yarn.
R8 (sc2tog over next 2 st) 4 times. [4 st]
R9 1sc in each st around, draw a loop and cut yarn, sew hole shut and work away yarn end through inside of body.
Upper wings – make two
R1 Using color 819/1020, ch5, starting in second ch from hook; 1hdc in next 4 ch, ch8, turn. [4 hdc, 8 ch]
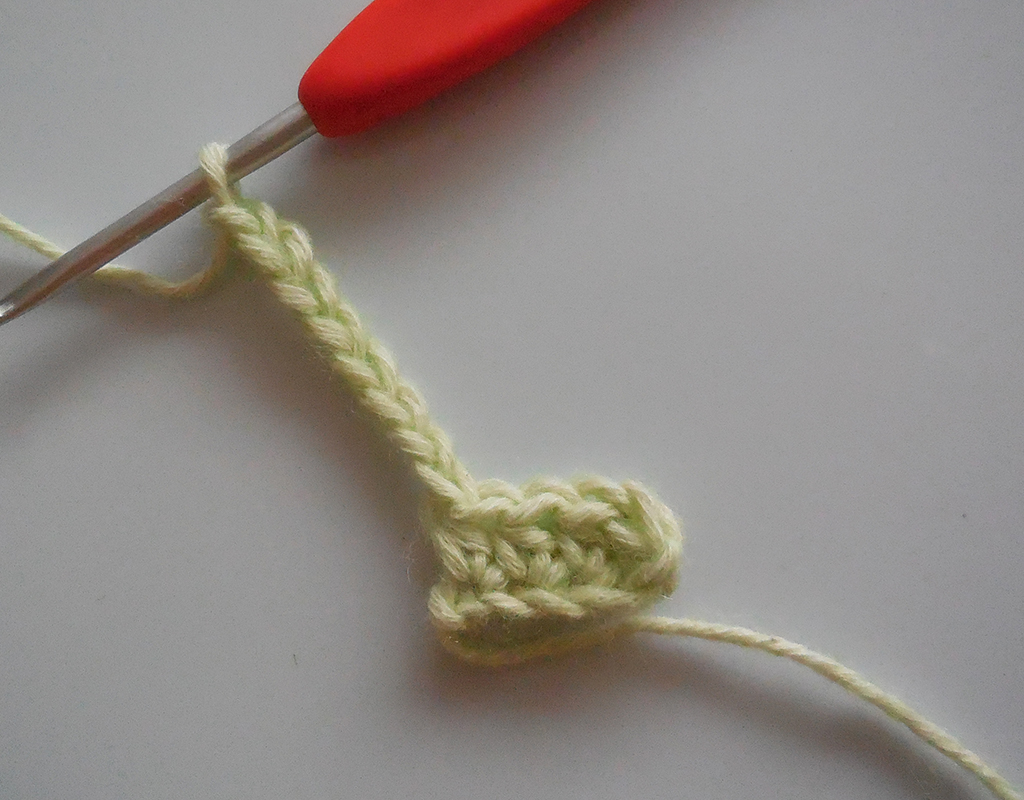
R2 Starting in second ch from hook; 1hdc in next 7 ch, 1hdc in next st {see arrow pic below}, 1sc in next 2 st, sl st in last st, ch1, turn. [11 st]
R3 sl st in sl st {see pic below}, 1sc in next st, 1hdc in last 9 st, ch1, turn. [11 st]
R4 1hdc in first 7 st,1sc in next 2 st, sc2tog over last 2 st, ch1, turn. [10 st]
R5 sc2tog over first 2 st, 1sc in next 2 st, 1hdc in next 5 st, 2hdc in last st, ch1, turn. [10 st]
R6 2hdc in first st, 1hdc in next 5 st, 1sc in next 2 st, sc2tog over last 2 st, ch1, turn. [10 st]
R7 Rep R5.
R8 hdc2tog over first two st {see pics below}, 1hdc in next 4 st, 1sc in next 2 st, sc2tog over last 2 st, fasten off all yarn ends. [8 st]
Rep R1-8 for second wing, fastening off at the WS, so your yarn ends will not show.
Lower wings – make two
R1 Using color 819/1020, ch10, starting in second ch from hook; 1hdc in next 5 ch, 1sc in next 3 ch, sl st in last ch, ch1, turn. [9 st]
R2 Sl st in sl st, 1sc in next 3 st, 1hdc in last 5 st, ch1, turn. [9 st]
R3 1hdc in first 5 st, 1sc in next 3 st, sl st in last sl st, ch1, turn. [9 st]
R4-5 Rep R2-3 once.
R6 Sl st in sl st, 1sc in next 3 st, 1hdc in last 5 st, ch10, turn. [9 st, 10 ch]
R7 Starting in second ch from hook; 1sc in next 9 ch, 1sc in next 8 st {start at arrow pic below}, sl st in last sl st, leave a tail of approximately 20cm/8in for attaching wings to body, fasten off beginning yarn end. [18 st]
Rep R1-7 for second wing, fastening off beginning yarn end at the WS, so your yarn ends will not show.
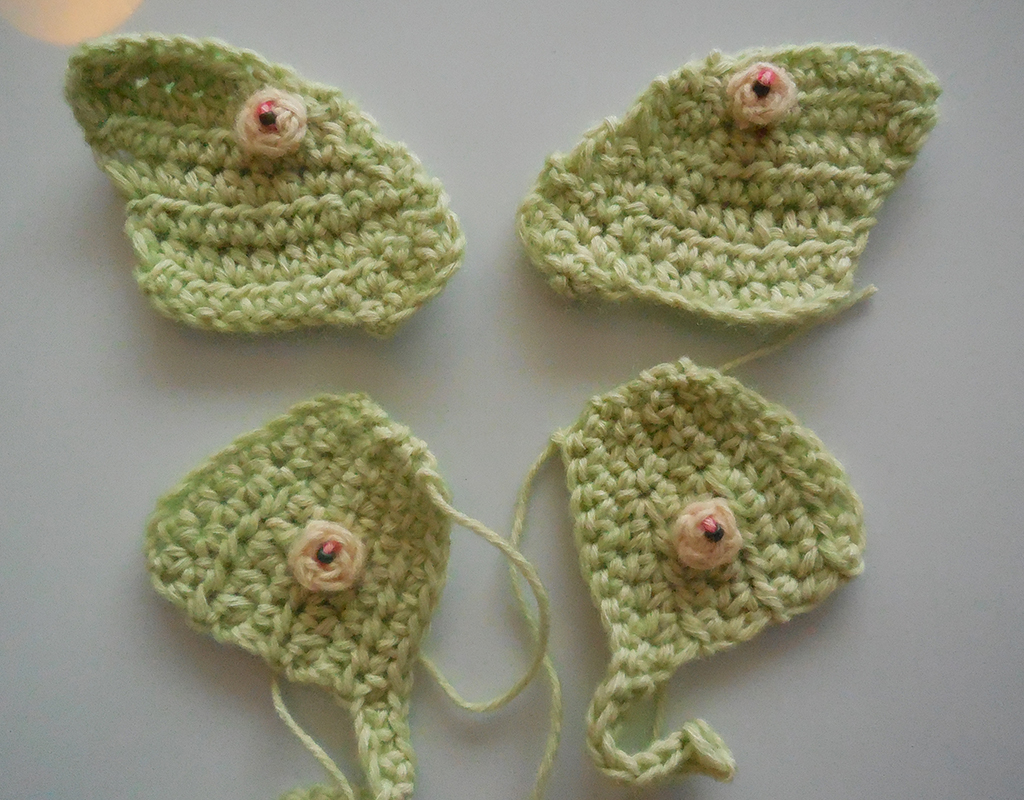
Eyes on the wings (make 4)
Using color 821/1218, in MR; work 4sc in MR, close ring, fasten off. [4 sc]
Cut four pieces of yarn of color 835/2013 of approximately 20cm/8in. Attach the eyes by threading a piece of yarn through the back of the right upper wing in the second to last row in the third st from the left.
Step 1: Thread one eye through the middle and push eye down to wing.
Step 2: Attach bead color 710 with beading needle and push down to base of eye.
Step 3: Go back down in the eye in the st above the middle of the eye and through the wing, fasten off at the back of the wing.

Rep the steps above for the other three wings in the following places:
Left upper wing: second to last row in the third st from the right.
Right lower wing: between rows 4 and 5 in the fifth st from the bottom.
Left lower wing: between rows 4 and 5 in the fifth st from the bottom.
Coloring on the lower wings edges
Using color 821/1218 and with RS facing;
Left lower wing: Work sl st evenly along the side of the rows and 1 sl st in each of bottom chain of the tail, fasten off.
Right lower wing: Work 1 sl st in each bottom chain of the tail and work sl st evenly along the side of the rows, fasten off.
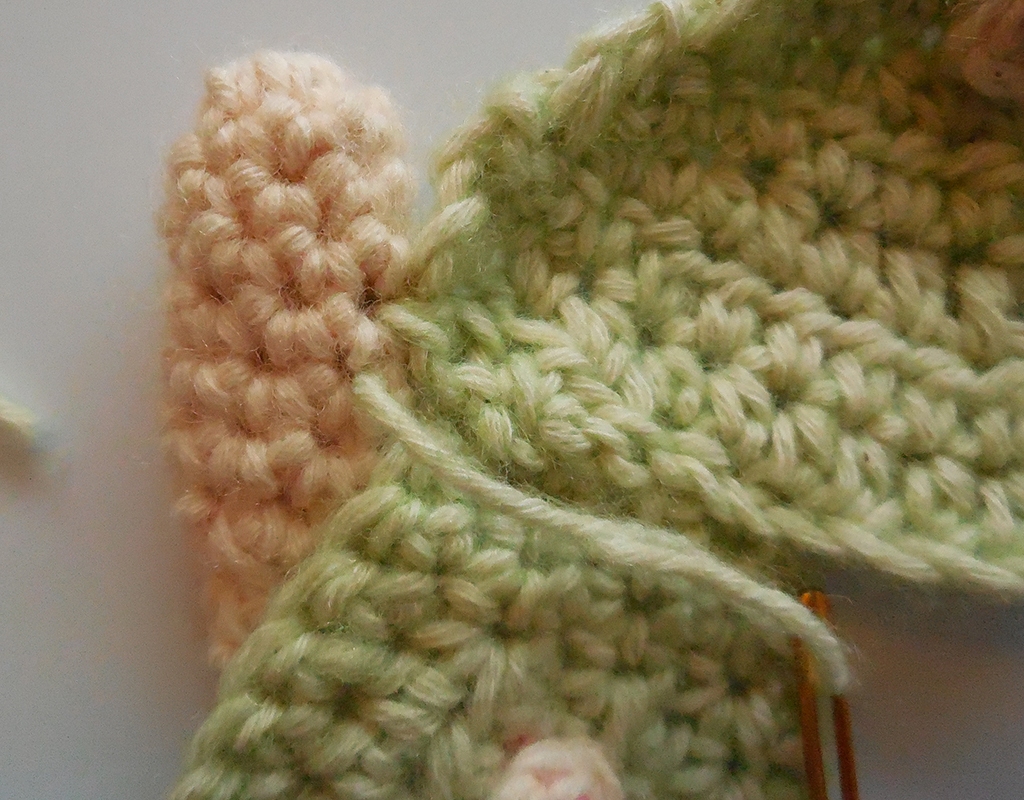
Attaching wings to body
Sew the top section of lower wings to bottom section of upper wings, beginning at the center of the first row of the upper wings, working your way across to end of lower wings.
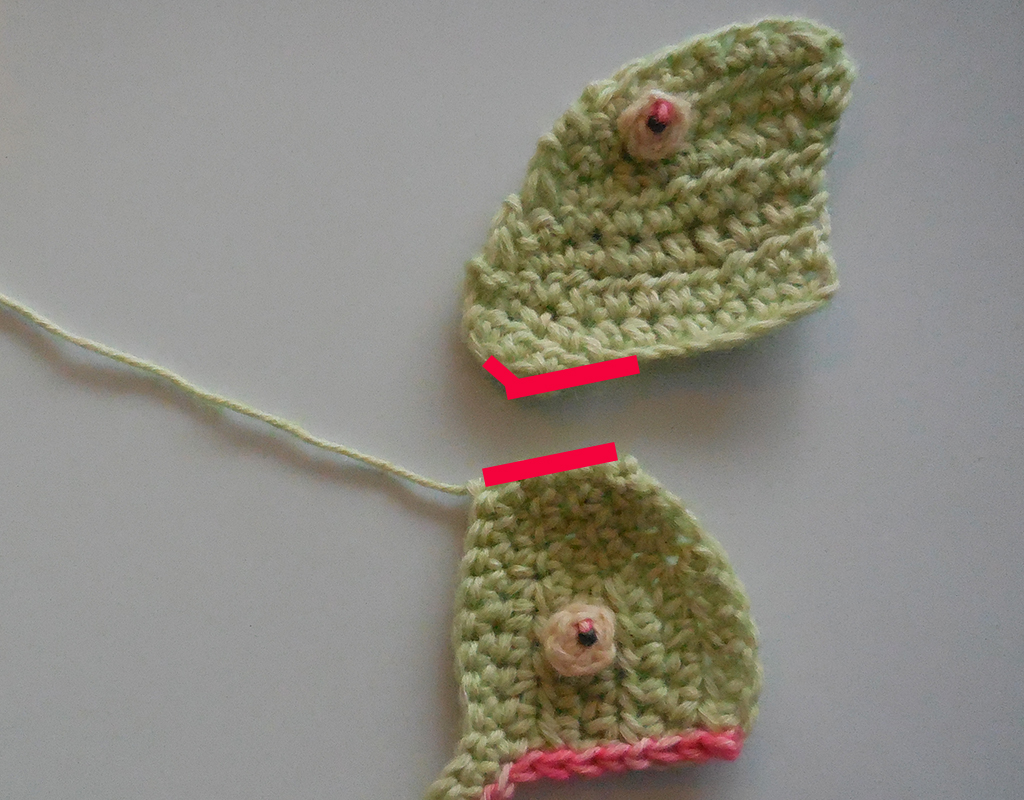
Sew the wings securely to the body between rounds 4-5 of the body (with the widest part facing upwards), leaving two sts between wings.
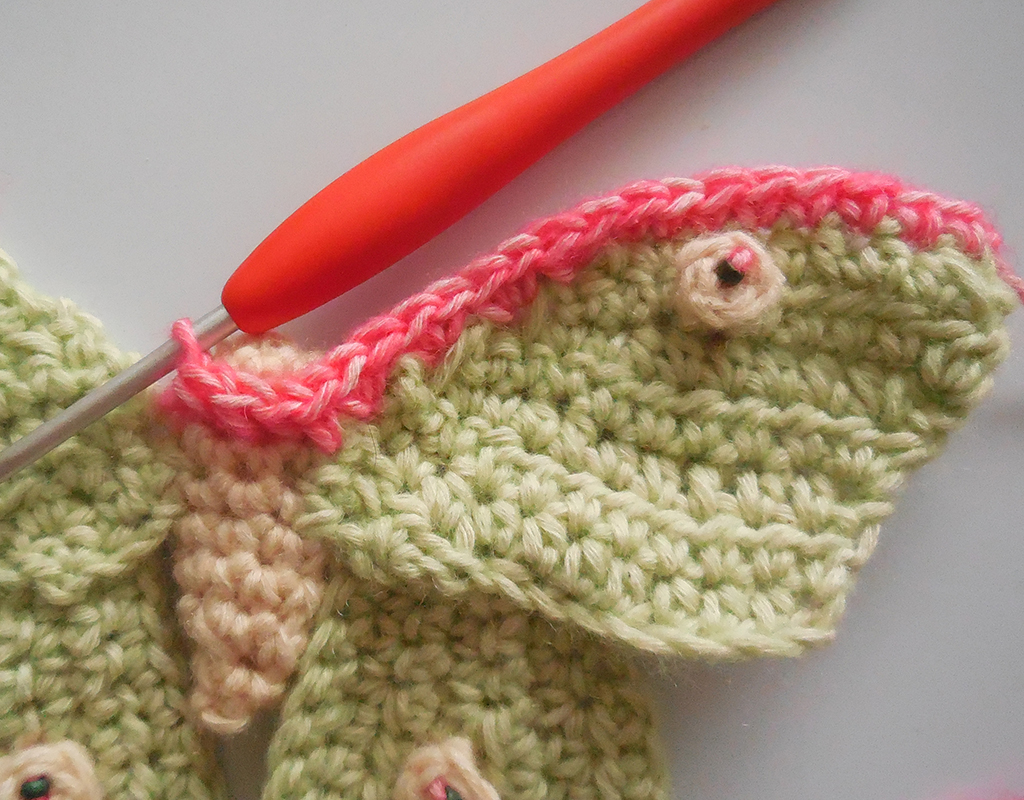
Coloring on upper wings edges
Using color 821/1218 and with RS facing;
Right upper wing: Work 1sc in each st at the top of the wing and work sc evenly along the side of the rows at the top of the wing until you’ve reached the point where you joined the wings to the body.
Body: work 1sc over the next 3 st of round 3 of the body, working around the post of the sc’s.
Left upper wing: Work sc evenly along the side of the rows at the top of the wing, work 1sc in each st at the top of the wing until you’ve reached the end of the top of the wing, fasten off.


Antennae and legs
Antennae
Cut a piece of yarn color 821/2017 of approximately 4cm/1.6in. Draw through the top of the head with a darning needle, while pinching one end of the yarn, so you don’t pull it all through.
Legs
Cut six pieces of yarn color 821/2017 of approximately 6cm/2.4in. Draw one piece through round 3 across the width of the body, draw the second piece across the width of the body one round below, do the same with the third piece.
Finishing
Gently but firmly roughen up the fibers of the body with a comb or with your fingers, to make it look hairy like a proper moth. Pick apart the yarn of the antennae a bit to make it looks like moth antennae.
~Mineralogy colorway – Purple-bordered Gold – Idaea muricata~

Body
Work the body instructions of the Luna moth of the Herbarium colorway, using colors 943/1023.
Upper wings
Work the upper wings instructions of the Luna moth of the Herbarium colorway, using colors 943/1023.
Lower wings
R1-5 Work R1-5 of lower wings instruction of the Luna moth of the Herbarium colorway, using colors 943/1023.
R6 Sl st in sl st, 1sc in next 3 st, 1hdc in last 5 st, ch1, turn. [9 st]
R7 1sc in first 8 st, sl st in last sl st, leave a tail of approximately 20cm/8in for attaching wings to body, fasten off beginning yarn end. [9 st]
Rep R1-7 for second wing, fastening off beginning yarn end at the WS, so your yarn ends will not show.
Eyes for the wings (make 4)
Work eye instructions of the Luna moth of the Herbarium colorway, using color 812/1712 to make the eyes for the wings and to attach the beads and eyes on the wings.
Coloring on the upper and lower wings edges
Using color 812/1712 and with RS facing;
Left and right lower wing: Work sl st evenly along the side of the rows at the bottom of the wings , fasten off.
Left and right upper wing: Work sl st evenly along the side of the rows at the side of the wings, fasten off.
Attaching wings to body
Work attaching instructions of the Luna moth of the Herbarium colorway, using colors 943/1023.
Antennae and legs
Work antennae and legs instructions of the Luna moth of the Herbarium colorway, using colors 812/1712 for the antennae and 943/1023 for the legs.
Finishing
Work finishing instructions of the Luna moth of the Herbarium colorway.
~Conchology colorway – Albino luna moth – Actias luna~

Work all the instructions of the Luna moth of the Herbarium colorway, but using the following colors:
801/1218 for the body and upper and lower wings.
830/2007 for the eyes and 801/1218 for attaching the beads and eyes to the wings.
801/1218 for coloring on the lower wings edges and attaching the wings to the body.
830/2007 for the coloring on upper wings edges, the antennae and legs.
~Entomology colorway – Blue moon butterfly – Hypolimnas bolina~

Body & Upper wings
Work the body and upper wings instructions of the Luna moth of the Herbarium colorway, using colors 803/2018.
Lower wings
R1-5 Work R1-5 of lower wings instruction of the Luna moth of the Herbarium colorway, using colors 803/2018.
R6 Sl st in sl st, 1sc in next 3 st, 1hdc in last 5 st, ch1, turn. [9 st]
R7 1sc in first 8 st, sl st in last sl st, leave a tail of approximately 20cm/8in for attaching wings to body, fasten off beginning yarn end. [9 st]
Rep R1-7 for second wing, fastening off beginning yarn end at the WS, so your yarn ends will not show.
Eyes for the wings
Eyes for upper wings (make two):
Using color 813/1820, in MR; work (2sc, 1hdc, 1dc, 1hdc) in MR, close ring, fasten off. [5 st]
Use color 805/1708 to attach the beads and eyes on the upper wings as described in instructions of the Luna moth of the Herbarium colorway, attaching the drop shaped eyes with the highest point towards the body of the butterfly.
Eyes for lower wings (make two): Work eye instructions of the Luna moth of the Herbarium colorway, using color 805/1708. Use color 813/1820 to attach the beads and eyes on the lower wings.
Coloring on the upper wings
See Tips & techniques for how to make a French knot.
Using color 813/1820 and with RS facing;
Right wing: Make a French knot on the third st from the right of R8 of the upper wing.
Left wing: Make a French knot on the third st from the left of R8 of the upper wing.
Coloring on the lower wings edges
Using color 813/1820 and with RS facing;
Work sl st evenly along the side of the rows at the bottom of the lower wings , fasten off.
Attaching wings to body, antennae and legs
Work instructions for attaching the wings, using colors 803/2018, but make sure to attach the whole of the bottom of the upper wings to the top of the lower wings {see picture of butterfly for reference}.
Work instructions for antennae and legs of the Luna moth of the Herbarium colorway, using colors 803/2018.
Finishing
Work finishing instructions of the Luna moth of the Herbarium colorway.
Displaying the insects
Pin the three insects you’ve made in your display case or frame, using stainless steel headless pins. Pin them from top to bottom in the order of bee, beetle, moth/butterfly.
Use one pin through each body and several pins to smooth out the wings.
Write down the scientific names of your insects in your neatest handwriting. Cut out the names and pin them down near the insects.
I love to see your creations! Please share on Facebook or tag me on Instagram (@aspoonfulofyarn)! And if you have a question, please don’t hesitate to ask using the contact page.
************************************************************************
Affiliate disclaimer
This post contains affiliate links. When you click this link and purchase something, I will get a small commission, but it will not cost you extra money. This way you can support my blog and I can keep making free patterns.
Copyright
All patterns are for unlimited personal use. Do not reproduce, sell or publish (parts of) the patterns. Patterns may not be copied in any way (print or digitally), in part or in full, except for personal use. Items may be sold that are made from this pattern as long as the designer is credited.
Discover more from A Spoonful of Yarn
Subscribe to get the latest posts sent to your email.