Klik hier voor de Nederlandse versie
Backstory – Donating to WIRES

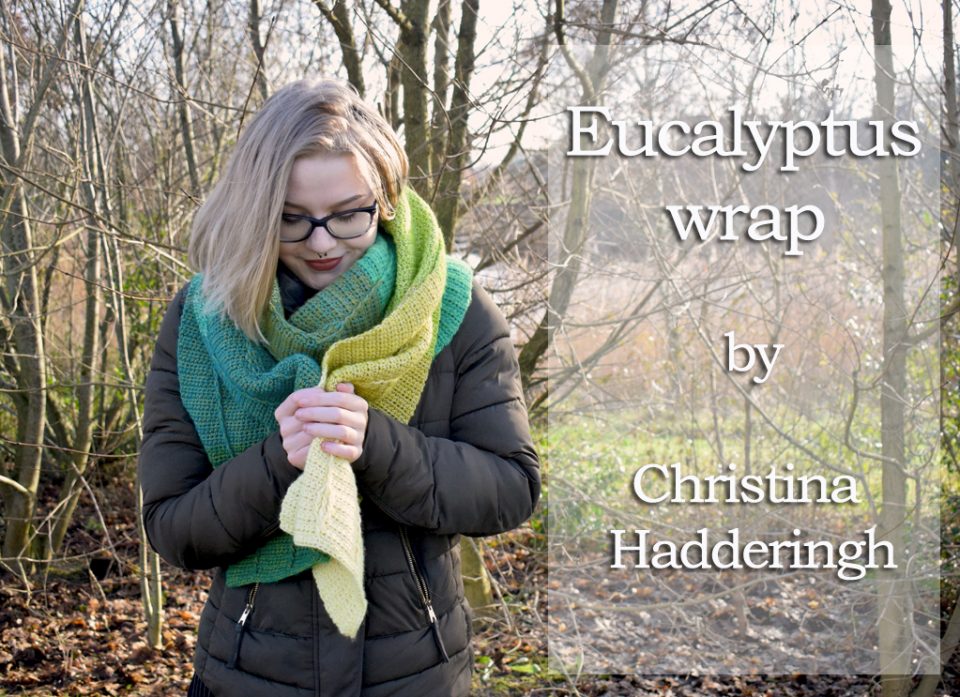
This pattern was created to help combat the devastating bushfires in Australia that were raging from September 2019 to March 2020. You can follow the pattern here on my blog, OR you can purchase the PDF version for €1.99. From January to March 2020 €1.50 of each copy sold has been donated to WIRES, Australia’s biggest wildlife rescue organisation.
From January to April 2020 there has been made a total donation of 482.34 AUD
Poem
This pattern is part of the Poetry Collection. Each pattern in this collection is accompanied by a poem. Read more via this link.
So devastating
White and grey, scared eyes, charred skin
Hope for water, green
Yarn
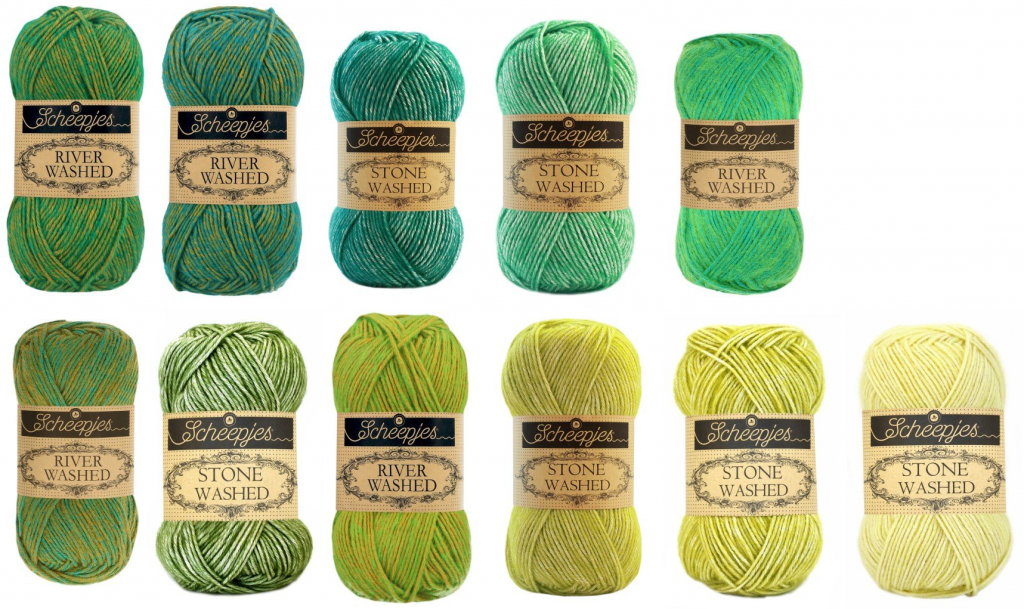
Scheepjes Stone Washed (SW) and River Washed (RW)* (78% Cotton, 22% Acrylic) in the following colors:

Prefer different colors? Check out this page for more color options : )
If you don’t have a Scheepjes retailer nearby, please consider buying your Scheepjes yarn via one of the links below. It will give me a small commission, but it won’t cost you anything extra.
UK/International: Wool Warehouse , The Knitting Network or Black Sheep Wools
Benelux: Caro’s Atellier
List of all Scheepjes retailers: Scheepjes website
Other notions
- 4.5mm hook or other size to obtain gauge
- Darning needle and thread clipper
- Blocking materials
Gauge & Size
10x10cm/4×4” = 16 sts and 16 rows in pattern. The wrap measures 38cm/15.2” wide and 210cm/84” long after blocking.
One color block measures approximately 19cm/7.6” high.
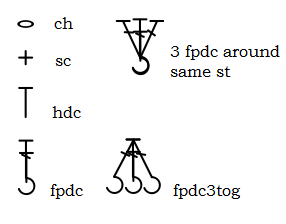
Stitches & Abbreviations (US terms)
ch chain
sk skip
st stitch
hdc half double crochet
sc single crochet
fpdc front post double crochet: yo, place your hook in before the post of the indicated st from front to back, place your hook to the front again after the post of the indicated st, yo and pull up loop, (yo and draw through 2 loops) 2 times.
fpdc3tog front post double crochet 3 together: *yo, place your hook in before the post of the indicated st from front to back, place your hook to the front again after the post of the indicated st, yo and pull up loop, yo and draw through first 2 loops* rep from * to * in the next two indicated st, yo and pull through all 4 loops on hook.
rep repeat
RS right side of your work
WS wrong side of your work
[…] work between brackets for the number of times indicated in the pattern
*…* work between asterisk for the number of times indicated in the pattern
{abc} notes and references to pictures are given between these brackets in cursive
Notes & Tips
- Turning chains never count as a stitch, so you will not skip the first stitch of the row.
- If you like to alter the width, you can add 10 chains at a time to the starting chain to add one more front post column. If you like to alter the length, you can add row repeats.
- There will be 12 fpdc between each eucalyptus leaf.
- Columns 1, 3 and 5 have 10 leaves and columns 2 and 4 have 9 leaves.
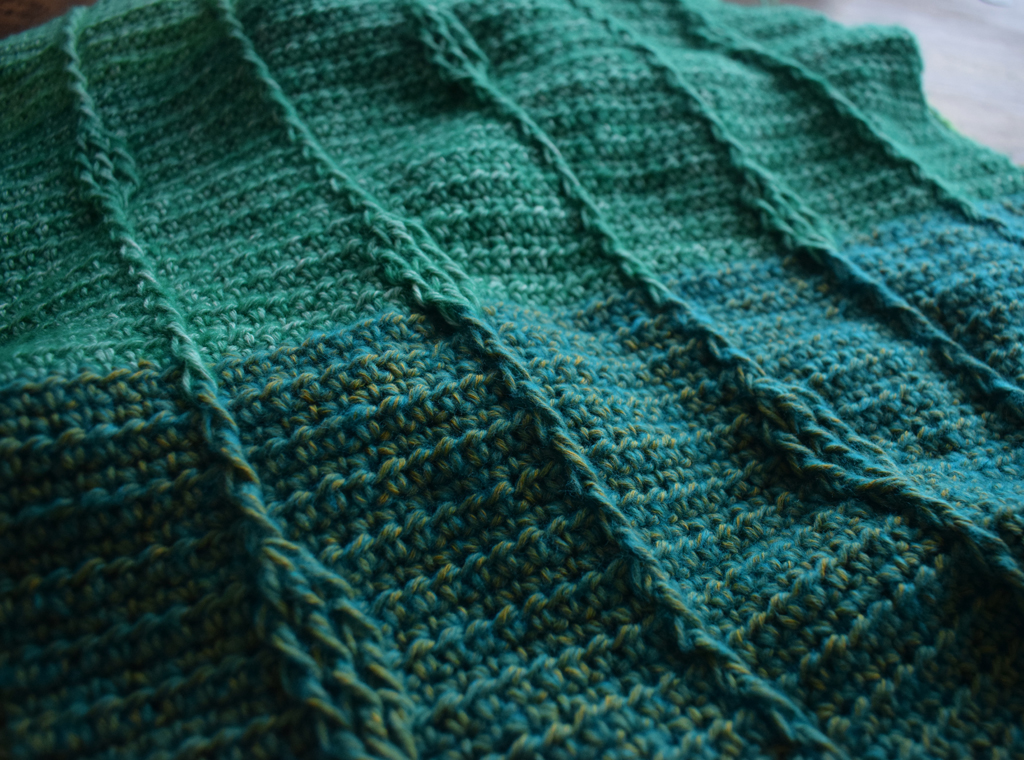
- The wrap will lean to one side a bit due to the stitch pattern. This causes some rippling at the edges. You can block the rippling out, but the leaning will still be present a bit.
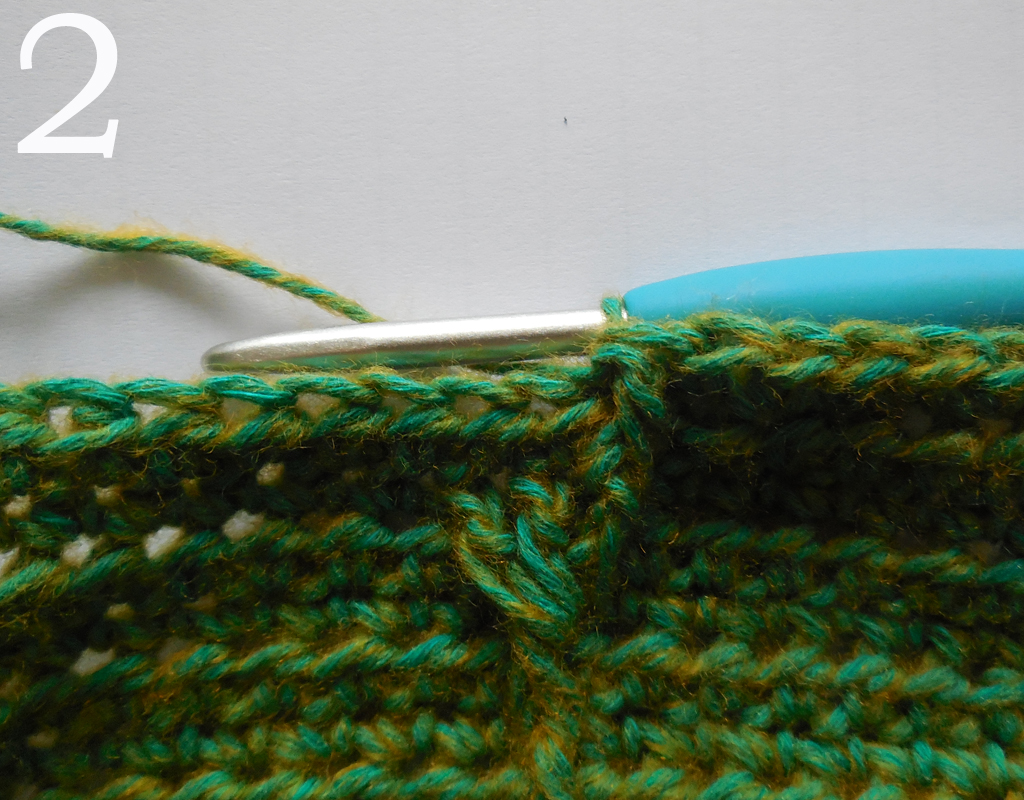
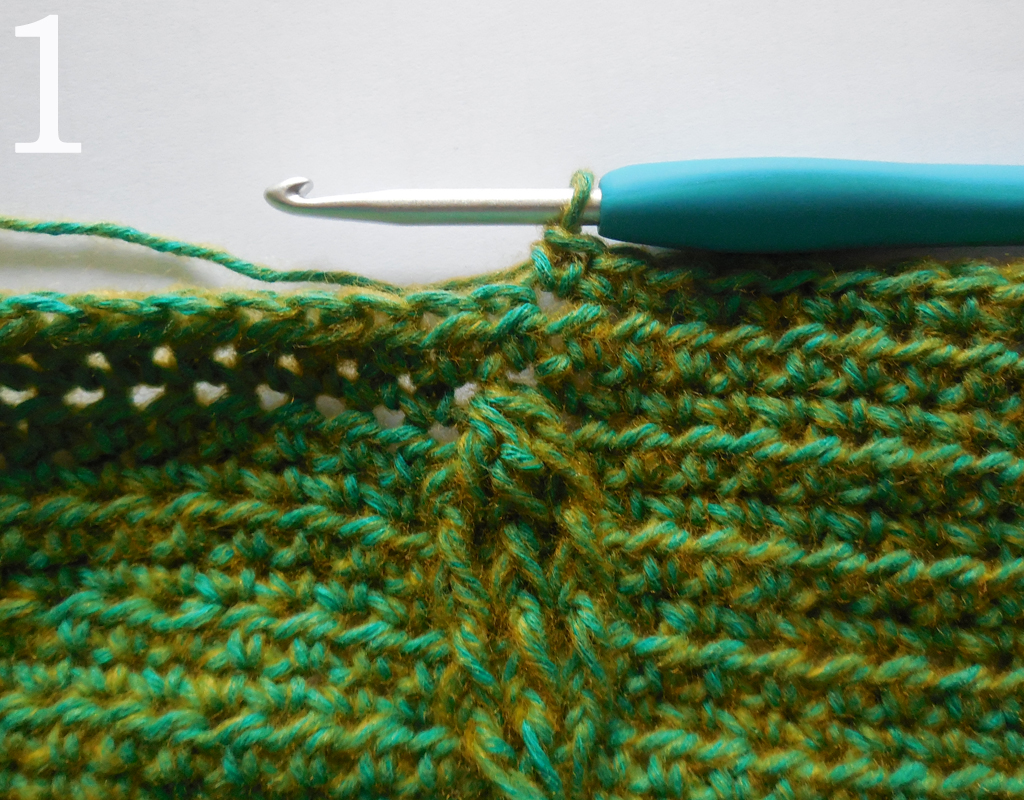
- Because you work in rows, the loop of the stitch will be situated to the left of the post of the stitch. Also see pic 1 of R2.
The Pattern (also see chart at the end of this page)
Making color changes, please read before you begin:
- You will change colors in the order established on the previous page.
- The first color change will be made after 29 rows, at the beginning of R30.
- After that you will work 28 rows in each color.
- The color changes are NOT indicated in the pattern, because it will be in different places for each pattern repeat.
Setup Using 4.5mm hook and Color A, ch61.
R1 (WS) Starting in third ch from hook; 1hdc in each ch across, ch1, turn.
Stitch count: 59 hdc
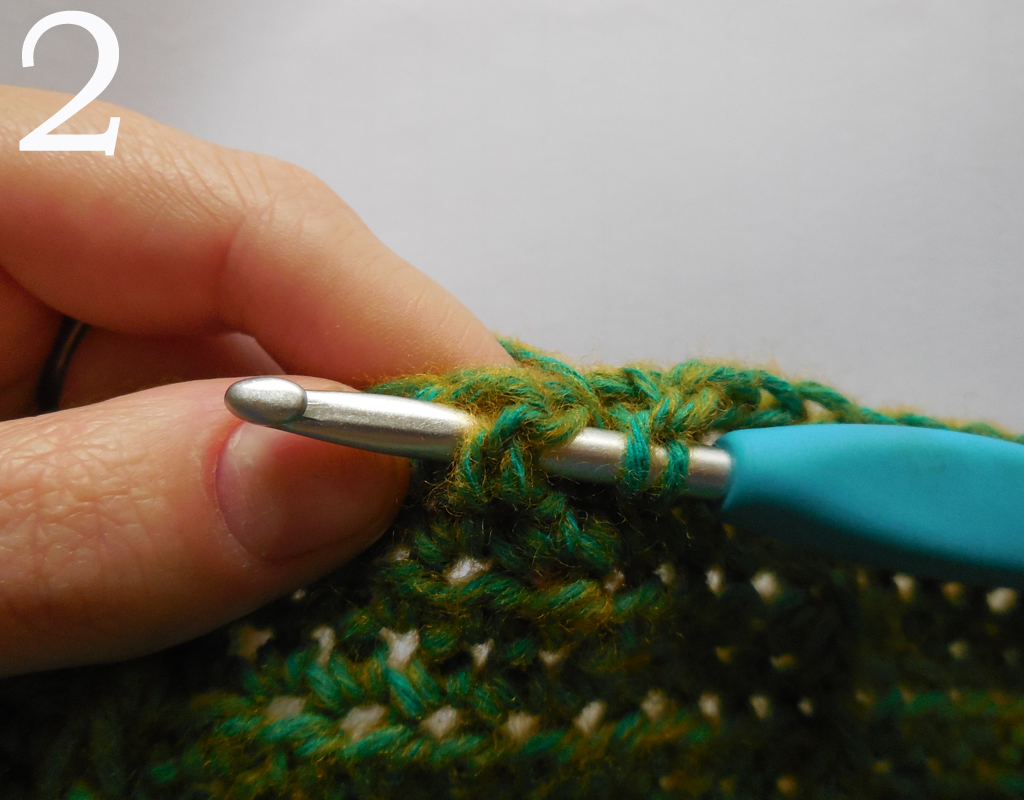
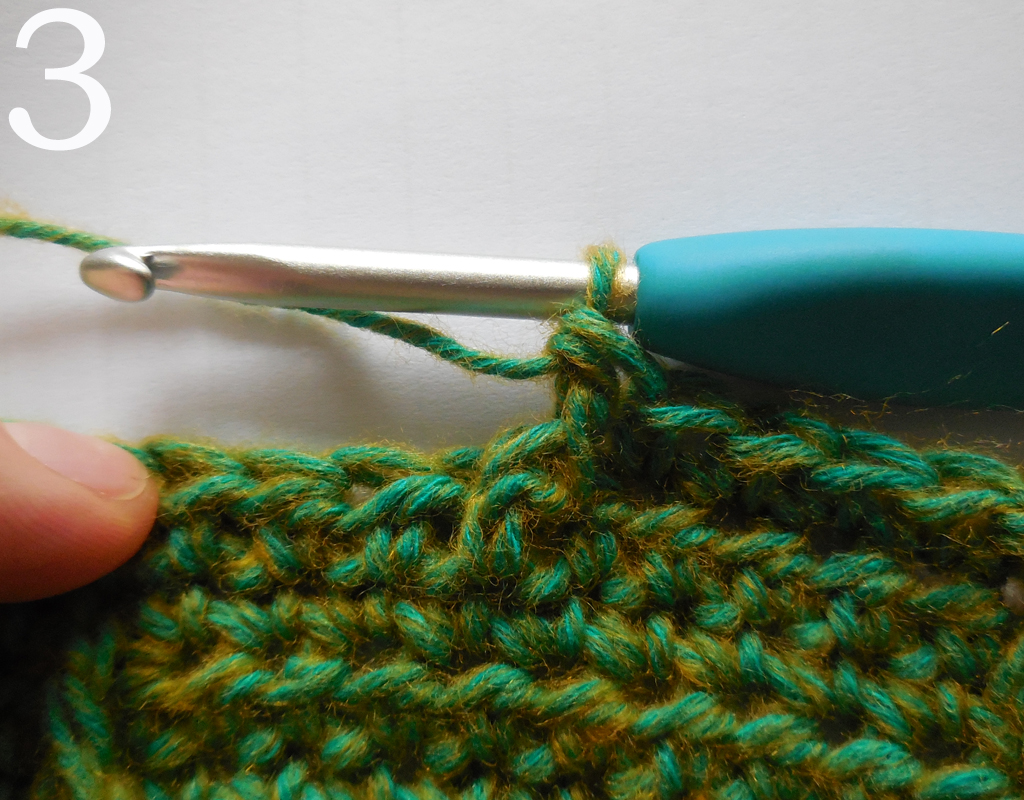
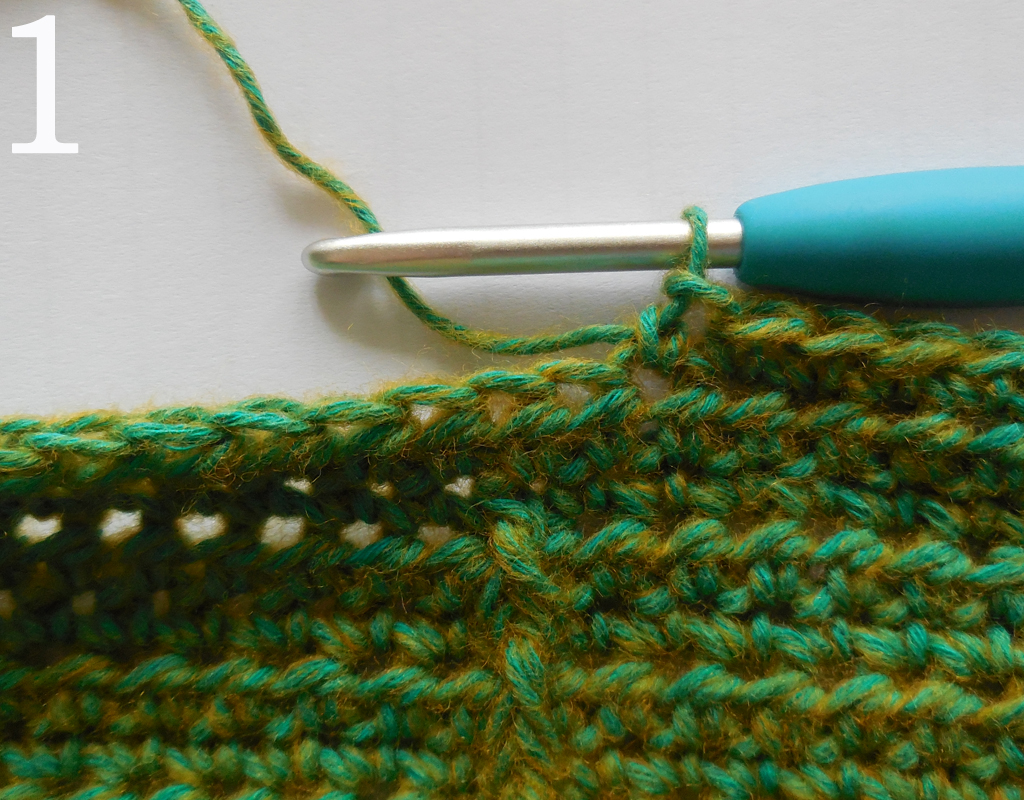
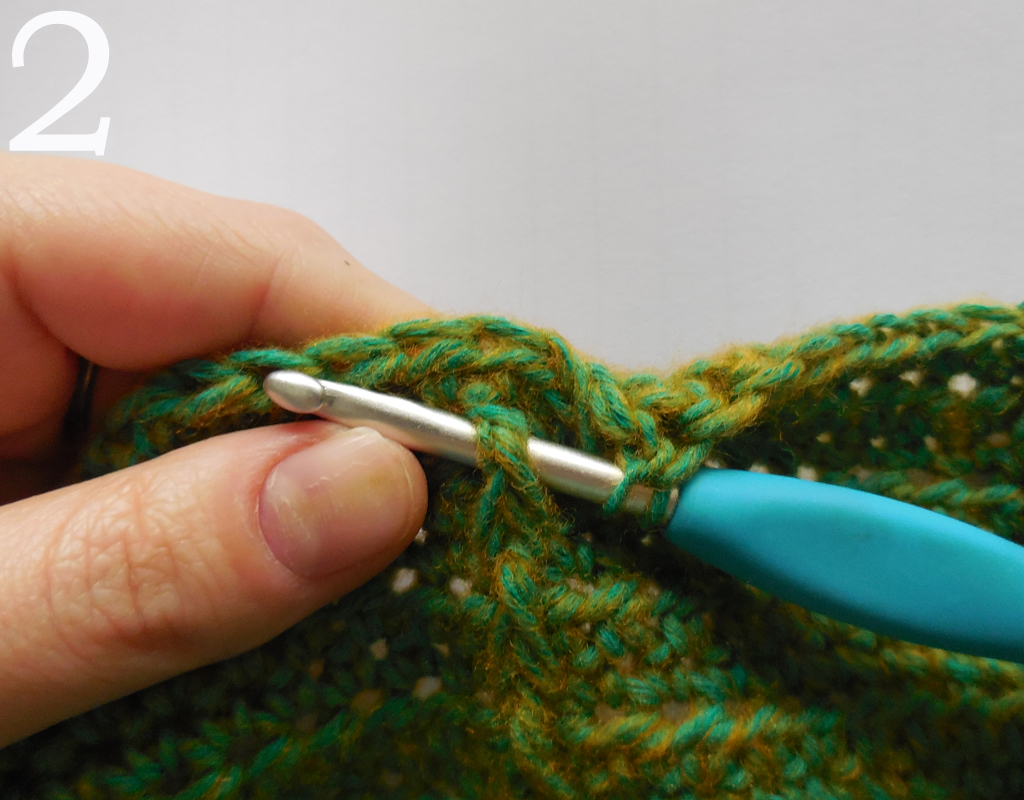
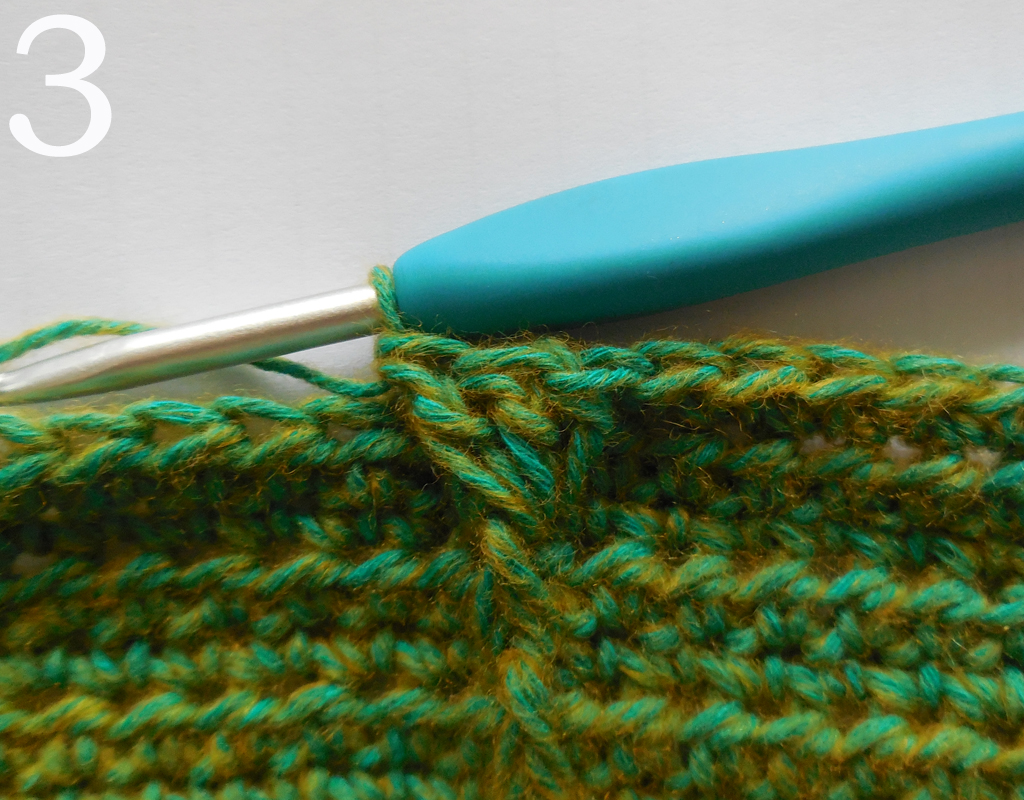
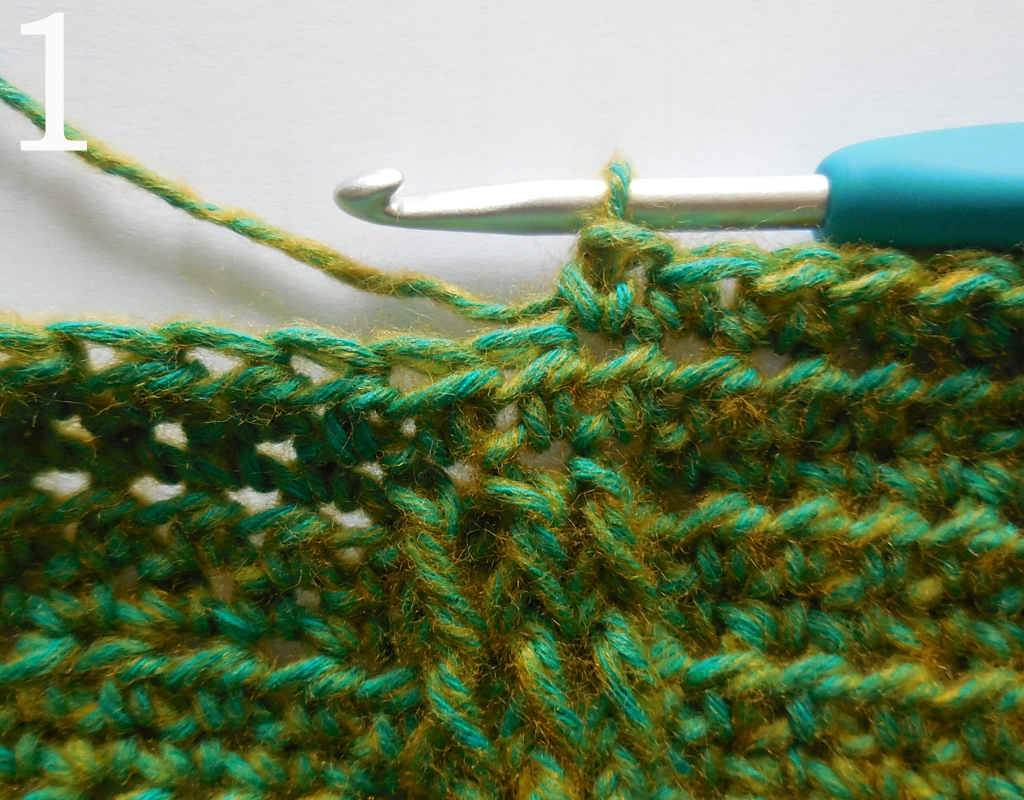
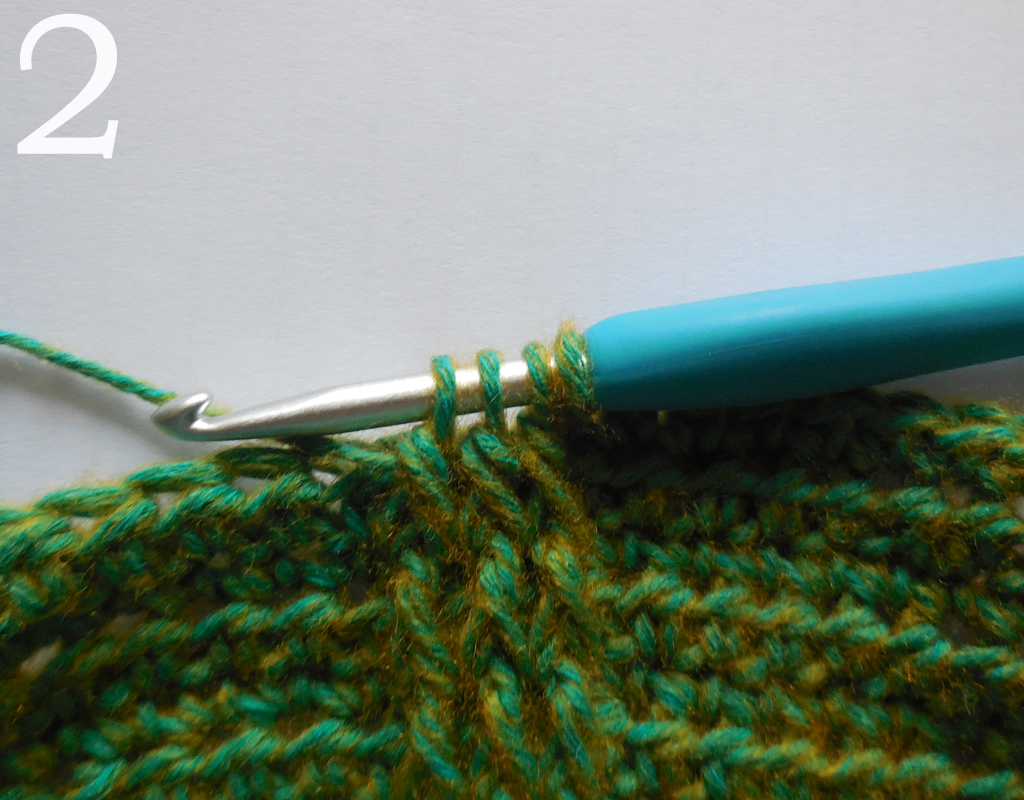
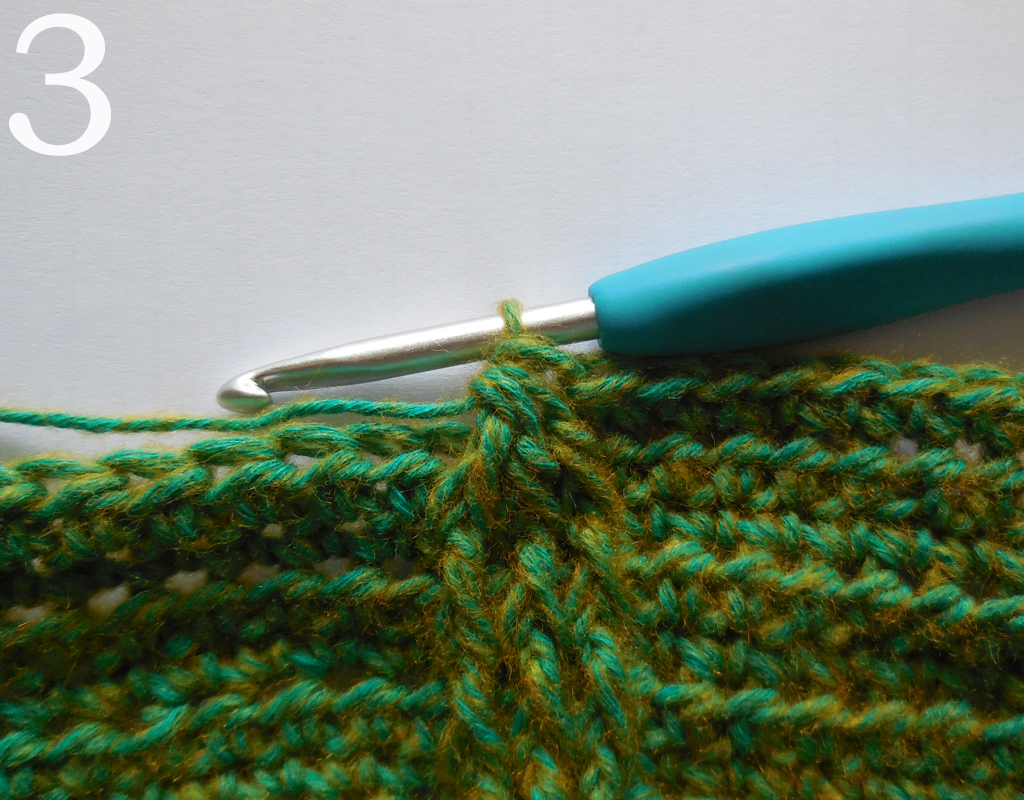
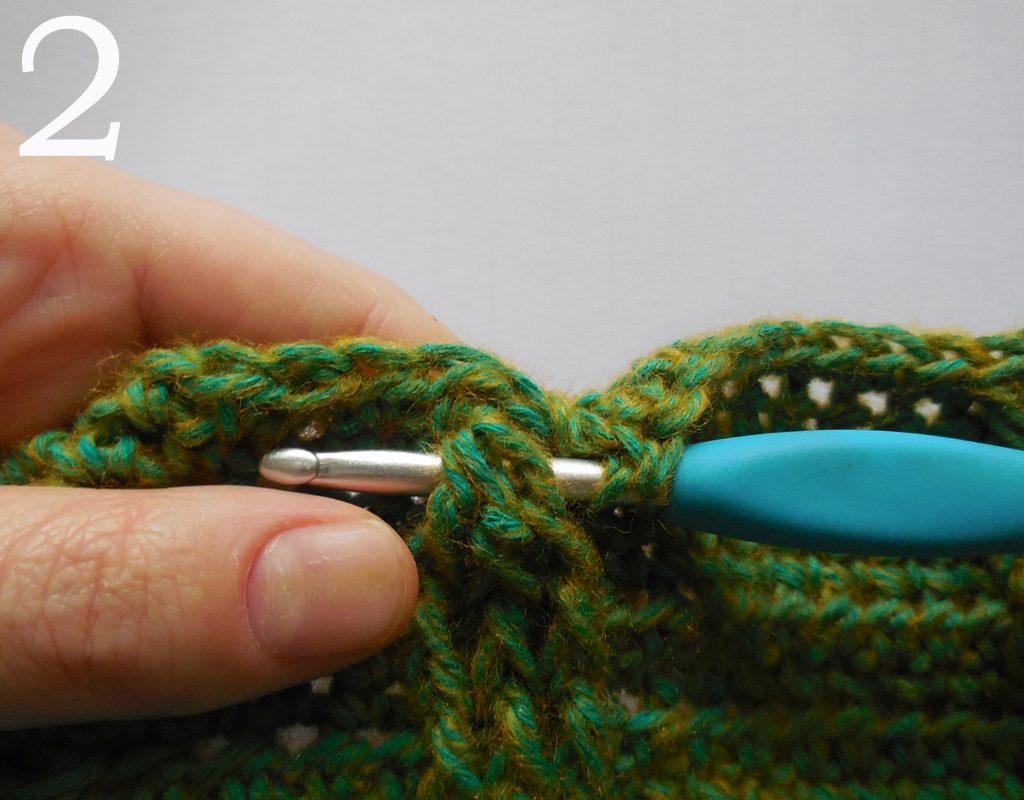
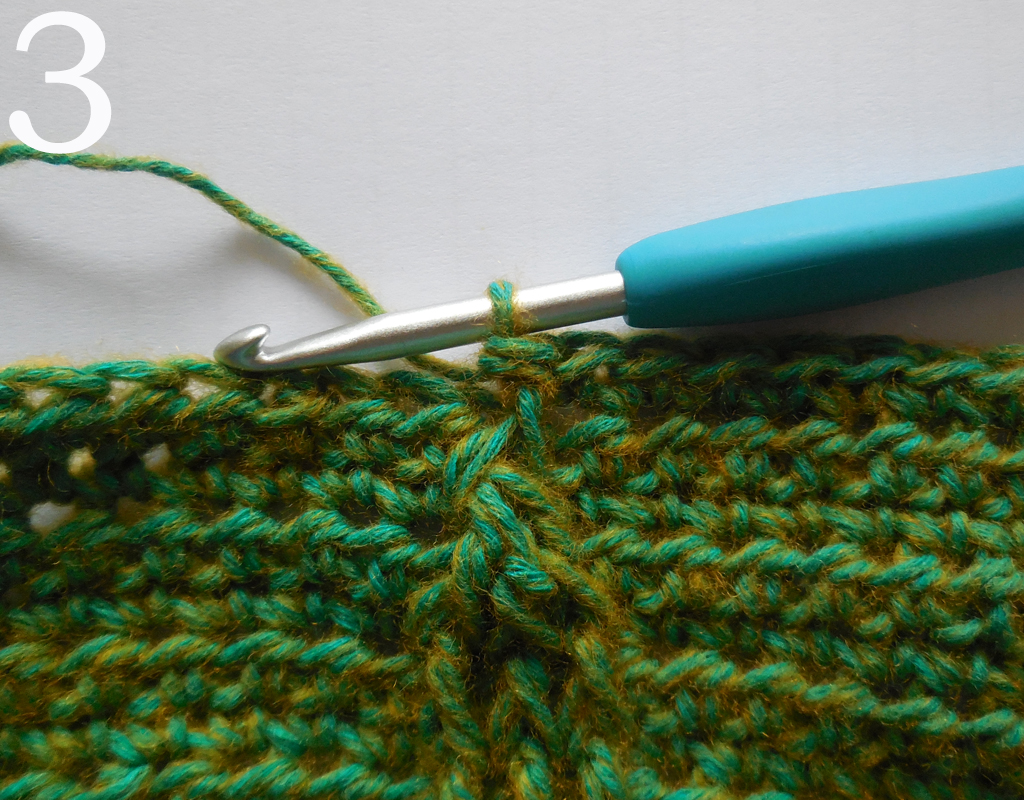
Note: pic 1-3 below are taken of later rows, but are to illustrate how to determine which st to make a fpdc around
R2 (RS) 1sc in first 9 st, *1fpdc around next st {pic 1-3}, sk next st {which is hidden behind the fpdc}, 1sc in next 9 st; rep from * to end, ch2, turn.
Stitch count: 54 sc, 5 fpdc

R3 (WS) 1hdc in each st across, ch1, turn.
Stitch count: 59 hdc
R4 1sc in first 9 st, *1fpdc around next fpdc, sk next st, 1sc in next 9 st; rep from * to end, ch2, turn.
Stitch count: 54 sc, 5 fpdc
R5-11: rep R3-4 three times. Rep R3 once more.
Note: from now on each odd numbered row in between even numbered rows will NOT be written out anymore. It is always a repeat of R3. So following R12, 14, 16, 18, etc. is a repeat of R3, before continuing on to the next row.
R12 *1sc in next 8 st, 3fpdc around next fpdc {pic 1-3}, sk next 3 st, 1sc in next 8 st, 1fpdc around next fpdc, sk next st; rep from * two more times, omitting the last fpdc on the last rep, ch2, turn.
Stitch count: 48 sc, 11 fpdc
R14 *1sc in next 8 st, 1fpdc around next 3 fpdc {pic 1-3}, sk next 3 st, 1sc in next 8 st, 1fpdc around next fpdc, sk next st; rep from * two more times, omitting the last fpdc on the last rep, ch2, turn.
Stitch count: 48 sc, 11 fpdc


R16: rep R14.
R18 *1sc in next 9 st, fpdc3tog around next 3 fpdc {pic 1-3}, sk next st, 1sc in next 9 st, 1fpdc around next fpdc, sk next st; rep from * two more times, omitting the last fpdc on the last rep {so you will end with 9 sc}, ch2, turn.
Stitch count: 54 sc, 2 fpdc, 3 fpdc3tog
R19-25: rep R3-4 three times. After that, rep R3 once more. Pic 1-3 below indicate how to make the fpdc around the fpdc3tog.
R26 1sc in first 9 st, *1fpdc around next fpdc, sk next st, 1sc in next 8 st, 3fpdc around next fpdc, sk next 3 st, 1sc in next 8 st; rep from * two more times, omitting the last 3 fpdc on the last rep, 1sc in last st {so you will end with 9 sc} ch2, turn.
Stitch count: 48 sc, 11 fpdc
R28 1sc in first 9 st, *1fpdc around next fpdc, sk next st, 1sc in next 8 st, 1fpdc around next 3 fpdc, sk next 3 st, 1sc in next 8 st; rep from * two more times, omitting the last 3 fpdc on the last rep, 1sc in last st, ch2, turn.
Stitch count: 48 sc, 11 fpdc
R30 rep R28.
R32 1sc in first 9 st, *1fpdc around next fpdc, sk next st, 1sc in next 9 st, fpdc3tog around next 3 fpdc, sk next st, 1sc in next 9 st; rep from * two more times, omitting the last fpdc3tog on the last rep, ch2, turn.
Stitch count: 48 sc, 11 fpdc
R33-43: rep R3-4 five times. After that rep R3 once more.
Rep R12-43 nine times, after that rep R12-21 once, and at the same time switching colors as described at the beginning of the pattern.
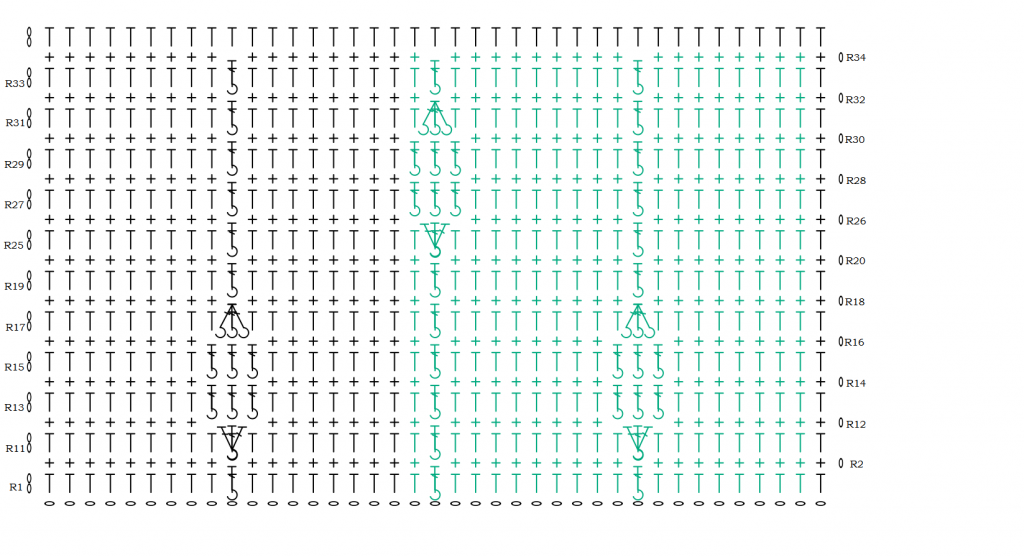
Eucalyptus wrap chart
Notes:
- All odd numbered rows are WS rows. All even numbered rows are RS rows.
- Read the odd numbered rows from left to right and all even numbered rows from right to left.
- The row repeat is given in green.
- Please read the notes at the beginning of the pattern for when to change colors.
Setup: With color A, ch61. In third ch from hook; 1hdc in each of next 59 ch.
Step 1: work R2.
Step 2: work R1 and 2 until you have a total of 11 rows.
Step 3: work R12-18.
Step 4: work R19 and 20 for a total of six rows.
Step 5: work R26-32.
Step 6: work R33 and 34 for a total of 11 rows.
Rep R12-43 nine times, after that rep R12-21 once, and at the same time switching colors as described at the beginning of the pattern.
I love to see your creations! Please share on Facebook or tag me on Instagram (@aspoonfulofyarn)! And if you have a question, please don’t hesitate to ask using the contact page.
************************************************************************
Affiliate disclaimer
This post contains affiliate links. When you click this link and purchase something, I will get a small commission, but it will not cost you extra money. This way you can support my blog and I can keep making free patterns.
Copyright
All patterns are for unlimited personal use. Do not reproduce, sell or publish (parts of) the patterns. Patterns may not be copied in any way (print or digitally), in part or in full, except for personal use. Items may be sold that are made from this pattern as long as the designer is credited.
Discover more from A Spoonful of Yarn
Subscribe to get the latest posts sent to your email.
2 Comments
Comments are closed.
Hi, is it normal that the fpdc go a bit to the left? Ty
The fpdc should be made right above the previous stitch. But your work as a whole will slant a bit to one side. If you count out your stitches, it should be correct.