
For the Dutch version, click here (Voor de Nederlandse versie klik hier)
Get an ad free PDF
For a small fee you can get a PDF version of this pattern. So if you rather work from paper, or just want to support me as a designer, you can get the PDF on Ravelry or Etsy. Thank you for your support <3
Intro & Pattern info
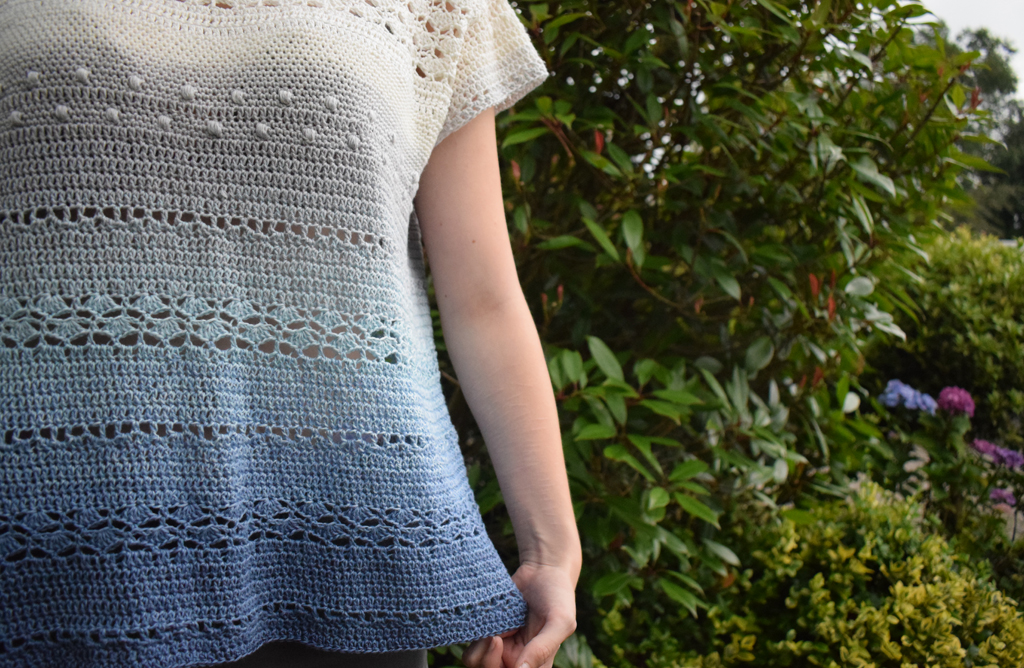
Imagine yourself lying in a field with your closest companion. The sun out and the sky a bright blue. Clouds dancing across the heavens like cotton balls, veils or little sheep. Take that feeling with you wherever you go with this cute Spotting Clouds top! This top is the second design of the Poetry Collection, which you can read more about here. The first design is the Picking Flowers sweater.
In the top you will find three different cloud shapes: Cumulus clouds (those big heaped clouds), cirrus clouds (thin and whispy) and cirrocumulus clouds (small puffy clouds).
Construction: The whole top is constructed top-down and seamlessly, so there are very little ends to work away when you’re done and you can decide on your own length.
Difficulty: easy/intermediate
For more information and pictures, read the introductory post here.
Special thanks to my lovely testers, Caroline, Sharon, Melody and Karen who’ve made this pattern excellent!
Please share your tops on social media (Facebookpage, Facebook social group and/or Instagram) with #spottingcloudstop or tag me @aspoonfulofyarn. I would also appreciate it if you gave it some love on Ravelry, to spread the word, so I can keep making free patterns.
Yarn & Notions
PLEASE READ: Due to the construction, this top uses one cake of whirl but also a few balls of Catona. There have been several people that have asked me if it is possible to use only a cake of whirl, but it will not give you the same effect and you also might not have enough yarn to make a whole top. Nowadays there are also little single colored cakes, named Scheepjes Whirlette*, that you can use instead of Catona.
– Scheepjes Catona* in colorway 105 (100% cotton, 125m/50g):
S/M: 2 balls
L/XL: 3 balls
OR
one cake of Scheepjes Whirlette* in colorway 860 Ice (60% cotton/40%acrylic, 455m/100g)
AND
-1 cake of Scheepjes Whirl* in colorway ‘Blueberry Bam Bam’ (60% cotton/40% acrylic, 1000m/215-225g):
– 3 and 3,5 mm hook or size to obtain gauge
– Darning needle, thread clippers and stitch markers
***************************************************************************************************************************
If you don’t have a retailer nearby, please consider buying your Scheepjes yarn via one of the links below. It will give me a small commission, but it won’t cost you anything extra.
UK/International: Wool Warehouse, The Knitting Network or Black Sheep Wools
Benelux: Caro’s Atelier
***************************************************************************************************************************
Gauge & Sizes
Use a 3,5mm hook with Whirl and a 3mm hook for the Scheepjes Catona or Whirlette: 10×10 cm (4×4”) = 12 rows x 18 dc unblocked
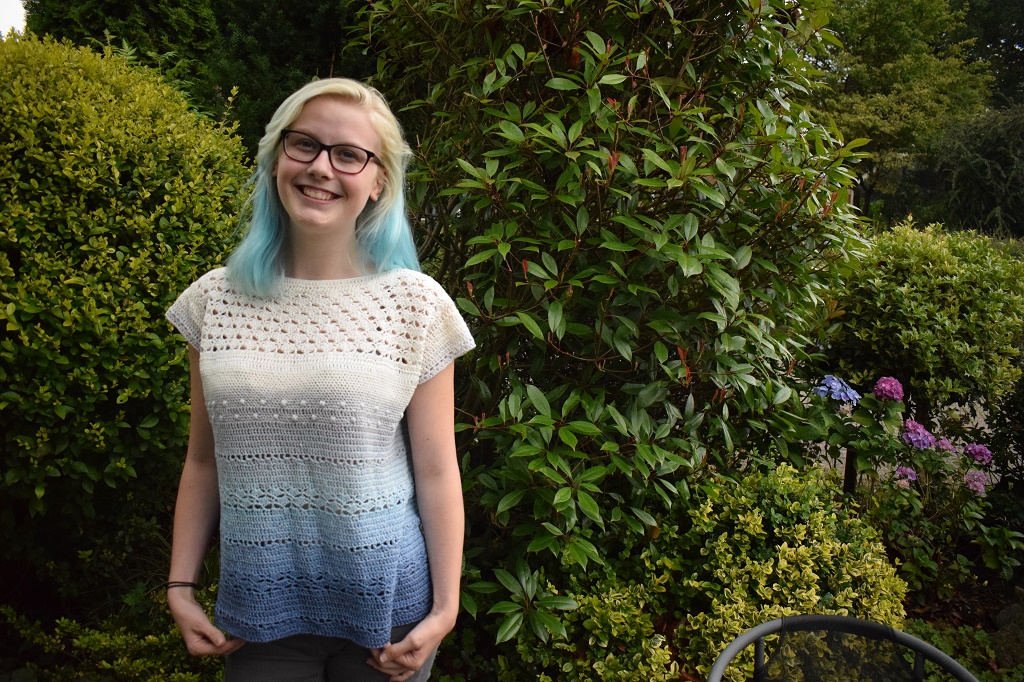
– The top comes in sizes S/M and L/XL (the model is a size S and is wearing size S/M):
* Body circumference: 118cm/47.2″ (138cm/55.2″)
* Shoulder piece width: 49cm/19.3″ (59cm/23.2″)
* Shoulder piece height: 37cm/14.6″ (43cm/16.9″)
– The length is up to you. I made the top in S/M and used 178 grams of Whirl, which gave me a length of 35 cm/14″ measured from the armhole (unblocked). I could have made this into a tunic with the remaining yarn I had.
Stitches & Abbreviations (US terms)
sl st slip stitch
ch chain
ch-sp chain space
sk skip
sc single crochet
hdc half double crochet
dc double crochet
tr treble
puff-st puff stitch: [yo, insert hook in stitch and pull up loop] 5 times total (11 loops on hook), yo and pull through all loops, close with ch1
st stitch
rep repeat
*…* repeat the instructions between asterisks up to where the pattern indicates
[…] work the instructions between brackets for the total number of times indicated in the pattern
RS right side of your work
pic picture
Notes & tips
- The turning chain doesn’t count as a stitch, i.e. you always begin in the first st of the new row.
- When you’re working on the lace section, the first and last stitch can be harder to see; use markers for these stitches.
- The instructions and stitch counts for different sizes are given between parenthesis in this order: S/M (L/XL). If the instructions are the same, the numbers for L/XL are not given again.
Ancient water in a system
The cycle of ice, of water, of gas
expanding, retracting
Stored in a beautiful white mass
~~~
Mountainous bunches hanging in the sky
An eagel, an angel, a bird passes by
~~~
A dolphin, a turtle, a fly, a feather
Let’s go spot clouds together
THE PATTERN
Back shoulder piece
Setup: With 3,5 mm hook and Scheepjes Catona/Whirlette; ch92 (110).
R1 (RS) Switch to 3 mm hook; Starting from the second ch from hook; sc across, ch2 {doesn’t count as a st throughout}, turn.
Stitch count: 91 (109) sc
R2-3 1 dc in each st across, ch2, turn.
Stitch count: 91 (109) dc
R4 1 hdc in each dc across, ch1, turn.
Stitch count: 91 (109) hdc
***Cumulus clouds***
R5 Switch to the 3,5 mm hook; 1 sc in first st, *sk next 2 st, 5 dc in next st {cloud made}, sk next 2 st, 1 sc in next st* rep between * * to end, ch2, turn.
Stitch count: 15 (18) clouds, 16 (19) sc
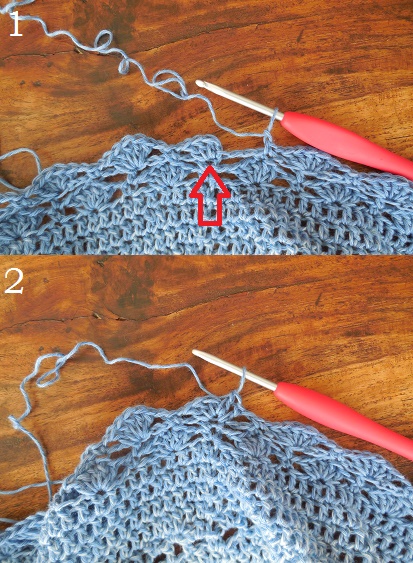
R6 1 hdc in first sc, *ch2, 1 sc in middle dc of cloud {pic 1 below}, ch2, 1 hdc in next sc*
rep between * * to end, ch2, turn. {pic 2 below}
Stitch count: 15 (18) sc, 16 (19) hdc, 30 (36) ch-sp
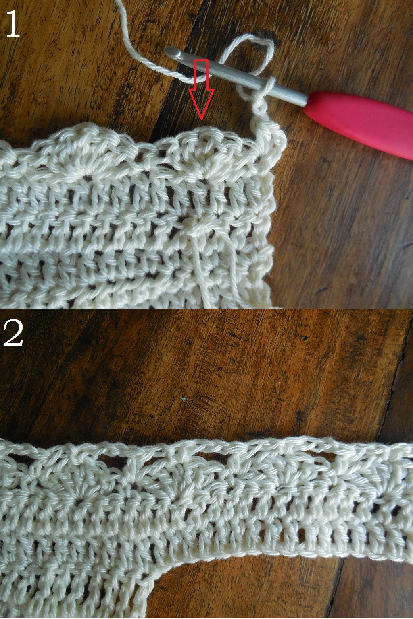
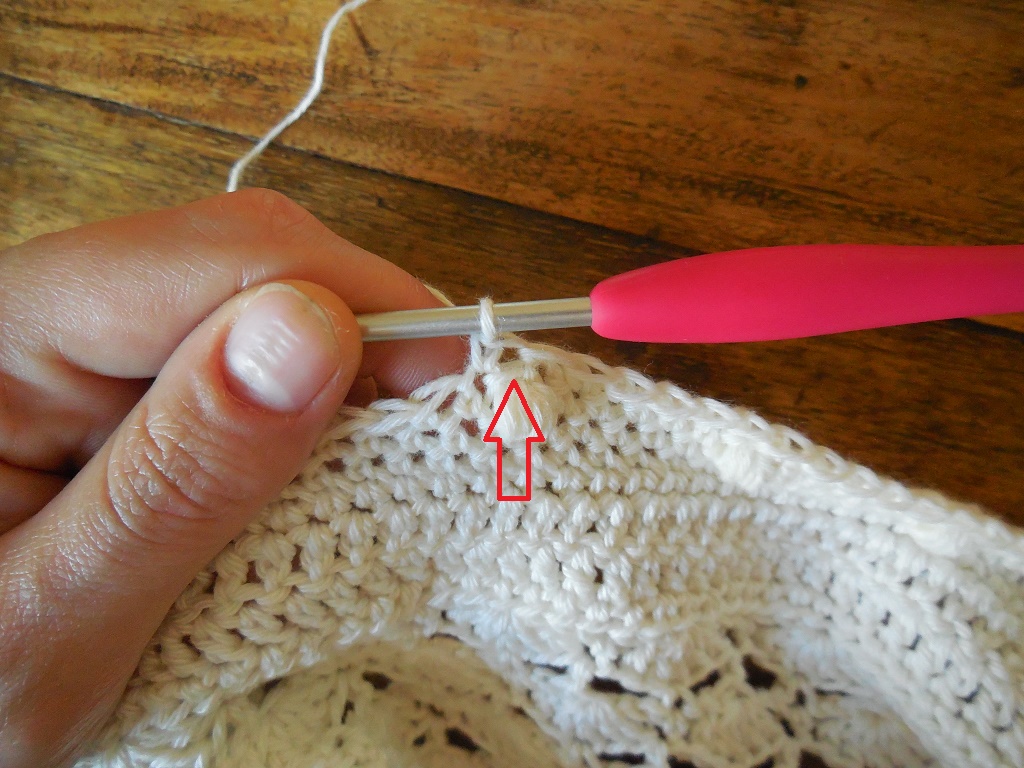
R7 Note: the loop of the hdc is sometimes a bit awkward to work into. It is situated after the post of the stitch, see arrow in pic 1 below.
3 dc in first hdc, *1 sc in next sc, 5 dc in next hdc* rep between * * until the last sc and hdc,
1 sc in next sc, 3 dc in last hdc, ch1, turn. {pic 2 below}
Stitch count: 14 (17) clouds, 2 x 3dc clouds, 15 (18) sc
R8 1 sc in first dc, *ch2, 1 hdc in next sc, ch2, 1 sc in middle dc of cloud* rep between * * to the last sc and the last 3dc-cloud,
ch2, 1 hdc in next sc, ch2, 1 sc in last dc of the 3dc-cloud, ch1, turn.
Stitch count: 16 (19) sc, 15 (18) hdc, 30 (36) ch-sp
R9 1 sc in first sc, *5 dc in next hdc, 1 sc in next sc* rep between * * to end, ch2, turn.
Stitch count: 15 (18) clouds, 16 (19) sc
S/M: R10-18: rep R6-9 two more times. After that, rep R6 once more. {you will have 7 rows with clouds}
L/XL: R10-22: rep R6-9 three more times. After that, rep R6 once more. {you will have 9 rows with clouds}
R19 (S/M) or R23 (L/XL) Switch to the 3 mm hook; 1 dc in first hdc, *2 dc in next ch2-sp, 1 dc in next sc, 2 dc in next ch2-sp, 1 dc in next hdc*
rep between * * to end, ch2, turn.
Stitch count: 91 (109) dc
R20 (S/M) or R24 (L/XL) 1 dc in each dc across, ch1, turn.
Stitch count: 91 (109) dc
Back shoulder and neck shaping
R21 (S/M) or R25 (L/XL) 1 sc in next 5 (7) dc, 1 hdc in next 5 (6) dc, 1 dc in next 5 (6) dc, 1 tr in next 5 (7) dc, ch1 {point of first shoulder made},
1 dc in next 5 (6) dc, 1 hdc in next 5 (6) dc, 1 sc in next 31 (33) dc, 1 hdc in next 5 (6) dc, 1 dc in next 5 (6) dc, ch1 {point of second shoulder made},
1 tr in next 5 (7) dc, 1 dc in next 5 (6) dc, 1 hdc in next 5 (6) dc, 1 sc in last 5 (7) dc, ch1, turn.
Stitch count: 41 (47) sc, 20 (24) hdc, 20 (24) dc, 10 (14) tr, 2 x ch1-sp
Front shoulder and neck shaping
Note: The neck opening is made with a long chain, make sure not to twist it while connecting it to the second shoulder. If you know yourself to be a tight chainer, use a bigger hook.
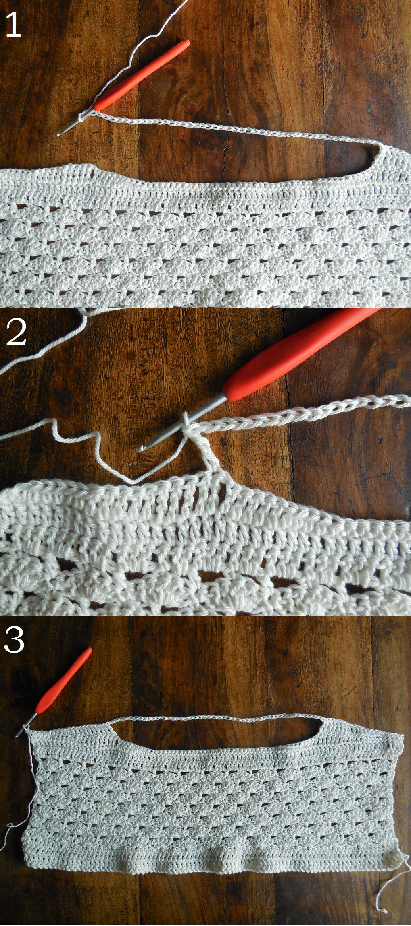
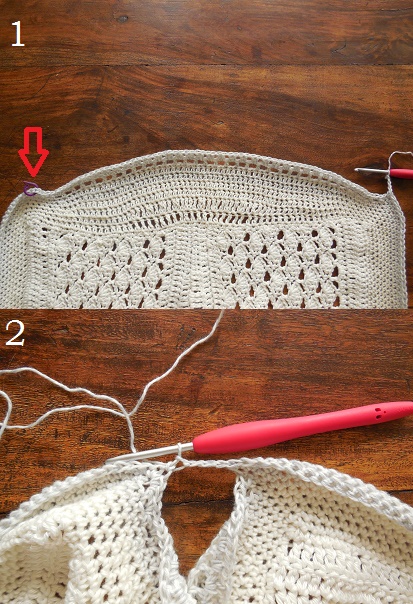
R22 (S/M) or R26 (L/XL) 1 sc in next 5 (7) st, 1 hdc in next 4 (5) st, 1 dc in next 4 (5) st, 1 tr in next 7 (9) st, chain 51 (57),
sk the next 51 (57) st, 1 tr in next 7 (9) st {this connects the chain to the second shoulder, pic 1-3 below},
1 dc in next 4 (5) st, 1 hdc in next 4 (5) st, 1 sc in last 5 (7) st, ch2, turn.
Stitch count: 10 (14) sc, 8 (10) hdc, 8 (10) dc, 14 (18) tr, 51 (57) chains
R23 (S/M) or R27 (L/XL) 1 dc in next 20 (26) st, 1 dc in each of the next 51 (57) chains, 1 dc in last 20 (26) st, ch2, turn.
Stitch count: 91 (109) dc
R24 (S/M) or R28 (L/XL) 1 dc in each dc across, ch1, turn.
Stitch count: 91 (109) dc
S/M: R25-38: rep R5-18, not forgetting to switch to the 3,5 mm hook.
L/XL: R29-46: rep R5-22, not forgetting to switch to the 3,5 mm hook.
R39 (S/M) or R47 (L/XL) Switch to 3 mm hook; 1 hdc in first st, *2 hdc in next ch2-sp, 1 hdc in next st, 2 hdc in next ch2-sp, 1 hdc in next st*
rep between * * to end, ch2, turn.
Stitch count: 91 (109) hdc
R40-41 (S/M) or R48-49 (L/XL) 1 dc in each hdc across, ch2, turn. {At the end of R41 (S/M) or R49 (L/XL), ch1 instead of 2}
Stitch count: 91 (109) dc
R42 (S/M) or R50 (L/XL) 1 sc in each dc across, cut yarn.
Stitch count: 91 (109) sc
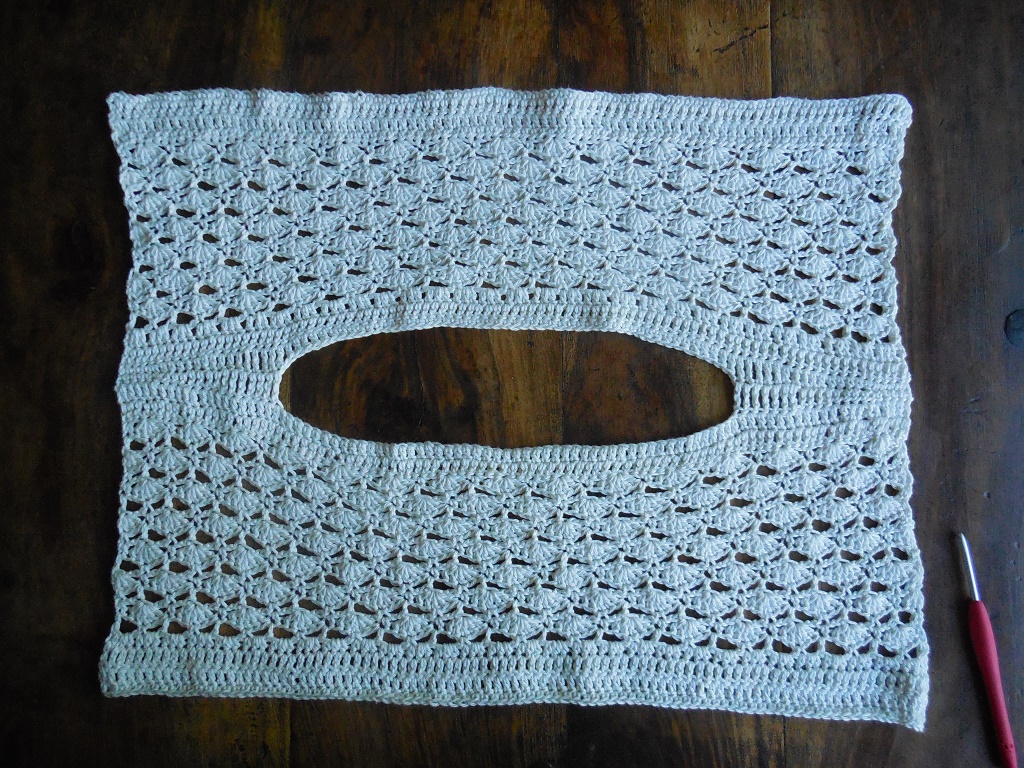
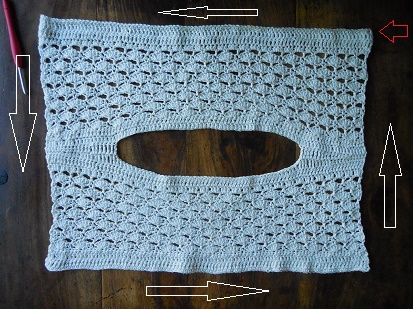
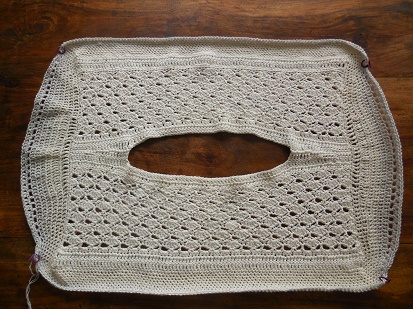
Slip stitch with a 3,5mm hook around the neckline, so it won’t lose its shape. Make sure to not make these slip stitches too tight! Work away the ends and wetblock the shoulder piece to the following dimensions {really stretching it to open up the lace}:
S/M: 49 cm/19.3″ wide and 37 cm/14.6” high
L/XL: 59 cm/23.2” wide and 43 cm/16.9” high
Sleeves
Notes:
- The 3,5 mm hook and Whirl yarn is used for the rest of the pattern
- For this part, up to R11, you work in the round in spirals, so there’s no slip stitching and chaining to close the round; you’ll just work continuously.
- The stitches that are picked up at the sides of the shoulder piece will form short sleeves.
- After R1 there can be some slight puckering in the corners, but this will be resolved with blocking.
R1 (RS) Switch to the 3,5 mm hook and Whirl yarn; begin with the right side facing you, start in the first sc of the front of the shoulder piece, using a standing sc (or sl st, ch1, 1 sc) {see red arrow in pic below};
1 sc in each of next 91 (109) sc, ch1, pm {= place marker} in ch1,
pick up 60 (72) sc along the side of the shoulder piece, ch1, pm in ch1,
1 sc in each of next 91 (109) chains of the foundation chain, ch1, pm in ch1,
pick up 60 (72) sc along the side of the shoulder piece, ch1, pm in ch1.
Stitch count: 302 (362) sc, 4 x ch1
Note: The increases that are made count towards the body, not the sleeves, so when you count your stitches for the front and back, you count from marker to marker and when you count for the sleeves, you count the stitches in between the markers.
R2 *1sc in each of next 91 (109) sc, 1 sc in ch1, pm in sc,
1 sc in next 5 sc, 1 hdc in next 5 (7) sc, 1 dc in next 10 (12) sc, 1 tr in next 20 (24) sc, 1 dc in next 10 (12) sc, 1 hdc in next 5 (7) sc, 1 sc in next 5 sc,
1 sc in ch1, pm in sc*
rep between * * 1 more time.
Stitch count: back/front: 93 (111) sc – Per sleeve: 10 sc, 10 (14) hdc, 20 (24) dc, 20 (24) tr
R3 *1 sc in each sc to marker, 2 sc in marked sc, pm in second made sc,
1 sc in next 5 sc, 1 hdc in next 5 (7) hdc, 1 dc in next 10 (12) dc, [1 tr in next tr, 2 tr in next tr] 10 (12) times total,
1 dc in next 10 (12) dc, 1 hdc in next 5 (7) hdc, 1 sc in next 5 sc,
2 sc in marked sc, pm in first made sc*
rep between * * 1 more time.
Stitch count: back/front: 95 (113) sc – Per sleeve: 10 sc, 10 (14) hdc, 20 (24) dc, 30 (36) tr
R4 *1 sc in each sc to marker, 2 sc in marked sc, pm in second made sc,
1 sc in next 5 sc, 1 hdc in next 5 (7) hdc, 1 dc in next 50 (60) st, 1 hdc in next 5 (7) hdc, 1 sc in next 5 sc,
2 sc in marked sc, pm in first made sc*
rep between * * 1 more time.
Stitch count: back/front: 97 (115) sc – Per sleeve: 10 sc, 10 (14) hdc, 50 (60) dc
R5-7: rep R4 three more times
Stitch count R5: Back/front: 99 (117) sc – Per sleeve: 10 sc, 10 (14) hdc, 50 (60) dc
Stitch count R6: Back/front: 101 (119) sc – Per sleeve: 10 sc, 10 (14) hdc, 50 (60) dc
Stitch count R7: Back/front: 103 (121) sc – Per sleeve: 10 sc, 10 (14) hdc, 50 (60) dc
R8 *1 sc in each sc to marker, 2 sc in marked sc, pm in second made sc,
[1 sc in next st, ch1, sk next st] 3 times total,
[1 hdc in next st, ch1, sk next st] 2 (3) times total,
[1 dc in next st, ch1, sk next st] 25 (30) times total,
[1 hdc in next st, ch1, sk next st] 3 (4) times total,
[1 sc in next st, ch1, sk next st] 2 times total,
2 sc in marked sc, pm in first made sc*
rep between * * 1 more time.
Stitch count: Back/front: 105 (123) sc – Per sleeve: 5 sc, 5 (7) hdc, 25 (30) dc, 35 (42) ch1-sp
R9 *1 sc in each sc to marker, 2 sc in marked sc, pm in second made sc, sk next sc,
2 sc in next 2 ch-sp,
2 hdc in next 3 (4) ch-sp,
2 dc in next 25 (30) ch-sp,
2 hdc in next 3 (4) ch-sp,
2 sc in next 2 ch-sp,
2 sc in marked sc, pm in first made sc*
rep between * * 1 more time
Stitch count: Back/front: 107 (125) sc – Per sleeve: 8 sc, 12 (16) hdc, 50 (60) dc
Body
***Cirrocumulus clouds***
R10 1 sc in each sc to marker, 1 sc in marked sc,
ch4, sk all the stitches of the sleeve, connect to the back of the shoulder piece with 1 sc in next marked sc {see pic 1&2 below},
1 sc in each sc to marker, 1 sc in marked sc, ch4, sk all the stitches of the sleeve, connect to the front of the shoulder piece with 1 sc in last marked sc. Remove all markers.
Stitch count: Back/front: 107 (125) sc, 2 x ch4
Note: From here on you will not work in spirals anymore. The ch1 is used to start a sc, hdc and dc. It does not count as a st, so you always work in the first st of the round. You are free to use any other method of beginning a new round.
R11 *1 sc in each sc across, 1 sc in each of next 4 chains*
rep between * * 1 more time,
join the round with a sl st in first sc, ch1 {doesn’t count as a st, here and throughout}.
Stitch count: 222 (258) sc
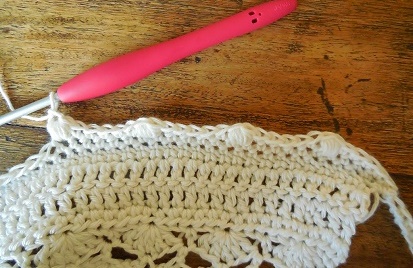
R12 *1 sc in next 5 sc, puff-st in next sc* rep between * * around, sl st in first sc, ch1. {see picture below}
Stitch count: 185 (215) sc, 37 (43) puff-st
R13 Note: don’t forget to skip the ch1 of the puff, see picture below
1 sc in each st around, sl st in first sc, ch1.
Stitch count: 222 (258) sc
R14 1 dc in each sc around, sl st in first dc, ch1.
Stitch count: 222 (258) dc
R15 1 sc in each st around, sl st in first sc, ch1.
Stitch count: 222 (258) sc
R16 1 sc in first 4 sc, *puff-st in next sc, 1 sc in next 5 sc* rep around, omitting the last 4 sc of the last repeat, sl st in first sc, ch1.
Stitch count: 185 (215) sc, 37 (43) puff-st
R17 1 sc in each st around, sl st in first sc, ch1.
Stitch count: 222 (258) sc
R18-22: 1 dc in each st around,sl st in first st, ch1.
***Cirrus clouds***
R23 1 sc in first st, *ch2, sk next st, 1 dc in next st, ch1, sk next st, 1 dc in next st, ch2, sk next st, 1 sc in next st*
rep between * * around, omitting the last sc of the last repeat, sl st in first sc, sl st in first ch-sp, ch2. {see pic below}
Stitch count: 37 (43) sc, 74 (86) dc, 111 (129) ch-sp
R24 *2 dc in ch2-sp, 2 sc in next ch1-sp {between the 2 dc}, 2 dc in next ch2-sp*
rep between * * around, sl st in first dc, ch2. {see pic below}
Stitch count: 148 (172) dc, 74 (86) sc
R25-28: 1 dc in each st around, sl st in first dc, ch1.
Stitch count: 222 (258) dc
***More cumulus clouds***
R29 1 sc in first dc, *ch1, sk next 2 dc, 5 dc in next dc {cloud made}, ch1, sk next 2 dc, 1 sc in next dc*
rep between * * around, skipping the last sc on the last repeat, sl st in first sc, ch2.
Stitch count: 37 (43) clouds, 37 (43) sc
R30 1 hdc in first sc, *ch2, 1 sc in middle dc of cloud, ch2, 1 hdc in next sc*
rep between * * around, skipping the last hdc on the last repeat, sl st in first hdc, ch2.
Stitch count: 37 (43) sc, 37 (43) hdc, 74 (86) ch2-sp
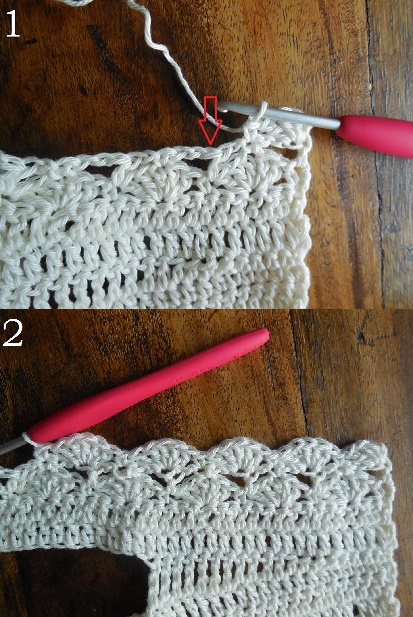
R31 3 dc in first hdc, *ch1, 1 sc in next sc, ch1, 5 dc in next hdc*
rep between * * around, working 2 dc in the first hdc on the last repeat {see pic 1 & 2 below}, sl st in first dc, ch1.
Stitch count: 37 (43) clouds, 37 (43) sc
R32 1 sc in first dc, *ch2, 1 hdc in next sc, ch2, 1 sc in middle dc of cloud*
rep between * * around, skipping the last sc on the last repeat, sl st in first sc, ch2.
Stitch count: 37 (43) sc, 37 (43) hdc, 74 (86) ch2-sp
R33 1 dc in first sc, *2 dc in next ch2-sp, 1 dc in next hdc, 2 dc in next ch2-sp, 1 dc in next sc*
rep between * * around, sl st in first dc, ch2.
Stitch count: 222 (258) dc
R34-37: 1 dc in each st around, sl st in first dc, ch1.
Stitch count: 222 (258) dc
Rep R23-37 until you reach the desired length or until you run out of whirl, ending with a few rounds of dc. (I repeated R23-37 once more. After that I repeated R23 and 24 and ended with 2 rounds of dc.) Block to the measurements at the top of this page and weave in the remaining ends. Enjoy!
*Affiliate disclaimer
This post contains affiliate links. When you click this link and purchase something, I will get a small commission, but it will not cost you extra money. This way you can support my blog and I can keep making free patterns.
Copyright
© 2017 A Spoonful of Yarn. All patterns are for unlimited personal use. Do not reproduce, sell or publish (parts of) the patterns. Patterns may not be copied in any way (print or digitally), in part or in full, except for personal use. Items may be sold that are made from this pattern as long as the designer is credited.
Discover more from A Spoonful of Yarn
Subscribe to get the latest posts sent to your email.
19 Comments
Comments are closed.
This is beautiful, Christina! Thank you for sharing your work free for us to enjoy. Have you made a PDF of the pattern please? Or will you be doing so? I would happily pay for your work xx
Thank you Sue 🙂 As it now stands, there will not be a PDF made for this pattern, just the blog version.
OK, no worries. Thank you for replying x
You did SUCH beautiful work in designing this top and providing the clearly written pattern and the helpful photos. It is the first time I have wanted to try to crochet an item of clothing–it is just so pretty, and I love the whole clouds theme. Thank you so much for sharing your talent.
aww, thanks so much! It warms my heart to hear that 🙂
Thank you for this cute pattern. I agree with Judy that it’s looks to be understandable enough that it would be the first time I may attempt a top. Hope the xl will fit me.
Your pictures and 1-piece construction puts it over the top for me. I’m excited!
Wow this is beautiful Sue. I have been looking for a top that I could use my whirl with and I was very excited to see your lovely work in my feed today. I have started and it’s great. Thank you very much for sharing your wonderful talents. Jo
Thank you for your kind words Jo! I’m glad to hear that it’s working out for you so far. My name is Christina by the way 😉
I like your top very much! I’m planning to make one and need to know if both Catona and Whirl are required for the project?
Thank you Dana. If you want the same effect as this top, you’ll need the catona too, otherwise the back and front will look different and there is a clear distinction between the lacy shoulder piece and the sleeves.
Thank you very much for your response!!
Love Love Love it!
Thank you so very much.
Laura
Hello Christina, just to let you know, scheepjes has a new whirl cake size, it is called whirlette and is designed for finishing projects that needs more than one normal “cake”. The whirlettes are in one colour so you could swap the catona for a whirlette and have the same sort of yarn all the way through. You created a beautiful pattern by the way! I think it will be a nice spring project for me to do, thank you for sharing!
Hi Carla, thank you for your kind words 🙂 I do know the whirlettes and it will work with some of the colorways, just not with the blueberry bambam, because you need white to start and that one is not included as a whirlette color. The light grey is, but that would not help this colorway.
Thanks for the suggestion though 🙂