Klik hier voor de Nederlandse versie
Get this pattern as a PDF
Like to work from paper or want to support me as a designer? Buy the PDF version on Etsy or Ravelry. This will include a printerfriendly option. Thank you for your support <3
Intro & Links
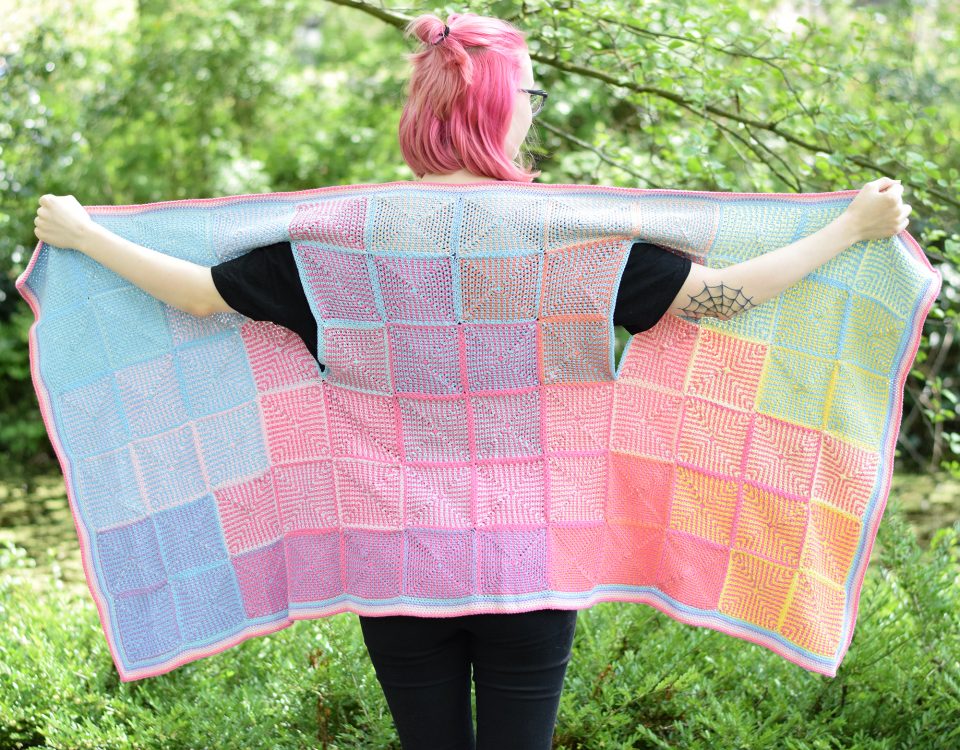
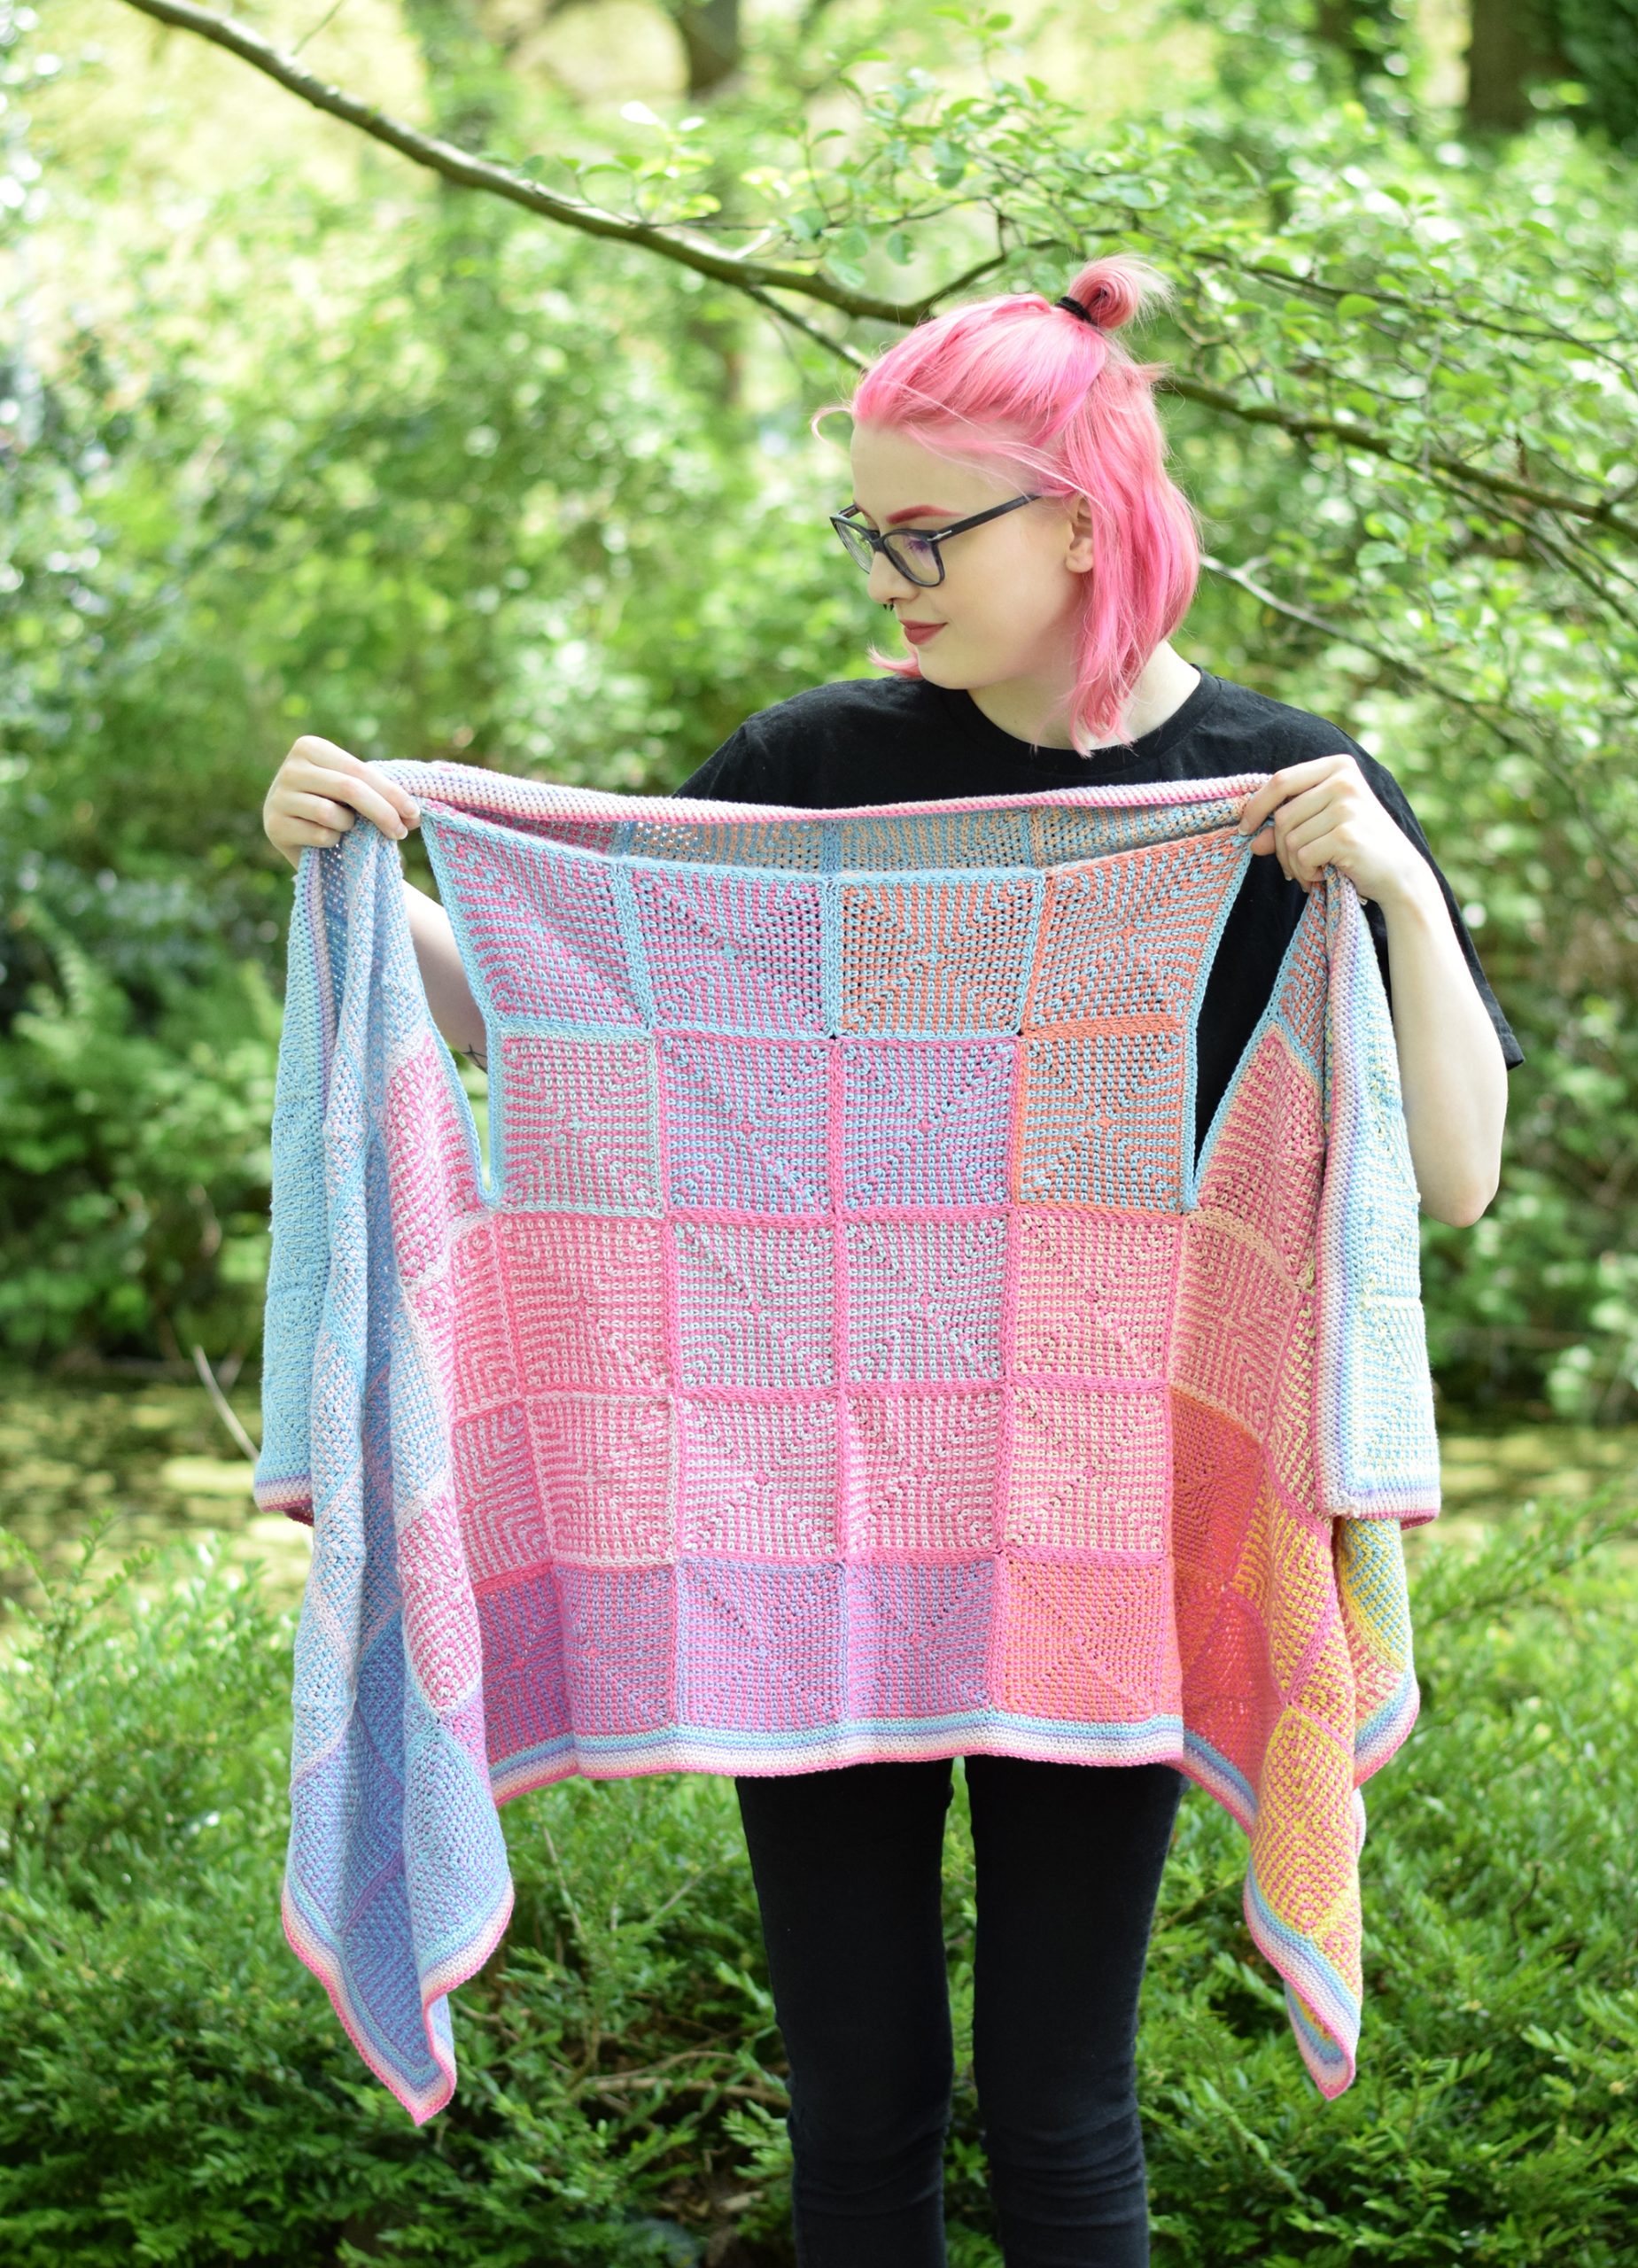
The Cardigan wrap is inspired by the setting sun and all the beautiful colors it can create, almost like the sky is a watercolor painting. I wanted to try to capture this image into a wrap by blending multiple colors. I’ve tried to work the colors in a ‘natural’ order in the wrap, just like you would get if the sun was setting.
- Read all previous posts about this pattern here, here and here.
- Create a project page on Ravelry, queue it for later or give it some love.
- Buy the PDF version on Etsy or Ravelry.
Poem
This pattern is part of the Poetry Collection. Each pattern in this collection is accompanied by a poem. Read more via this link.
Red and orange light
Purple wisps drawing in blue
Green and yellow hues
Looking at the painted sky
Another Spring day ending
Yarn
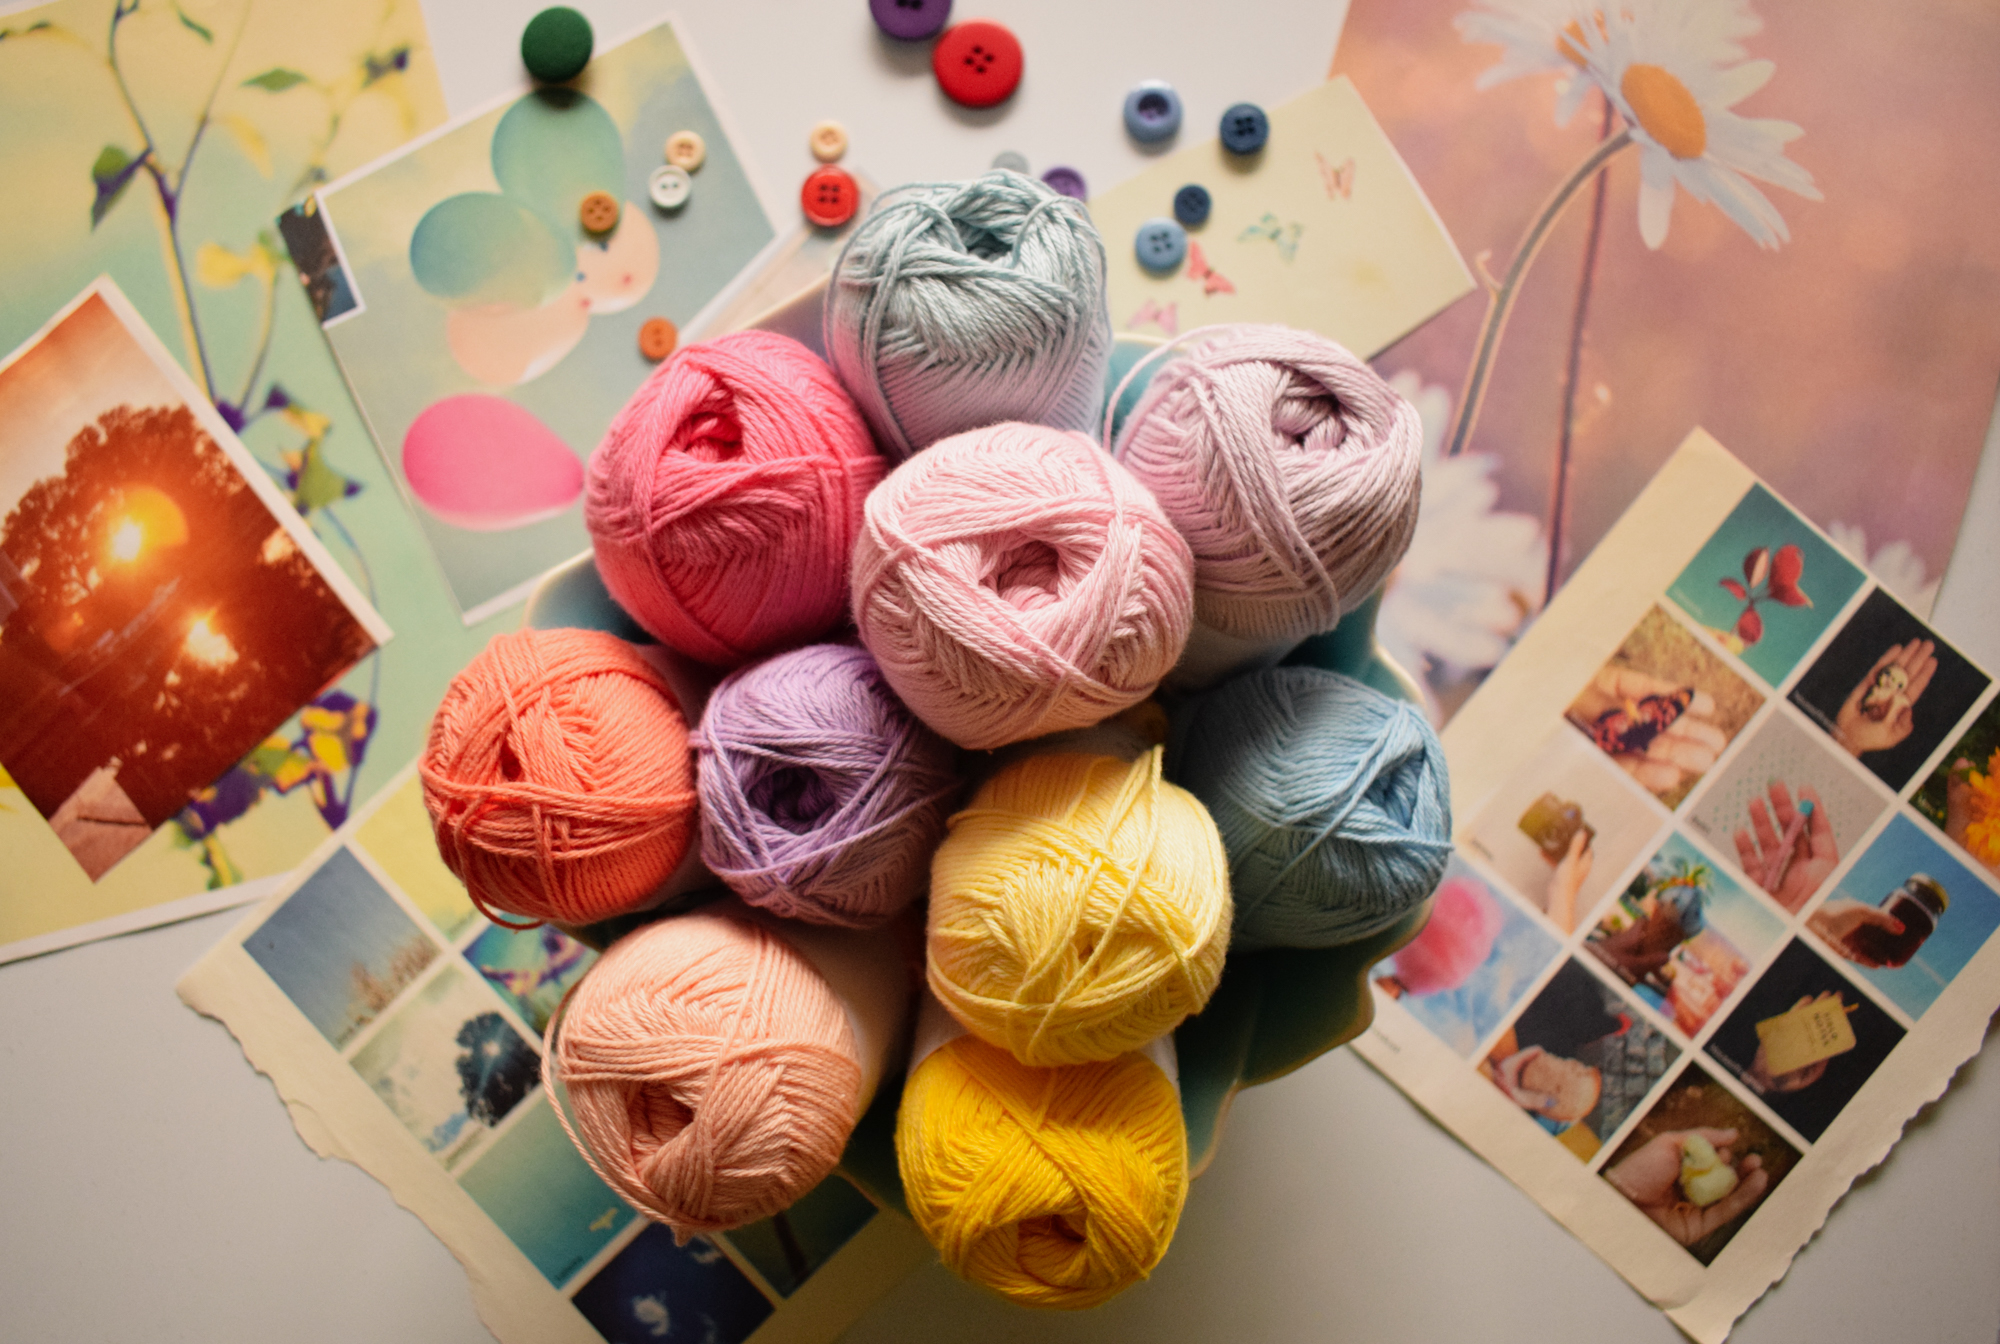
Scheepjes Organicon (100% organic cotton, 170m/50g) in the following colors x no. of balls:
Color A: 217 Fresh Air – Baby blue x 4
Color B: 207 Apple Blossom – Hot pink x 4
Color C: 205 Lavender – Purple x 1
Color D: 204 Lavender Haze – Light purple x 1
Color E: 216 Soft Sky – Light blue x 1
Color F: 206 Soft Blossom – Light pink x 1
Color G: 208 Peach Fuzz – Light orange x 1
Color H: 209 Desert Bloom – Orange x 1
Color I: 211 Gentle Primrose – Yellow x 1
Color J: 210 Buttermilk – Light yellow x 1
If you’d like to order Scheepjes Organicon for this wrap, but don’t have a Scheepjes retailer nearby, please consider buying your Scheepjes yarn via one of the links below. It will give me a small commission, but it won’t cost you anything extra.
UK/International: Wool Warehouse or Black Sheep Wools
Benelux: Caro’s Atelier
List of all Scheepjes retailers: Scheepjes website
Notions
- 3mm and 3.5mm hook or other size to obtain gauge
- Darning needle and thread clipper
- Blocking materials
Gauge & Size
1 finished square measures 11x11cm/4.4×4.4” before blocking, using 3.5mm hook. The Cardigan Wrap measures 135cm/54” long and 70cm/28” wide after blocking.
Stitches & Abbreviations (US terms)
ch chain
ch-sp chain space
corner-sp corner space
MR magic ring
sk skip
sl st slip stitch
st stitch
sc single crochet
rep repeat
RS right side of your work
*…; rep from * once more/twice more/3 more times/to end work the instructions after * and then rep that section as specified.
[…] indicates stitch counts, but I also use them when a group of sts need to be worked into the same st/sp in cases when using parentheses would be confusing.
{italic text} indicates notes and tips throughout the pattern.
Before you begin – Important notes and Tips
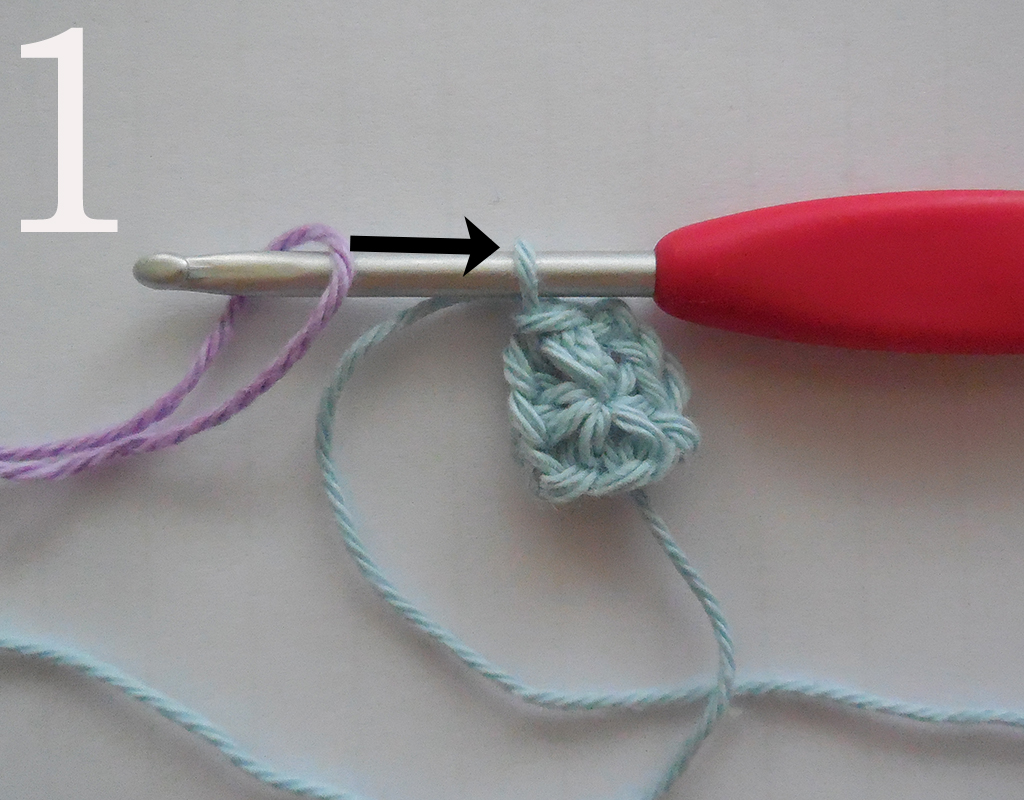
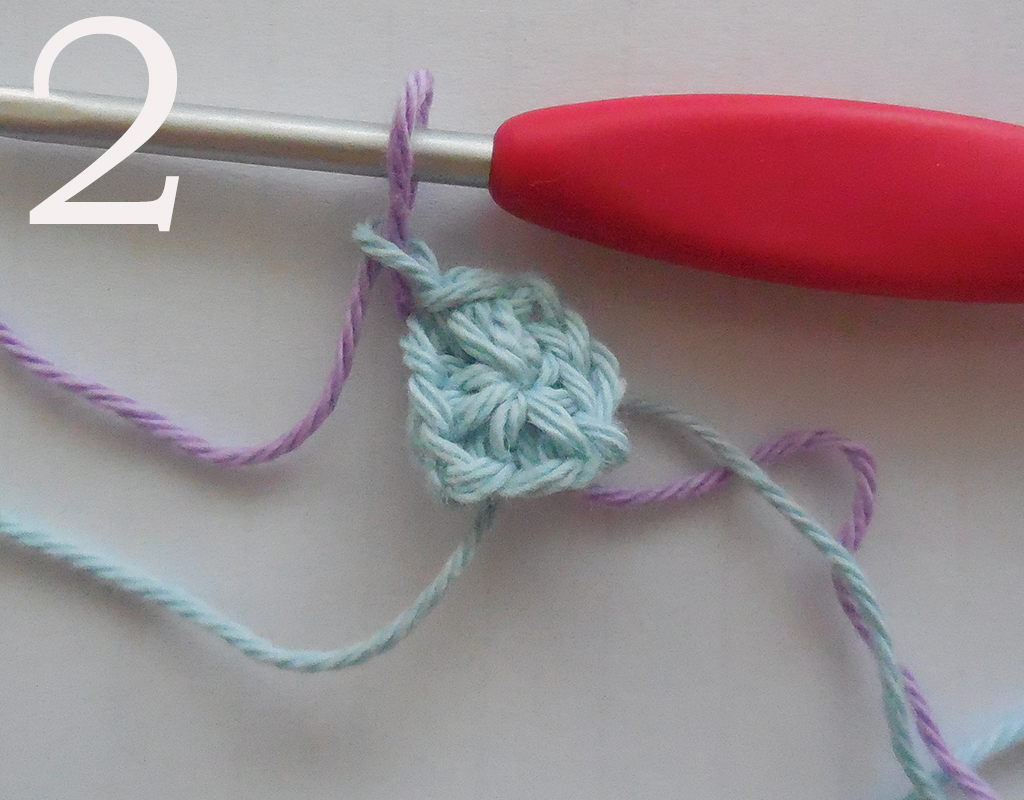
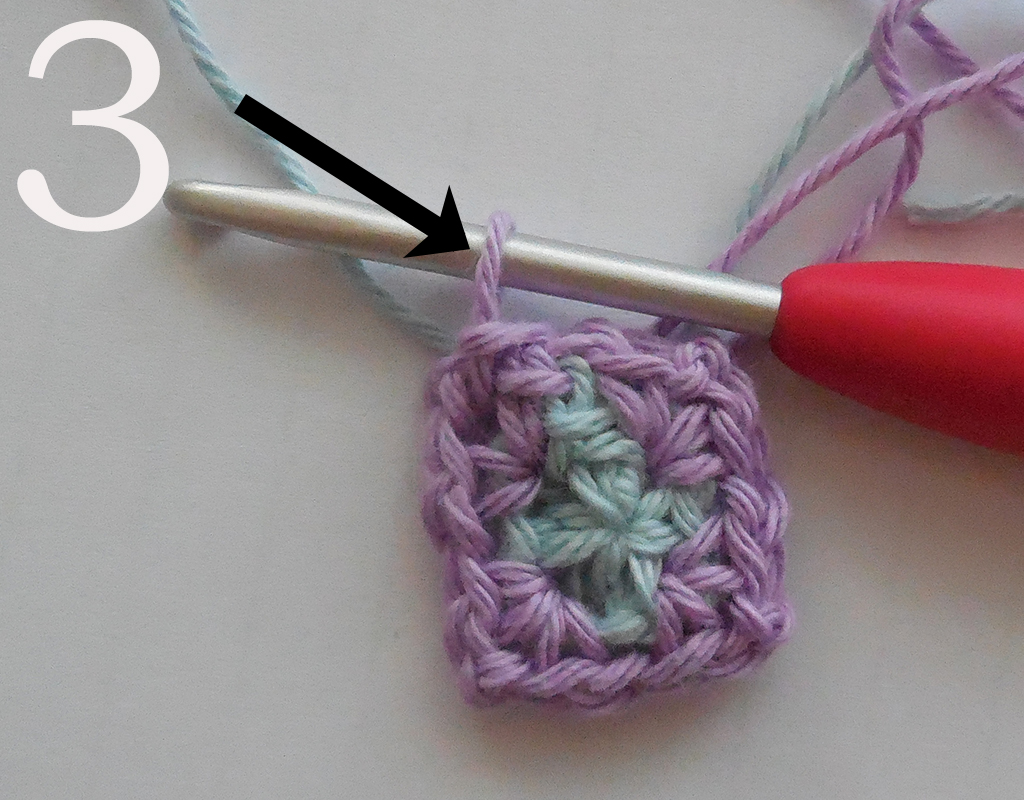
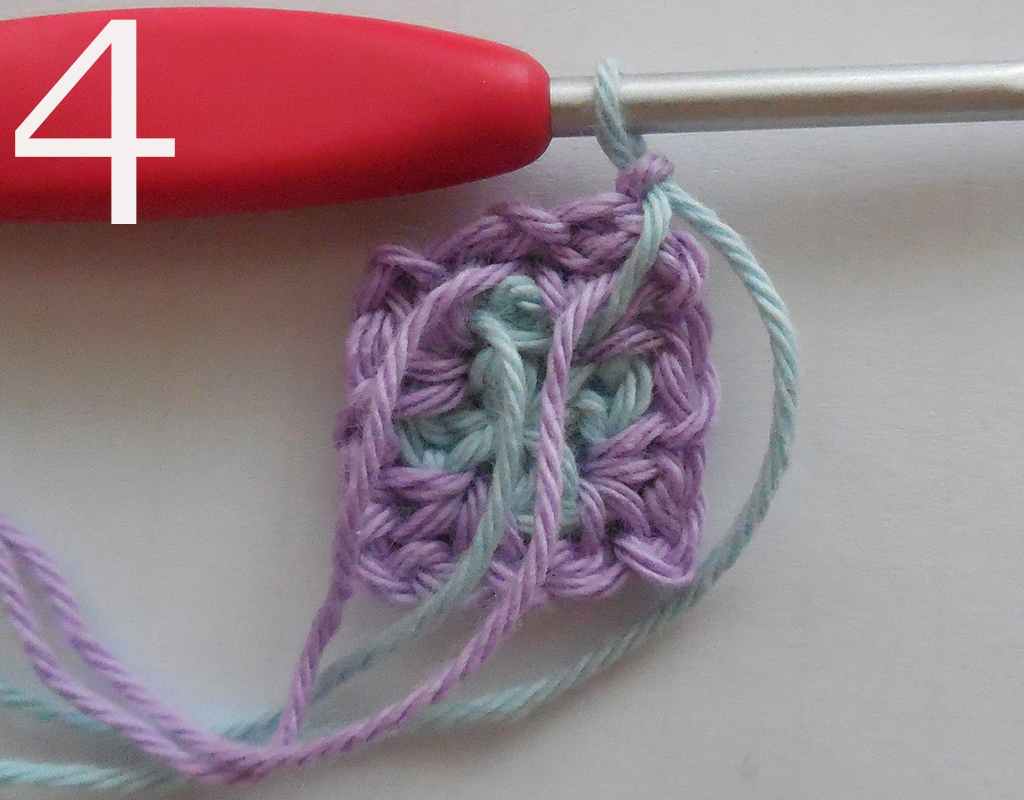
1: When changing colors, pull the loop of the second color through the loop of the first color. Pull the first color tightly and let it hang at the back. This prevents a lot of ends {Pic 1-4, pic 4 shows the back of your work}.
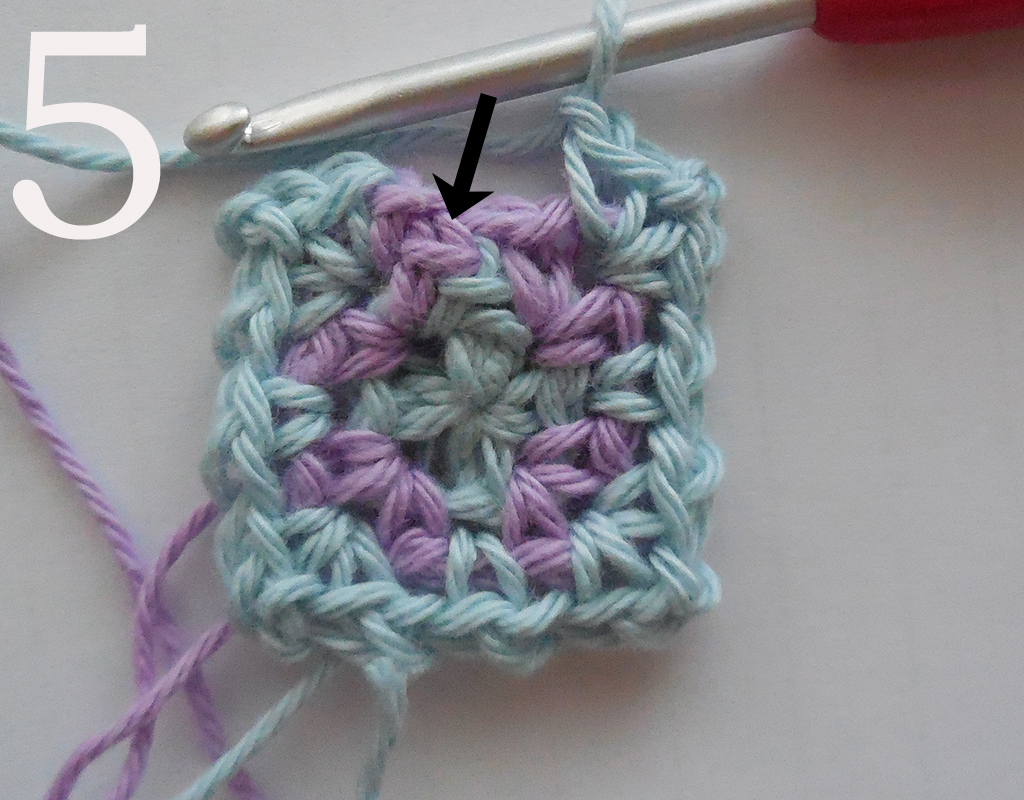
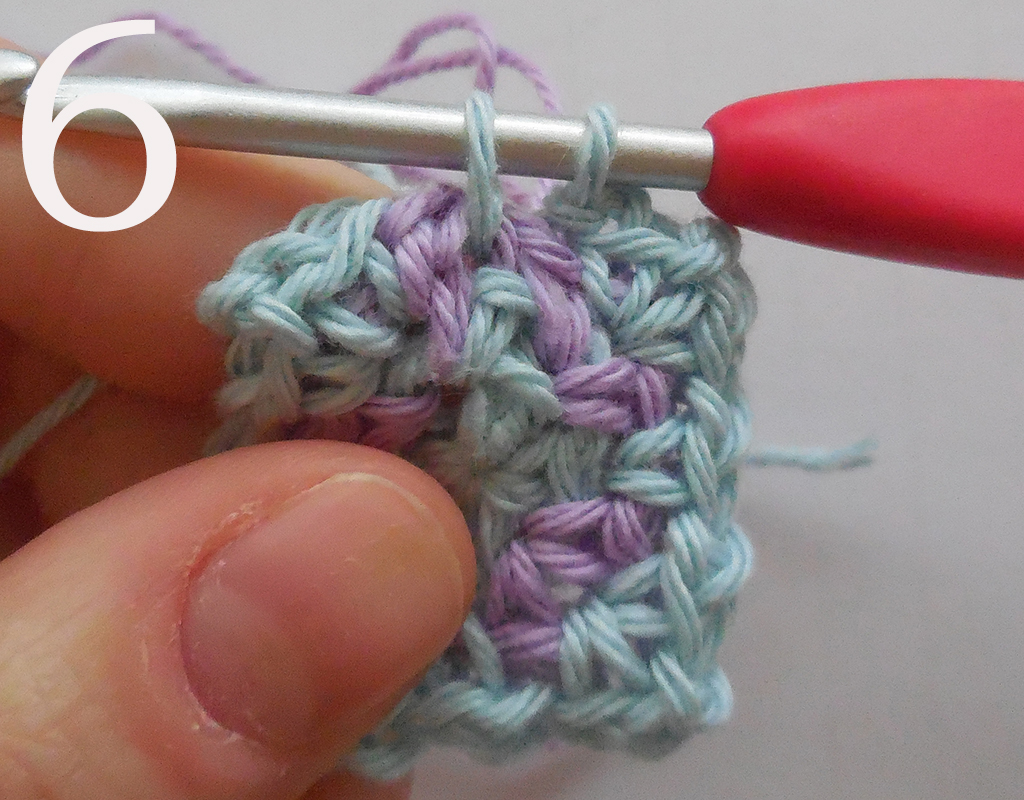
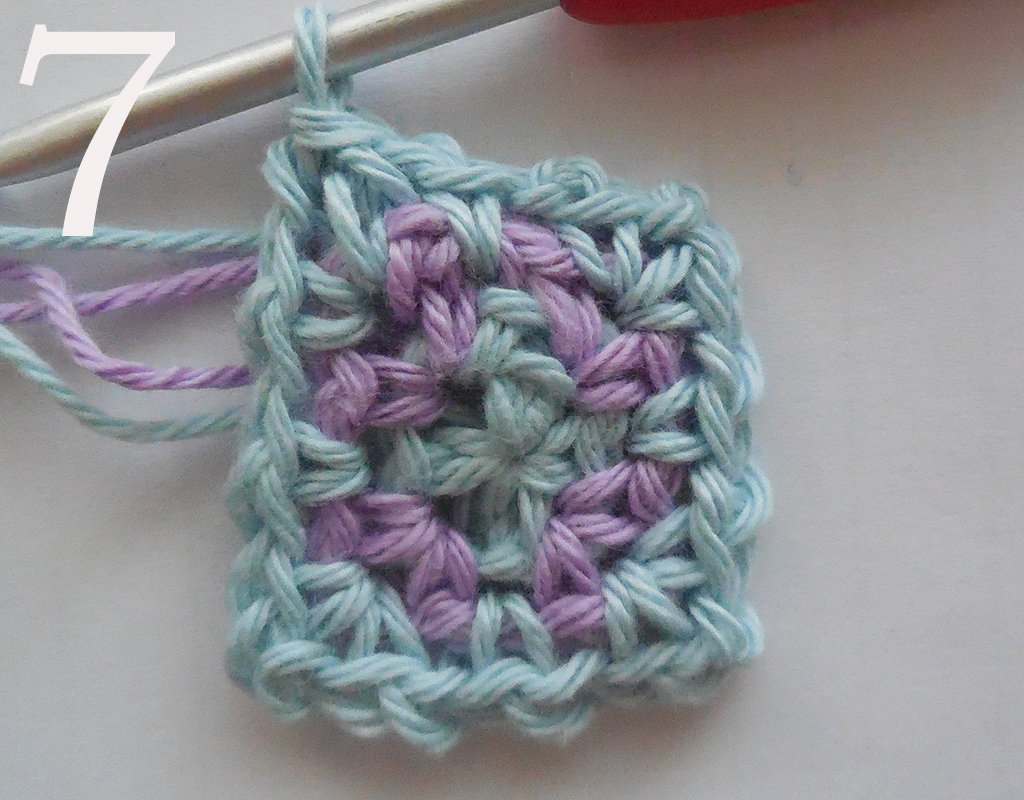
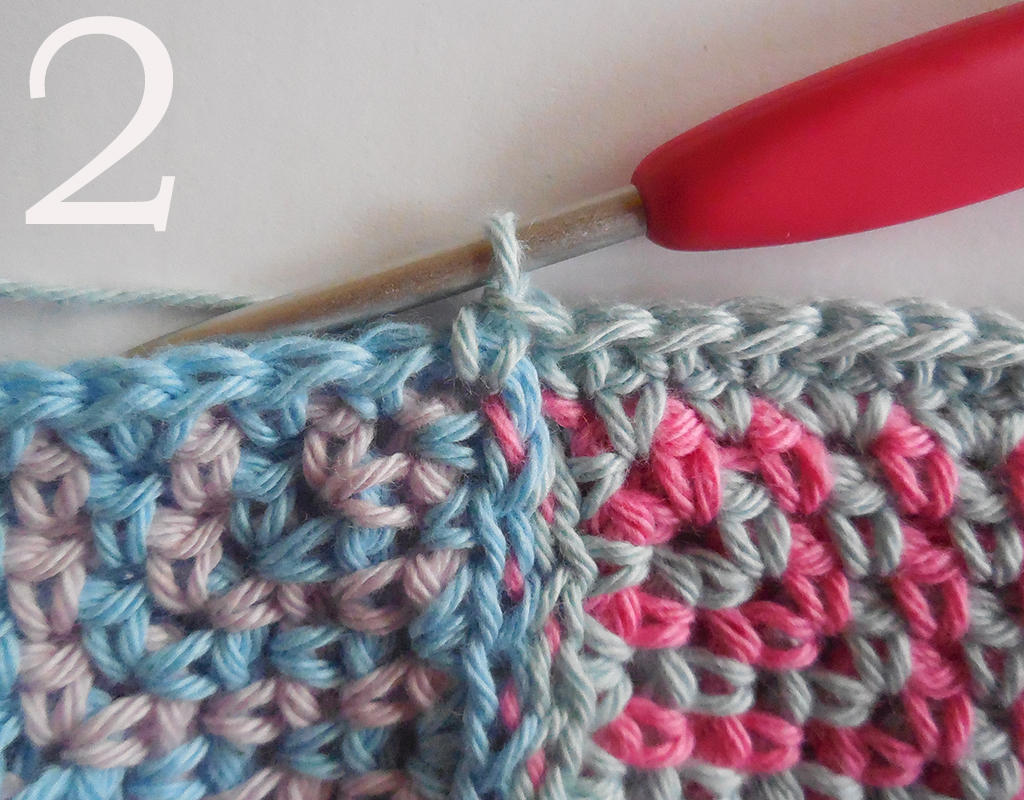
2: From R3, when working the last sc of the round, insert your hook into the last ch-sp and in the sc of the round below, for a neater finish {pic 5-7}.
The pattern
R1 (RS) With 3.5mm hook and Color A; make MR, work [1sc, ch2] 4 times in MR, sl st in first ch-sp {skipping the sc}, change to Color B {see Important Notes&Tips}. [4 sc, 4 ch-sp]
R2 (RS) With Color B; *[1sc, ch2, 1sc] in ch-sp, ch1, sk next sc; rep from * around, sl st in first ch-sp {skipping the sc}, change to Color A. [8 sc, 8 ch-sp]
R3 With Color A; *[1sc, ch2, 1sc] in ch-sp, [ch1, sk next sc, 1sc in next ch-sp] to last sc before the next corner, ch1, sk last sc; rep from * around, sl st in first ch-sp {skipping the sc}, change to Color B. [12 sc, 12 ch-sp]
R4-12 Rep R3 for 9 times more, alternating Color A and B, change to Color A at the end of R12. [48 sc, 48 ch-sp]
R13 With Color A; *[1sc, ch2, 1sc] in ch-sp, sk next sc, 1sc in next ch-sp, [sk next sc, 2sc in next ch-sp] 9 times, sk next sc, 1sc in last ch-sp before next corner; rep from * around, sl st in first ch-sp {skipping the sc}, fasten off both colors. [88 sc, 4 ch-sp]
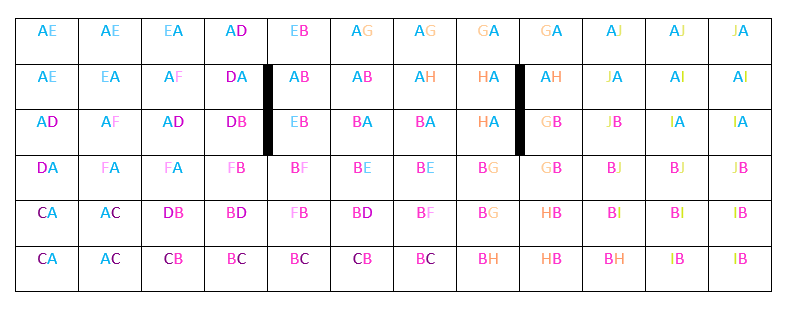
Make squares in the following color combinations {starting with the first listed color and alternating with the second listed color}:
| 2x AB | 2x BA | 2x CA | 2x CB |
| 2x AC | 3x BC | 2x DA | 2x DB |
| 3x AD | 2x BD | 2x EA | 2x EB |
| 3x AE | 2x BE | 2x FA | 2x FB |
| 2x AF | 2x BF | 2x GA | 2x GB |
| 2x AG | 2x BG | 2x HA | 2x HB |
| 2x AH | 2x BH | 2x IA | 3x IB |
| 2x AI | 2x BI | 2x JA | 2x JB |
| 2x AJ | 2x BJ |
Crochet Chart (in English and Dutch terminology)
Layout & Joining
Join the squares as indicated in the schematic below using your darning needle and about 1.5 x arm’s length of yarn matching the predominant color of the section you’re sewing together.
Step 1: Start joining all squares in vertical rows. Take the first two squares and lay them on a flat surface with the RS facing upwards and the edges towards each other. Attach yarn at the back of the first square.
Step 2: Thread yarn through the corner spaces of both squares from bottom to top.
Step 3: Thread yarn through st left of corner space in back loop of top square and bottom square.
Step 4: Thread yarn through st left of previous st in back loop of bottom square and top square.
Step 5: Thread yarn through st left of previous st in back loop of top square and bottom square.
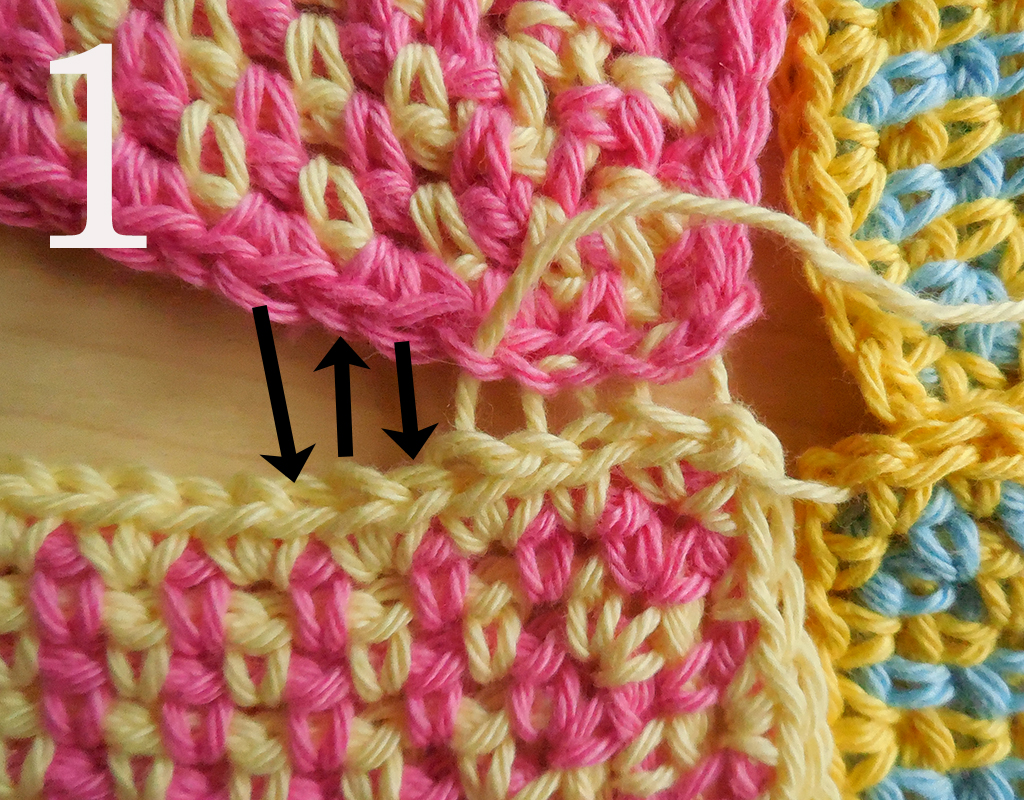
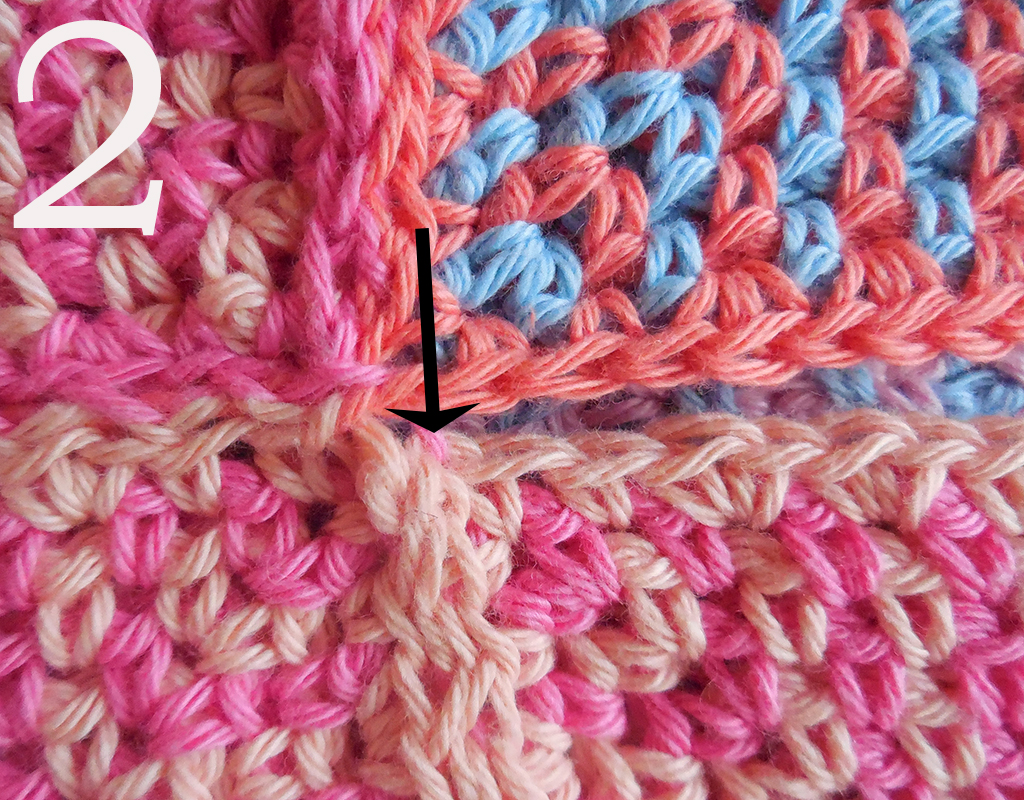
Rep step 4 and 5 {pic 1} until you come across the corner space, thread yarn through corner spaces of both squares. Continue with two new squares. Pull the yarn gently now and then to neaten the stitches {pic 2}.
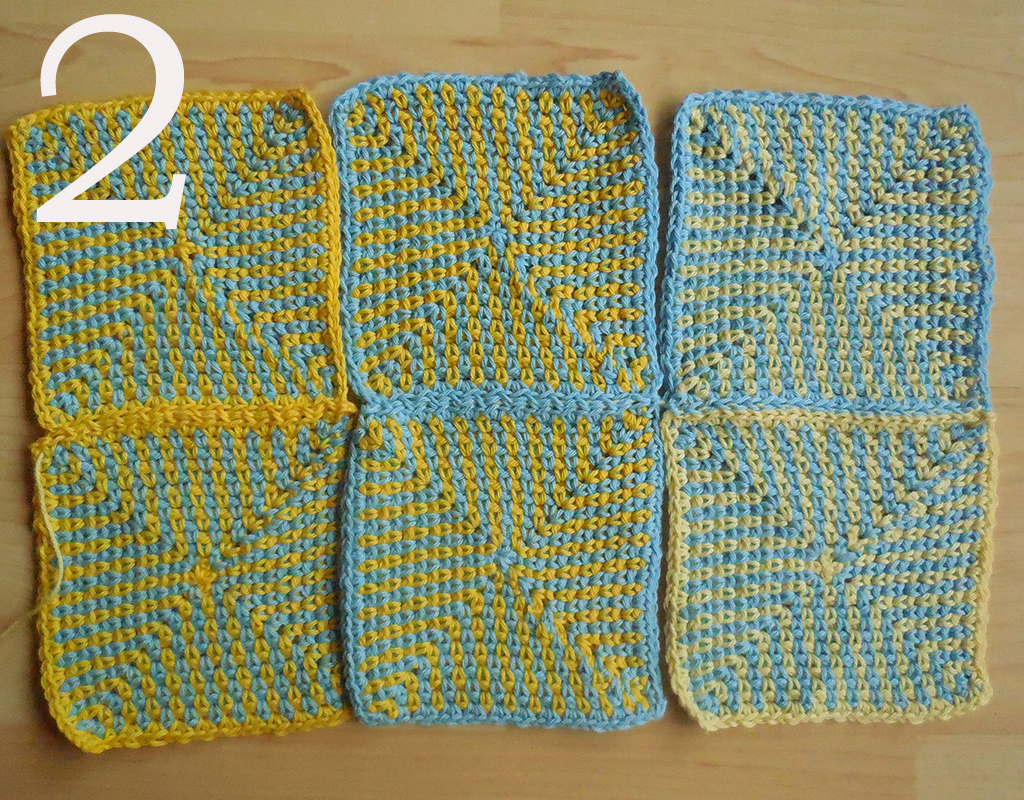
When all squares are joined vertically, rep the same steps horizontally, so all squares are attached on all sides. Do not join squares at the marked lines below, these will be your armholes.
Border
Tip: I didn’t have a lot yarn left over to work the finishing edge, so if you run out of yarn mid-round, attach the color of the following round and continue the round and the following round with the same color.
R1 (RS) With 3mm hook and Color E; Lay cardigan wrap with the RS towards you, join yarn with sl st in any outer corner-sp of the cardigan wrap, ch1, *[1sc, ch2, 1sc] in corner-sp, 1sc in each st and each ch-sp {pic 1-2} to next corner-sp; rep from * around, fasten off Color E.
R2 (RS) Join Color A with sl st in any corner-sp, ch1, *[1sc, ch2, 1sc] in corner-sp, 1sc in each st to next corner-sp; rep from * around, fasten off Color A.
R3 Join Color C with sl st in any corner-sp, ch1, *[1sc, ch2, 1sc] in corner-sp, sk first {hidden, pic 3} st, 1sc in each st to next corner-sp; rep from * around, fasten off Color C.
R4-7 Rep R2-3 twice more, in color order: D, F, G, B.

Armholes
R1 (RS) With 3mm hook and Color E; Lay cardigan wrap with the RS towards you, join yarn with sl st in bottom right ch-sp {pic 1-2}, work 1sc in each st and each ch-sp around, fasten off Color E. Rep instructions for second armhole.
R2 (RS) Join Color A with a sl st in same st as join, ch1, work 1sc in each st around, fasten off color A. Rep instructions for second armhole.
Work away all ends and block cardigan wrap to the correct dimensions.
I love to see your creations! Please share on Facebook or tag me on Instagram (@aspoonfulofyarn)! And if you have a question, please don’t hesitate to ask using the contact page.
************************************************************************
Affiliate disclaimer
This post contains affiliate links. When you click this link and purchase something, I will get a small commission, but it will not cost you extra money. This way you can support my blog and I can keep making free patterns.
Copyright
All patterns are for unlimited personal use. Do not reproduce, sell or publish (parts of) the patterns. Patterns may not be copied in any way (print or digitally), in part or in full, except for personal use. Items may be sold that are made from this pattern as long as the designer is credited.
Discover more from A Spoonful of Yarn
Subscribe to get the latest posts sent to your email.