
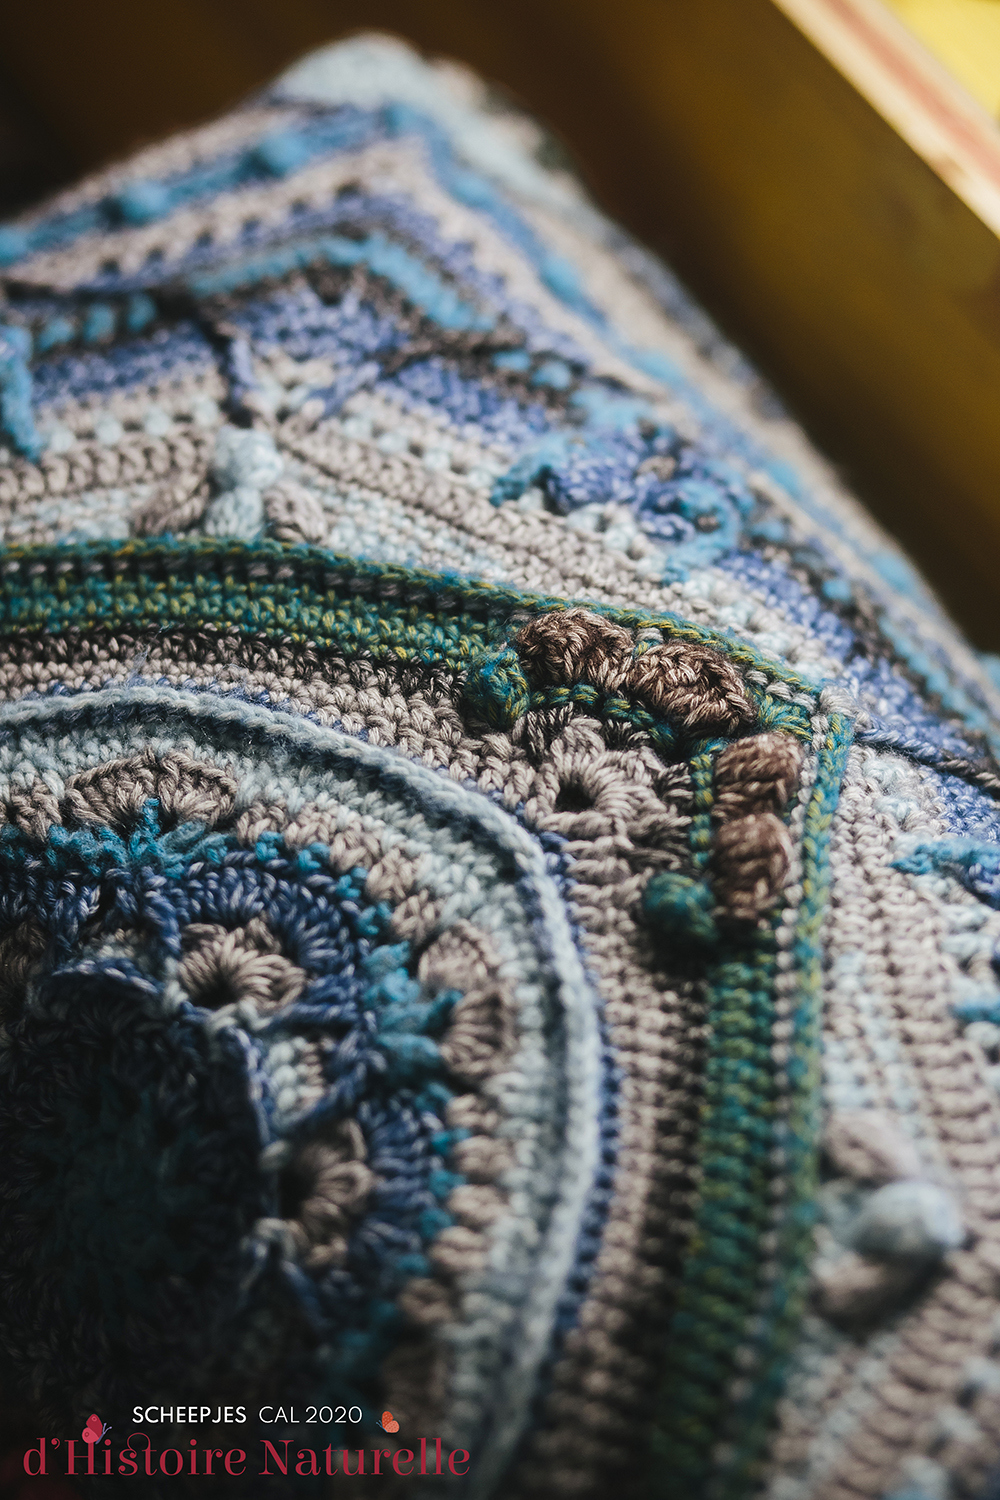
Welcome to the first blog post of the official 2020 Scheepjes CAL – d’Histoire Naturelle. I hope you are as excited as I am to start our museum adventure : D Below you will find more info regarding the inspiration for this first part and some tutorial photos to help you in your crochet journey!
Welkom bij de eerste blogpost van de officiële 2020 Scheepjes CAL – d’Histoire Naturelle. Ik hoop dat je net zo’n zin hebt als ik om ons museumbezoek te beginnen : D Hieronder vind je wat meer info over de inspiratie voor dit eerste deel en een aantal tutorial foto’s om je te helpen in je haakavontuur!
Get the full CAL PDF with added benefits! / Krijg de volledige CAL PDF met leuke extra’s!
You can now get a full PDF with ALL parts into one + added benefits! Etsy I Ravelry
Read more about this here.
Je kunt nu ook een volledige PDF krijgen met ALLE delen in één + leuke extra’s Etsy I Ravelry
Lees er hier meer over.
Links
- Main CAL page / CAL Hoofdpagina
- Share your work or get pattern support through the Scheepjes Facebook group / Deel je werk of stel vragen over het patroon via de Scheepjes Facebook groep
- Tips & Tricks
- The PDF pattern in English and other languages / Het PDF patroon in Nederlands
- CAL video (UK terms) part 1 / CAL video deel 1
- Interview videos with the author of All The Light We Cannot See / Interview videos met de auteur van Als Je Het Licht Niet Kunt Zien
The Story / Het Verhaal
We begin our journey outside, in the Jardin des Plantes, which is the museum botanical garden. The garden, with all its (museum) buildings and greenhouses, is a stunning 26 hectares (about 39 football fields) and is situated in the center of Paris. It is also the home of three beautiful museums: the gorgeous Grande Galerie de l’Evolution, the Galerie de Paléontologie et d’Anatomie comparée and the Galerie de Minéralogie et de Géologie.
Can you envision the grand hedges that cast their shadow upon the botanical gardens with more than 10.000 named plant species? Hard to imagine, right?
We starten ons avontuur buiten, in de botanische museumtuin, de Jardin des Plantes. De tuin, inclusief al de (museum) gebouwen en tuinkassen, is wel 26 hectare groot (ongeveer 39 voetbalvelden!) en ligt in het centrum van Parijs. Het is tevens waar drie prachtige musea staan: de Grande Galerie de l’Evolution, de Galerie de Paléontologie et d’Anatomie comparée en de Galerie de Minéralogie et de Géologie.
Kan je je de grootse heggen voorstellen die hun schaduw werpen op de botanische tuinen met meer dan 10.000 benoemde plantensoorten? Ik niet, haha.
The gardens / De tuinen


The Blanket / De Deken
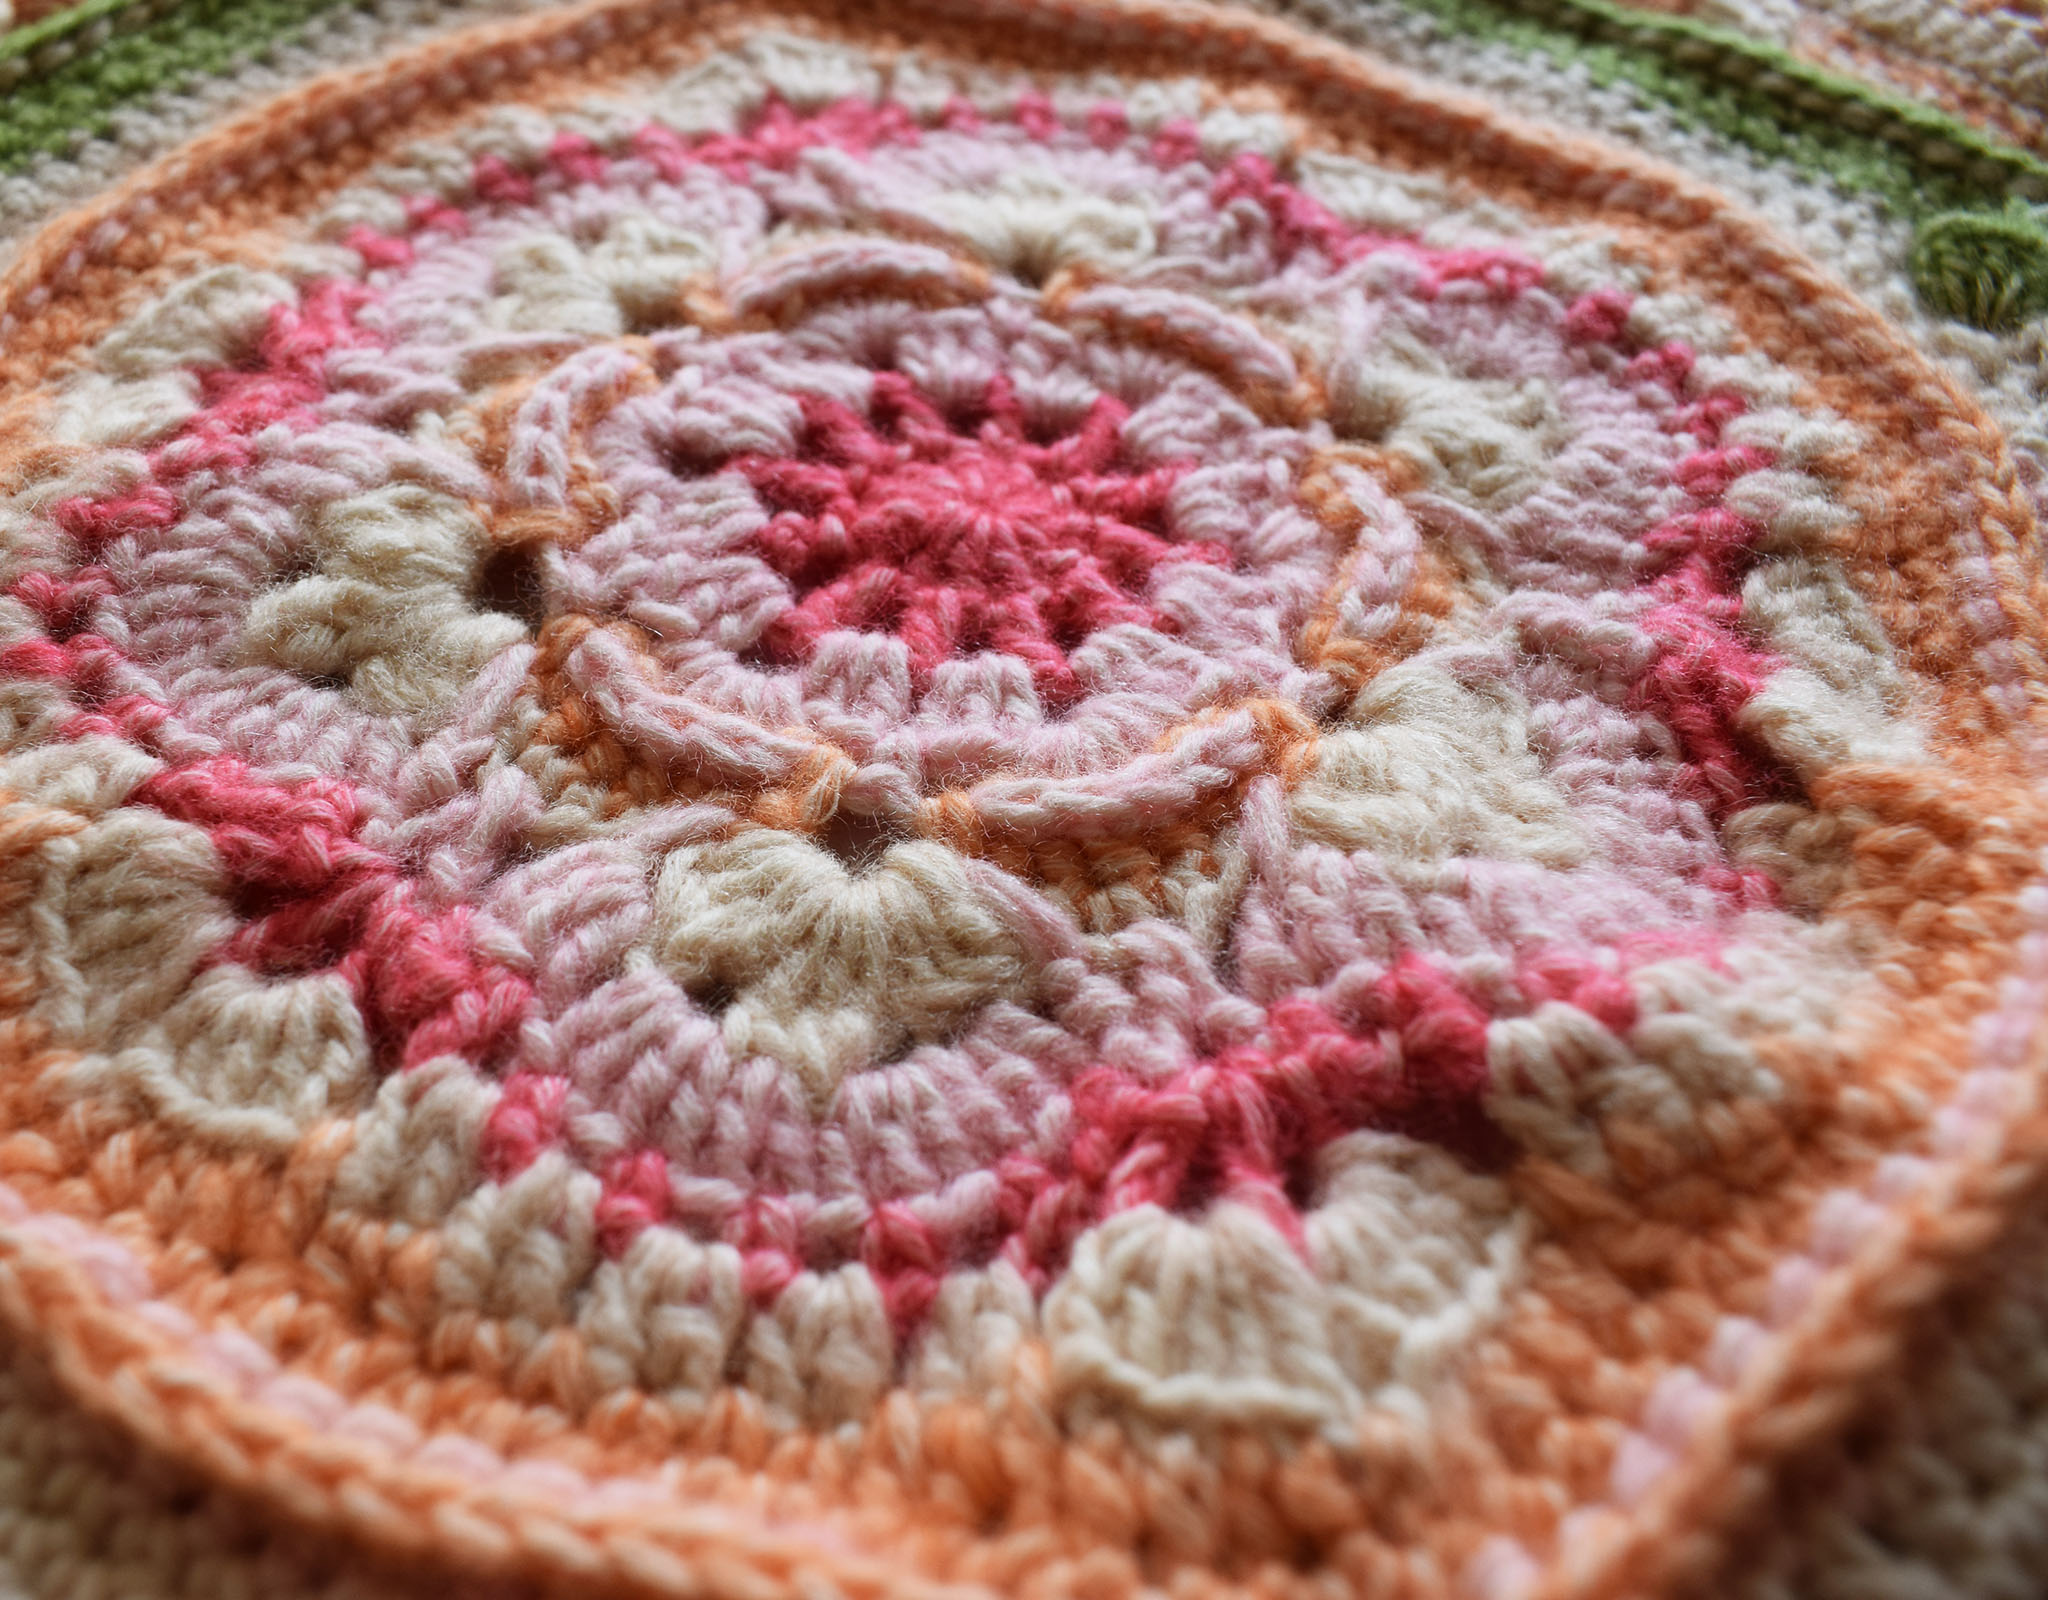
The blanket will start with a round shape, which is turned into a hexagonal flower shape. After that it is turned into a circle and ends in a square. In this part you will find floral stitch patterns, inspired by botany, as well as round hedges in the corners, inspired by the grand hedges of the garden.
De deken start met een ronde vorm, die in een zeshoekige bloem wordt gemaakt. Daarna wordt het weer een cirkel en het eindigt in een vierkant. In dit deel vind je bloemige steken, geïnspireerd door de botanische tuinen, en ook ronde heggen in de hoeken, geïnspireerd door de grootse heggen van de Jardin des Plantes.
Shop the yarn / Bestel het garen
If you haven’t bought your kit yet and you don’t have a Scheepjes retailer nearby, please consider buying your Scheepjes kit through one of the links below. It will give me a small commission, but it won’t cost you anything extra. That way I can keep making free patterns : )
Als je nog geen kit hebt gekocht en geen Scheepjes verkooppunt dichtbij hebt, overweeg dan je Scheepjes kit via één van onderstaande links te kopen. Hiervoor krijg ik een kleine commissie, terwijl het jou niks extra’s kost. Op die manier kan ik gratis patronen blijven maken : )
UK/International: Wool Warehouse, Black Sheep Wools or The Knitting Network
Benelux: Caro’s Atelier
List of all / Lijst van alle Scheepjes retailers:Scheepjes website
The Pattern / Het Patroon
You can find the pattern for the first chapter on the Scheepjes Website or in the Scheepjes Facebook group. In the group you can also share your progress or ask questions. Me and the admin/mods of Scheepjes are there to assist you.
Esther from It’s All in a Nutshell has made a tutorial video, which you can find here. Below you can find a few tips and photos for some (but not all) of the rounds for the possibly tricky bits, which can help you in your journey. But please note it is not a substitute for the written pattern. While the written pattern is also available in US terms, the English terms below, as well as Esther’s videos are in UK terminology, as the original Scheepjes pattern terminology is also UK terms.
Happy crocheting : )
Je kunt het patroon voor het eerste hoofdstuk op de Scheepjes website vinden of in de Scheepjes Facebook groep. Daar kun je ook je voortgang delen of vragen stellen. Ik en de admin/mods van Scheepjes staan daar voor je klaar om je te helpen.
Esther van It’s All in a Nutshell heeft een tutorial video gemaakt die je hier kunt vinden. Hieronder vind je wat tips en foto’s voor sommige (niet alle) rondes die misschien wat lastiger zijn, om je te helpen in dit haakavontuur. Maar let op dat dit geen vervanging is voor het geschreven patroon.
Veel haakplezier : )
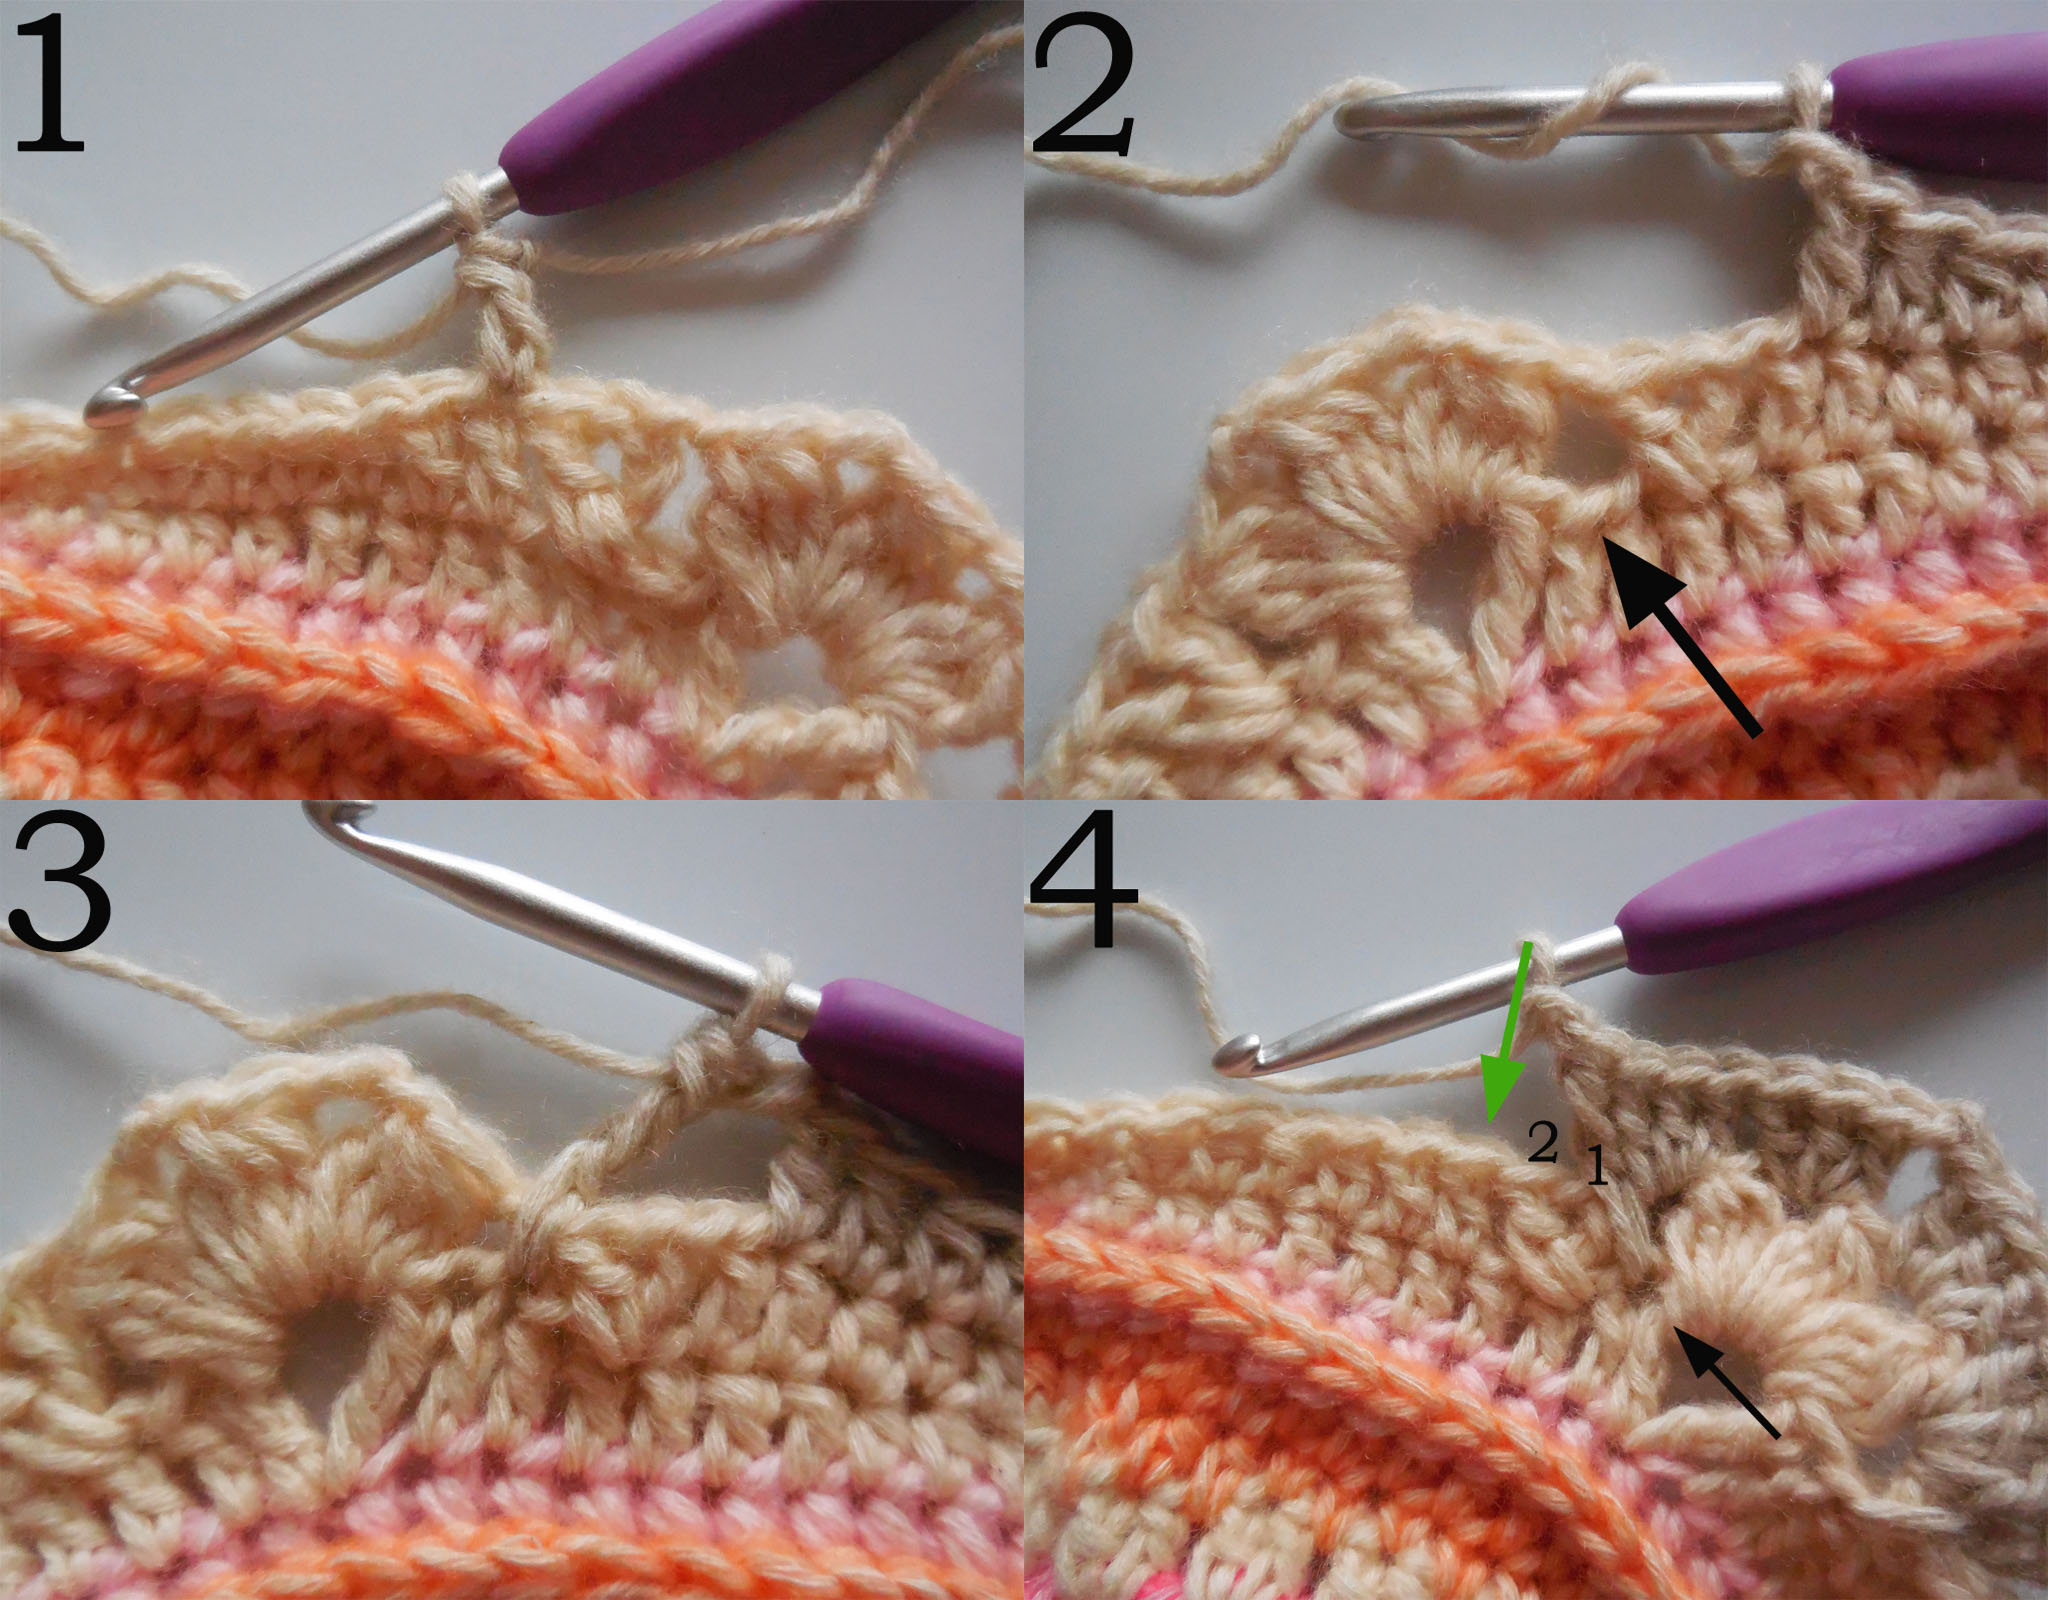
R4
1/2: Stitches are made in between 3tr-groups and are indicated with black lines. / Steken worden gemaakt tussen twee 3st-groepen en weergegeven met zwarte lijnen.
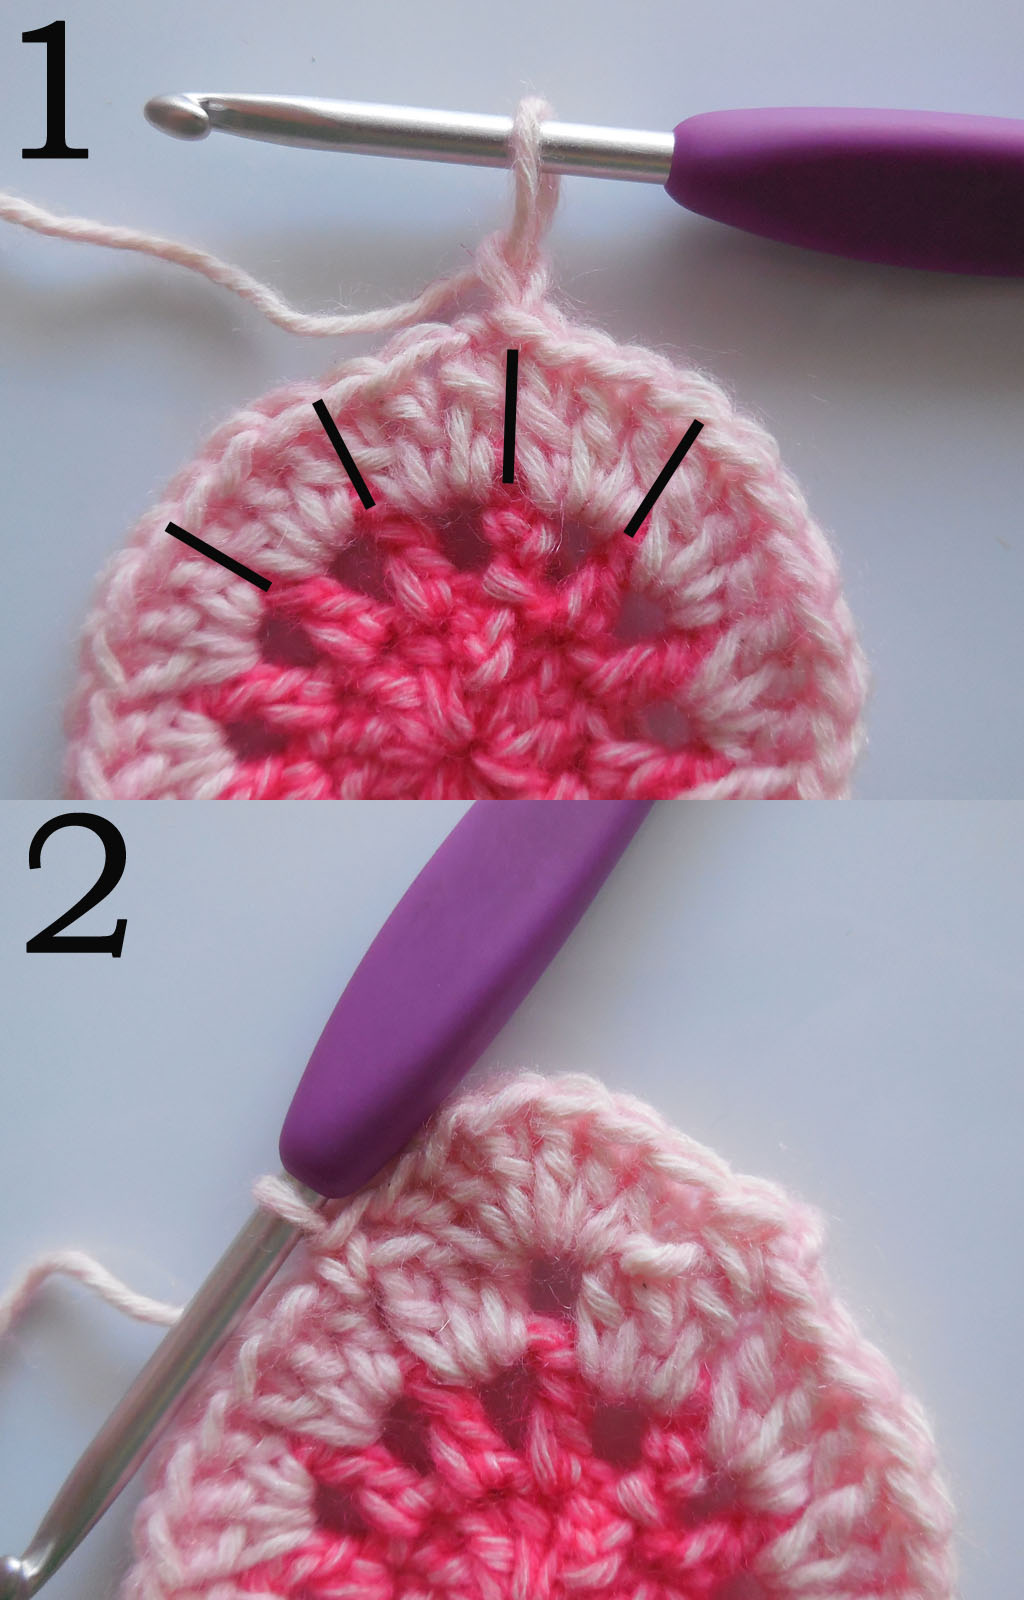
R5
1: The spaces you need to work into are indicated with the black circles.
De ruimtes waar je in moet werken worden weergegeven met zwartje puntjes.
2-5: The black lines indicate the posts of the stitches you need to go around to make the bphtr.
De zwarte lijnen geven de staanders weer van de steken waar je omheen moet werken om een RhstA te haken.
4: The arrow indicates the loop of the stitch, the line indicates the post of the stitch, this will help you understand the stitch anatomy.
De pijl geeft de lus van de steek aan, de lijn geeft de staander van de steek aan, dit helpt je om de anatomie van de steek te begrijpen.
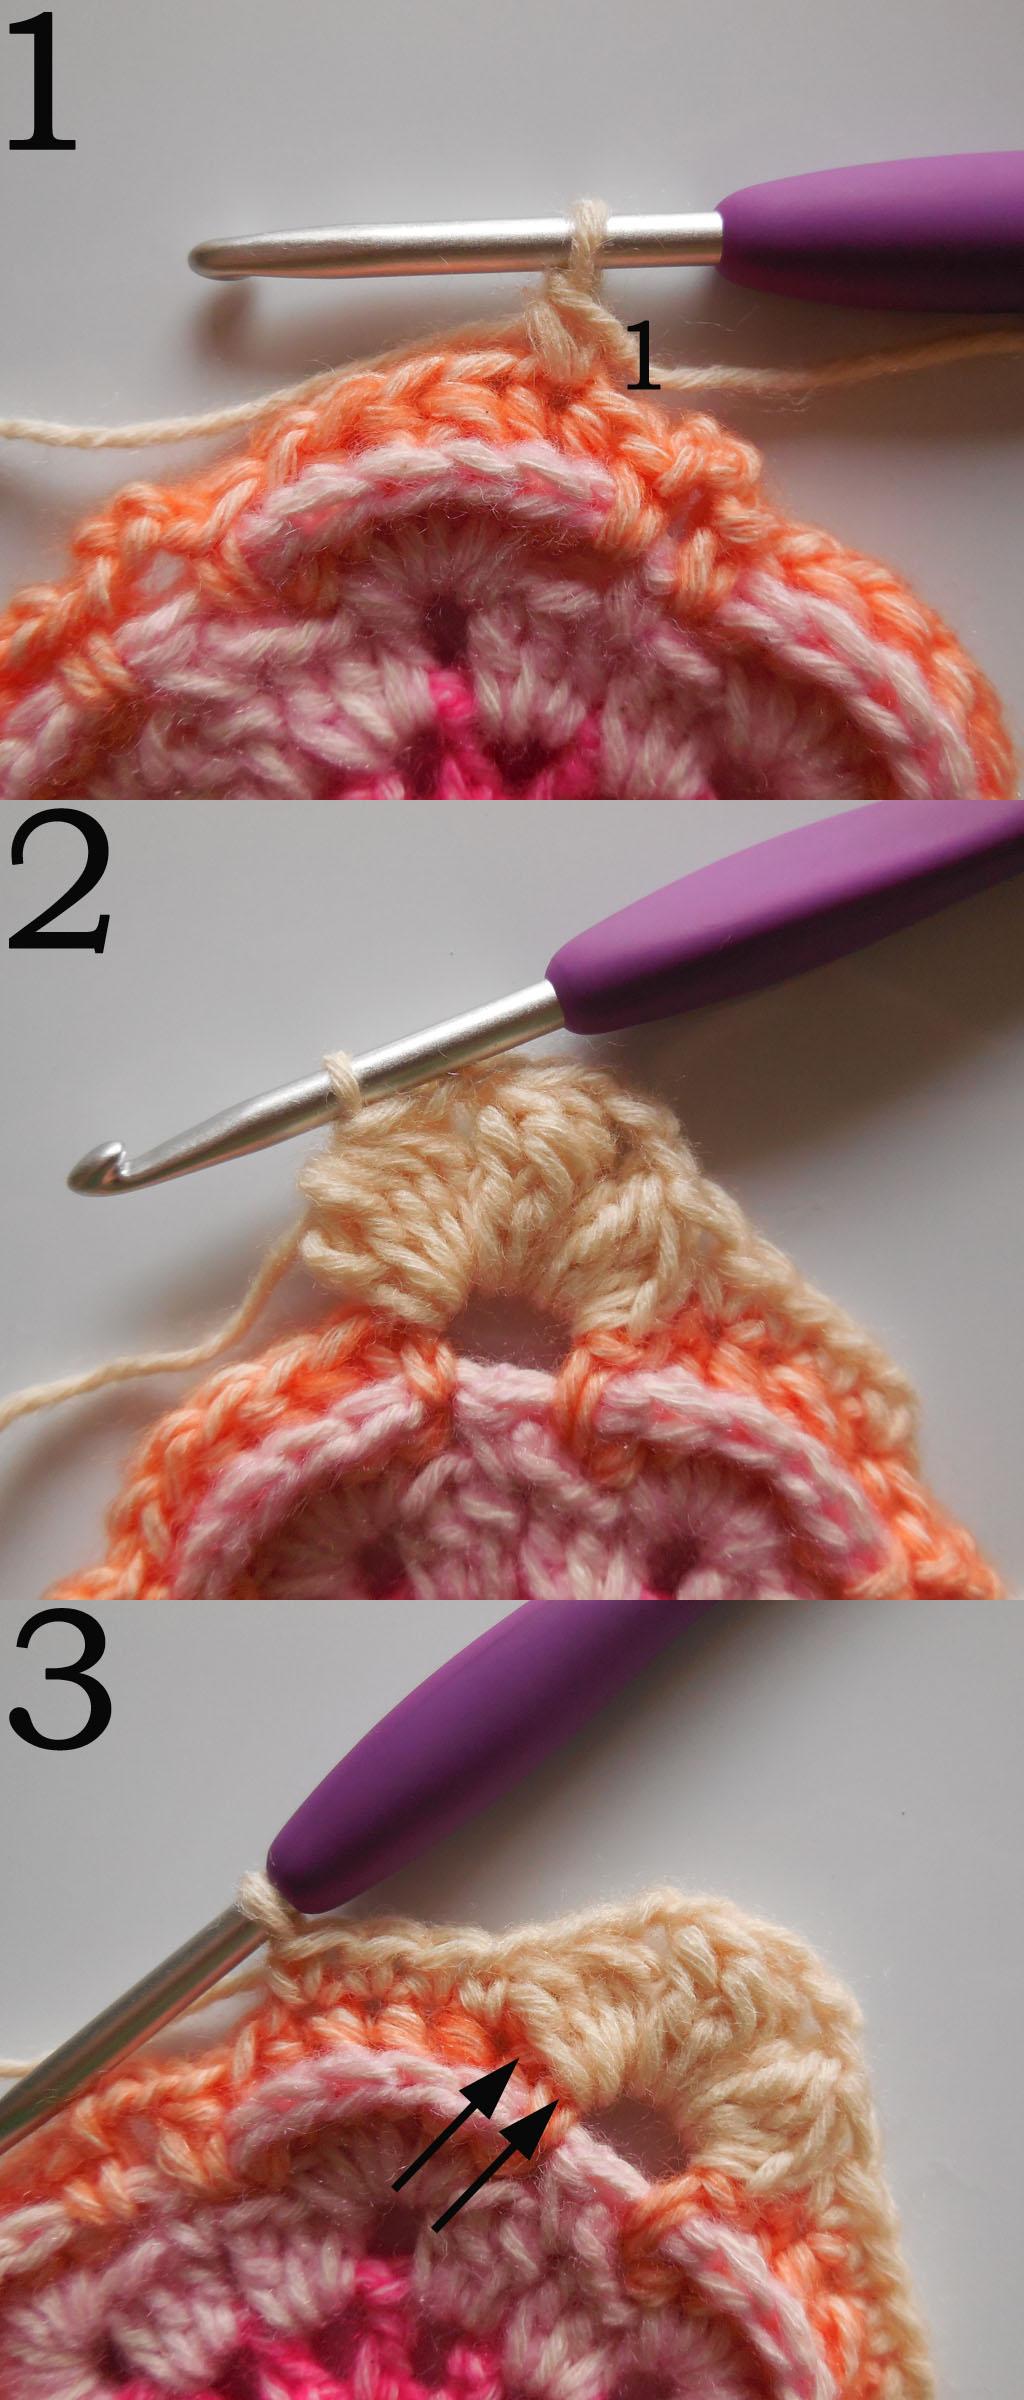
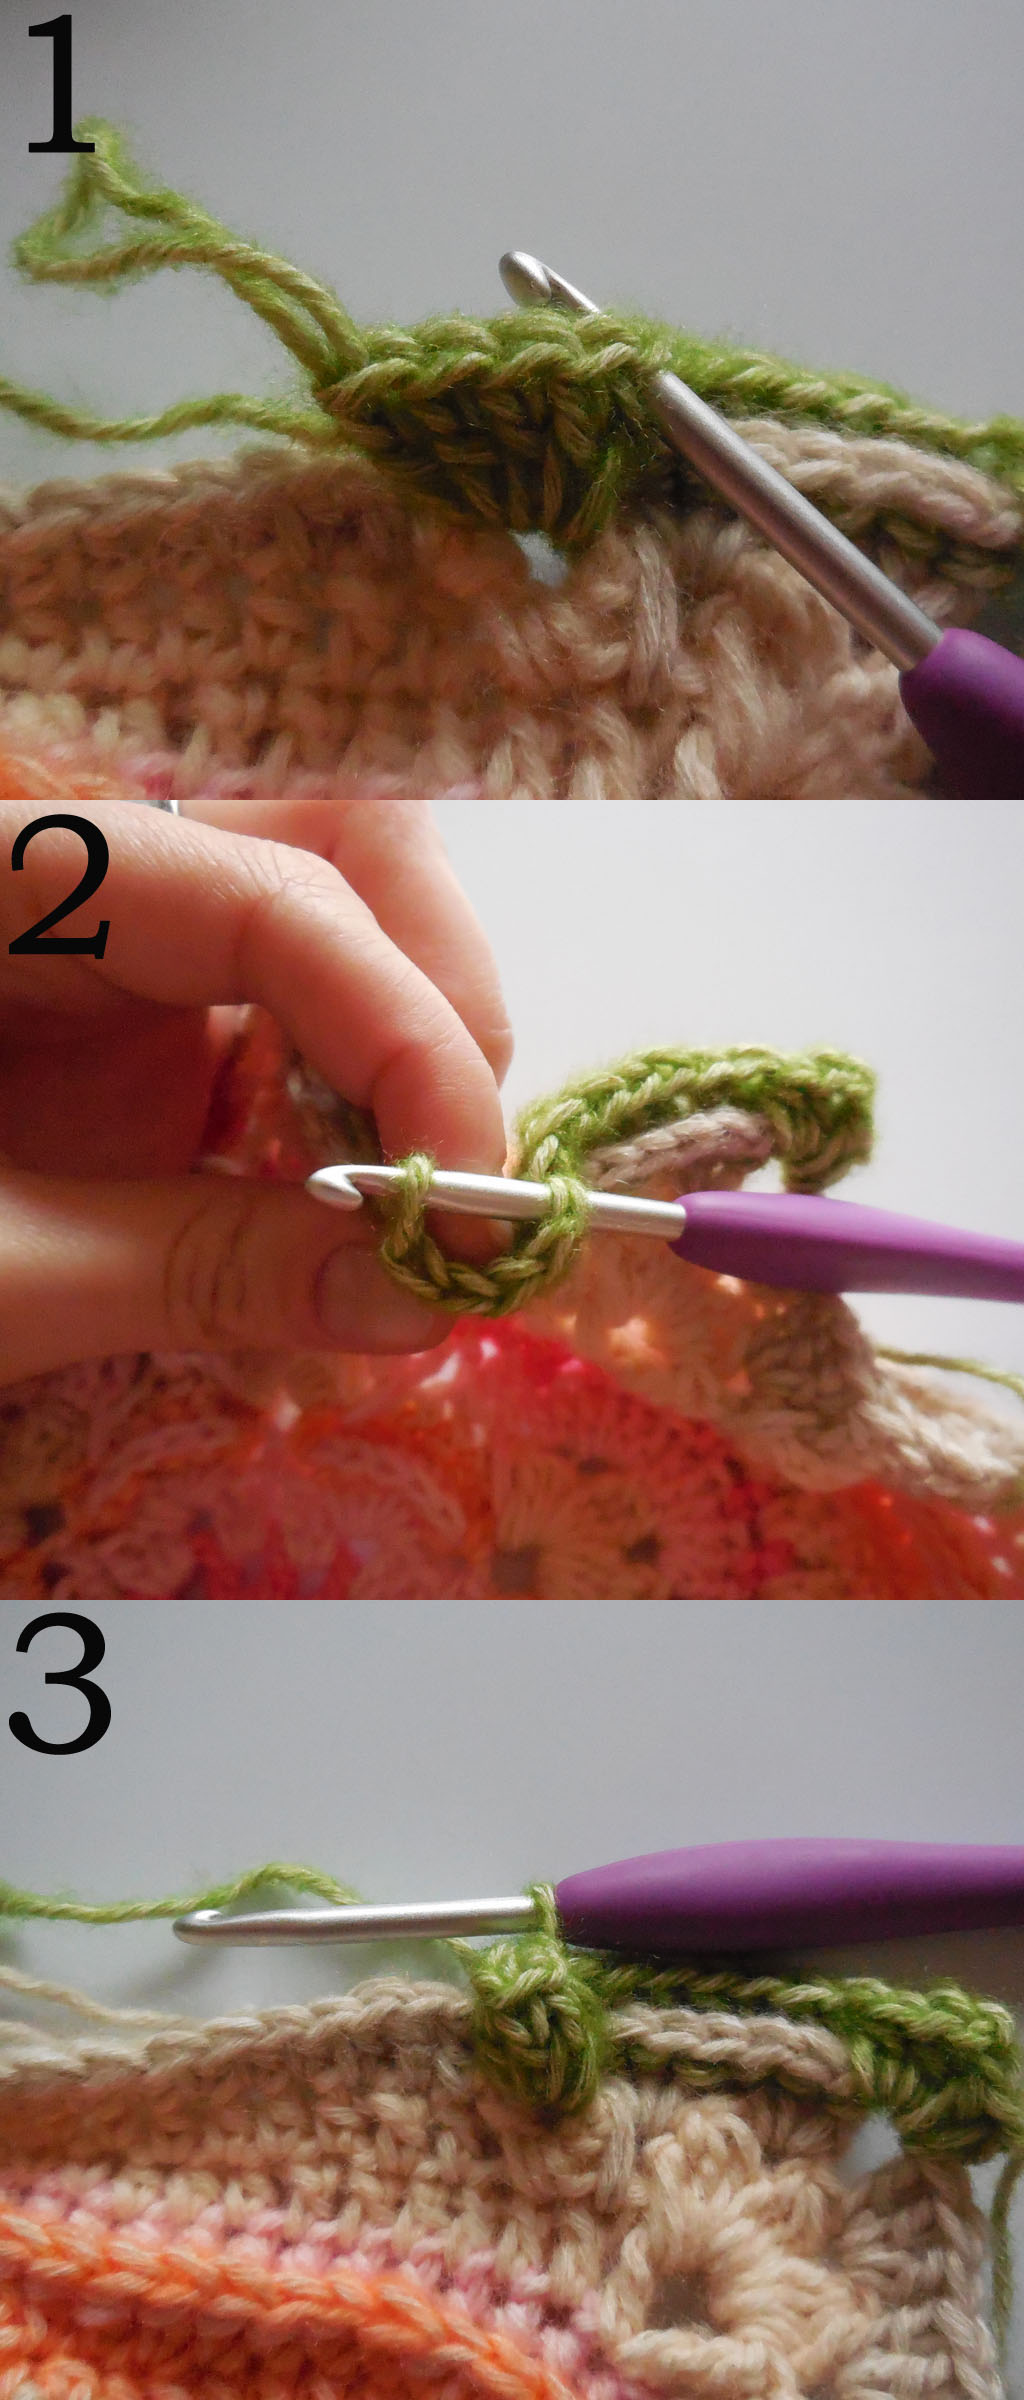
R6
1: Where to start the round. / Waar de ronde te starten.
2: The 3 bobble stitches. / De 3 bobbel steken.
3: The first two stitches are hidden. / De eerste twee steken zijn verstopt.
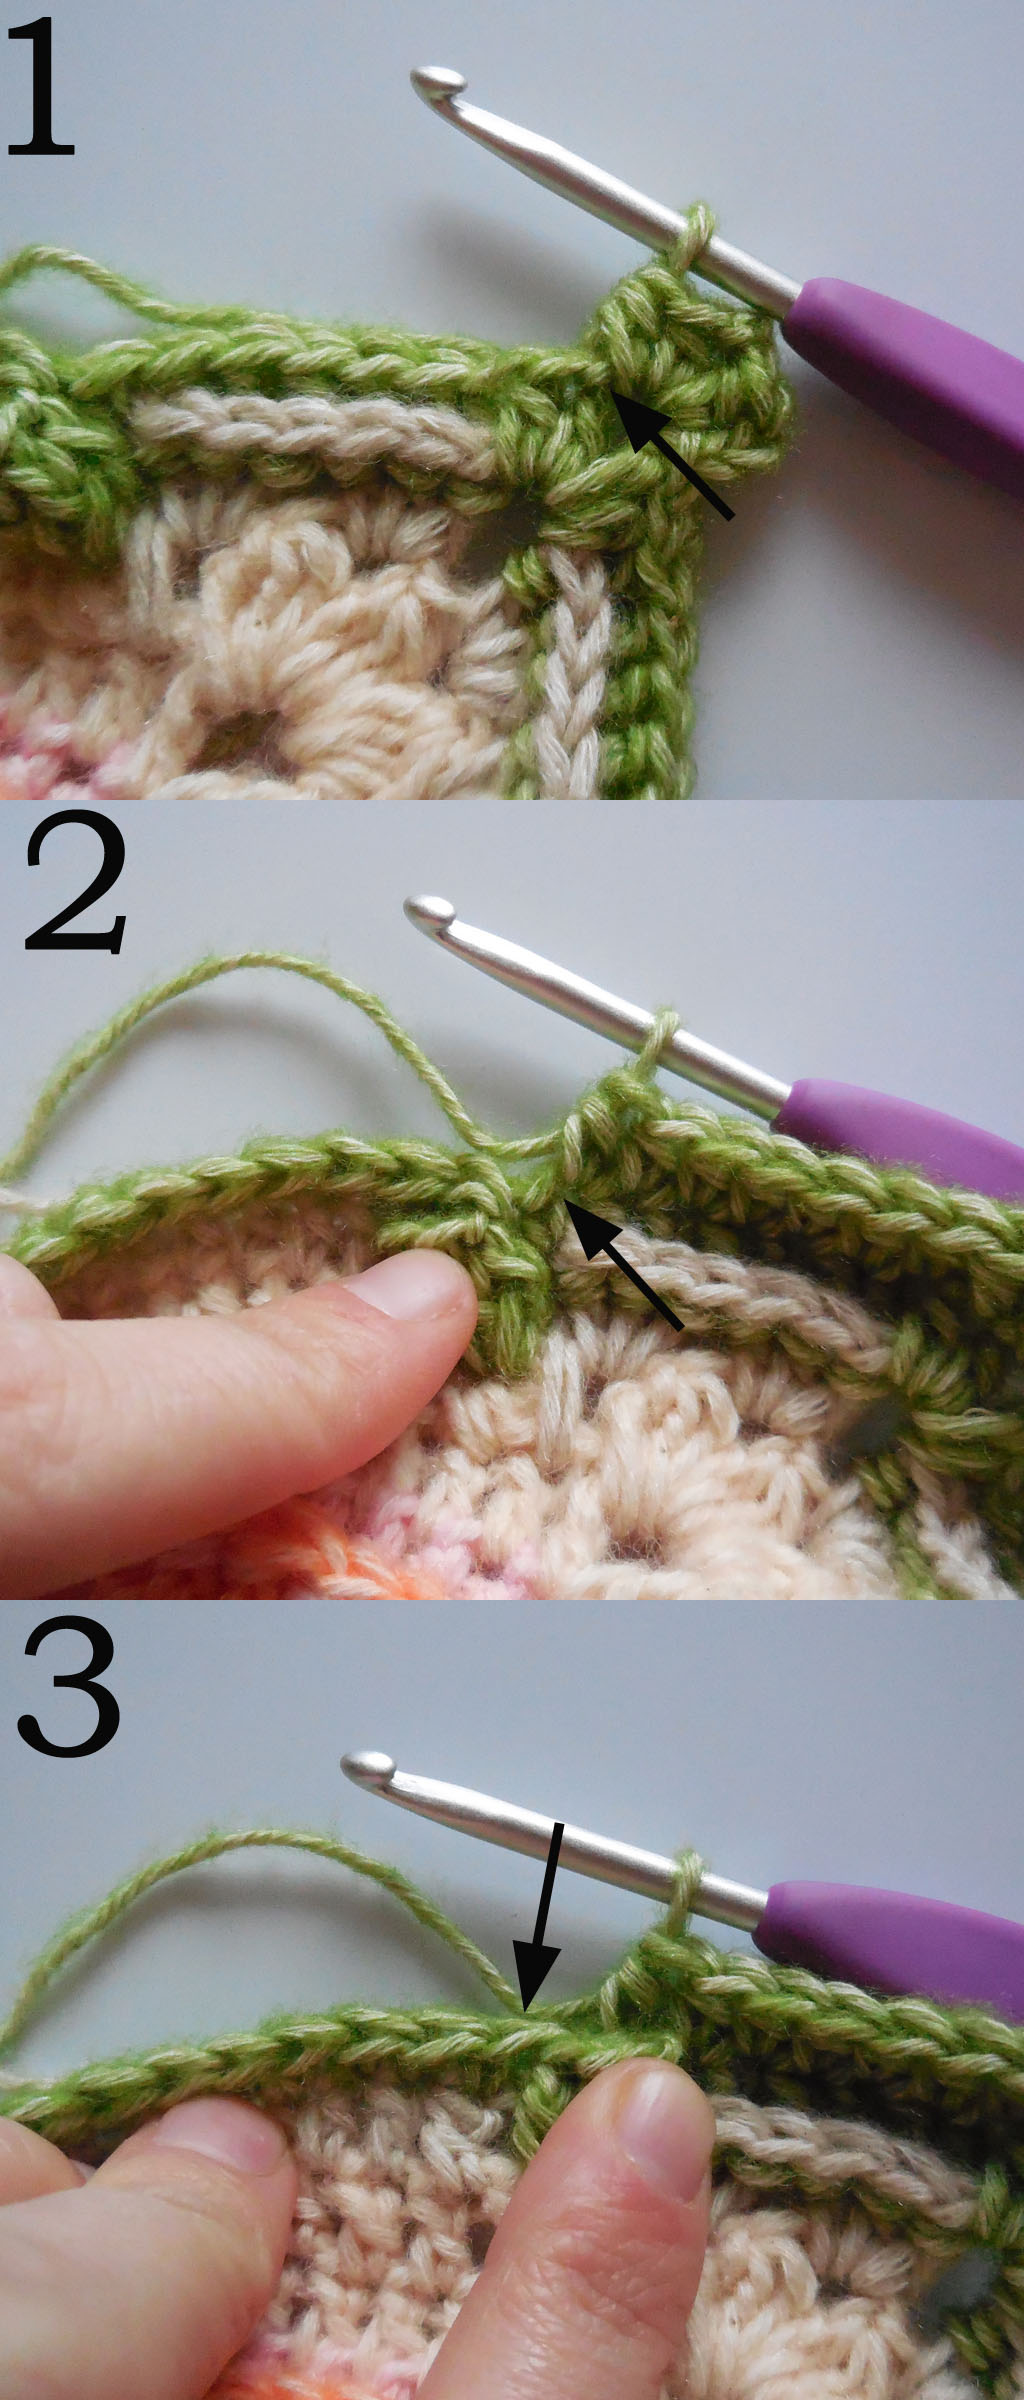
R7
1: Start the round in the third dc. / Start de ronde in de derde vaste.
2: Make the second tr in the stitch indicated by the arrow.
Maak het tweede stokje in de steek aangegeven door de pijl.
3-4: You work the crossed tr over the previous made stitch.
Je werkt het gekruiste stokje over de laatst gemaakte steek.
5: The arrow indicates where to make the dtr.
De pijl geeft aan waar je het dst moet haken.
6: You work the dtr over the rest of your work.
Je werkt het dst over de rest van je werk.
7: The second dtr is made at the black arrow. This dc is hidden by the bobble stitch, so you need to push it aside.
Het tweede dst is gemaakt bij de zwarte pijl. Deze vaste is verstopt door de bobbel steek. Dus die moet je naar de zijkant duwen.
8: Start at the green arrow, note that the first dc is hidden by the dtr {see black arrow}.
Start bij de groenen pijl, let op dat de eerste v is verstopt door het dst {zie zwarte pijl}.

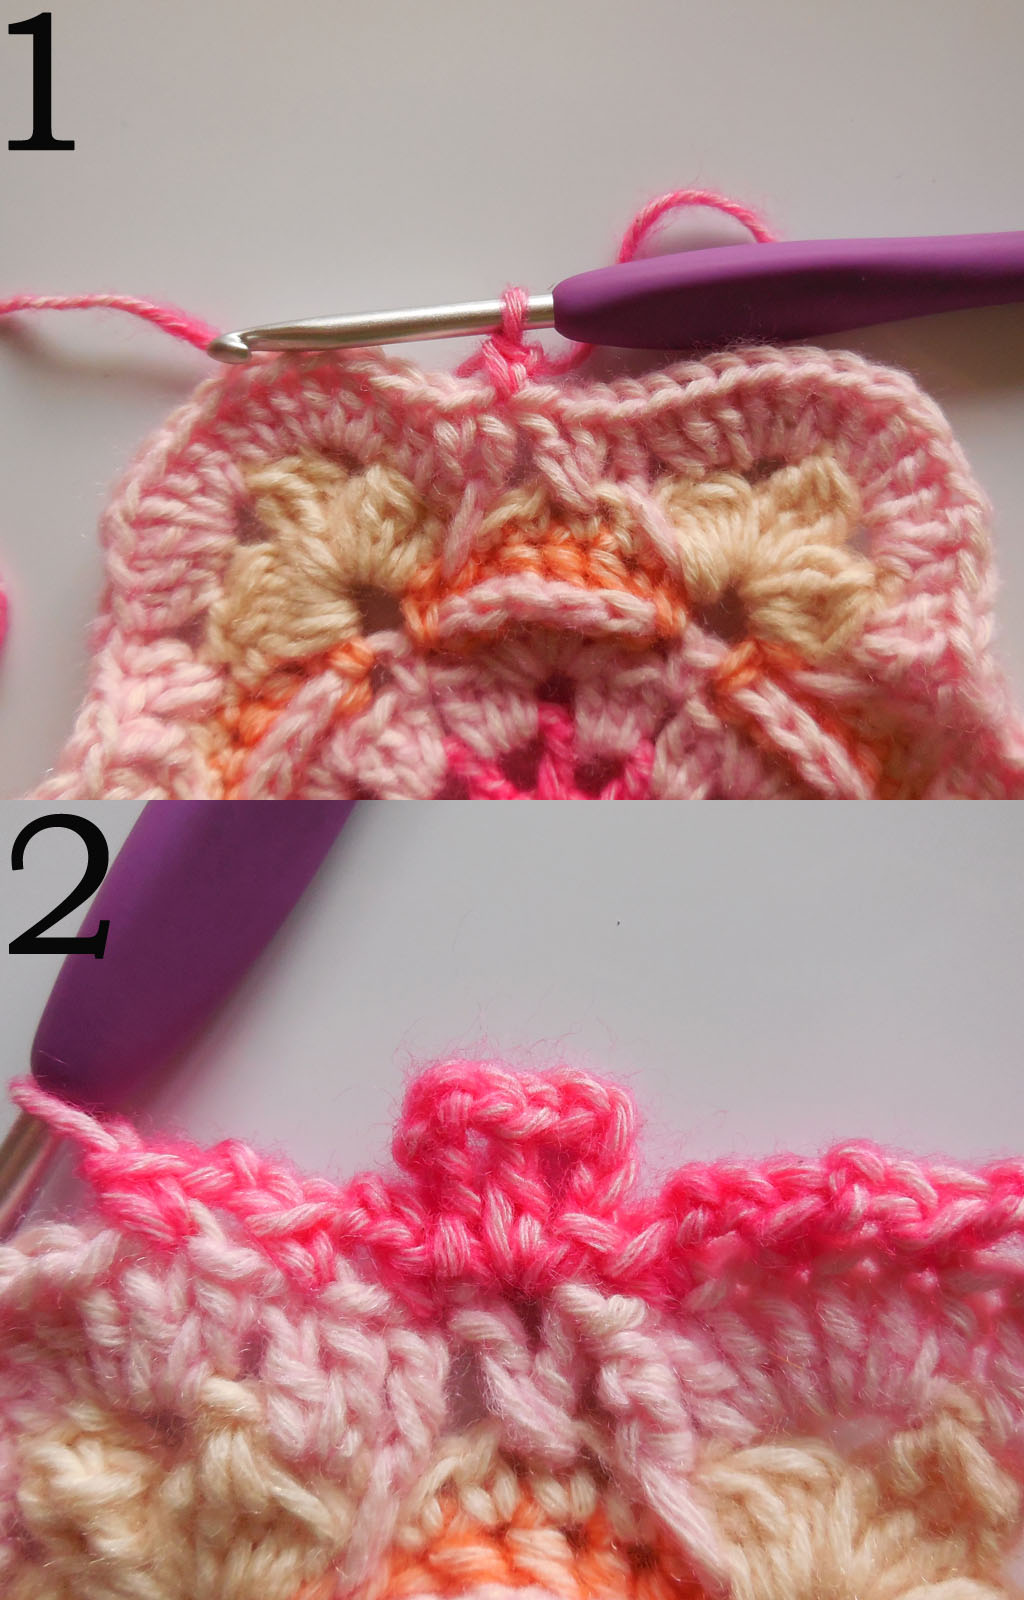
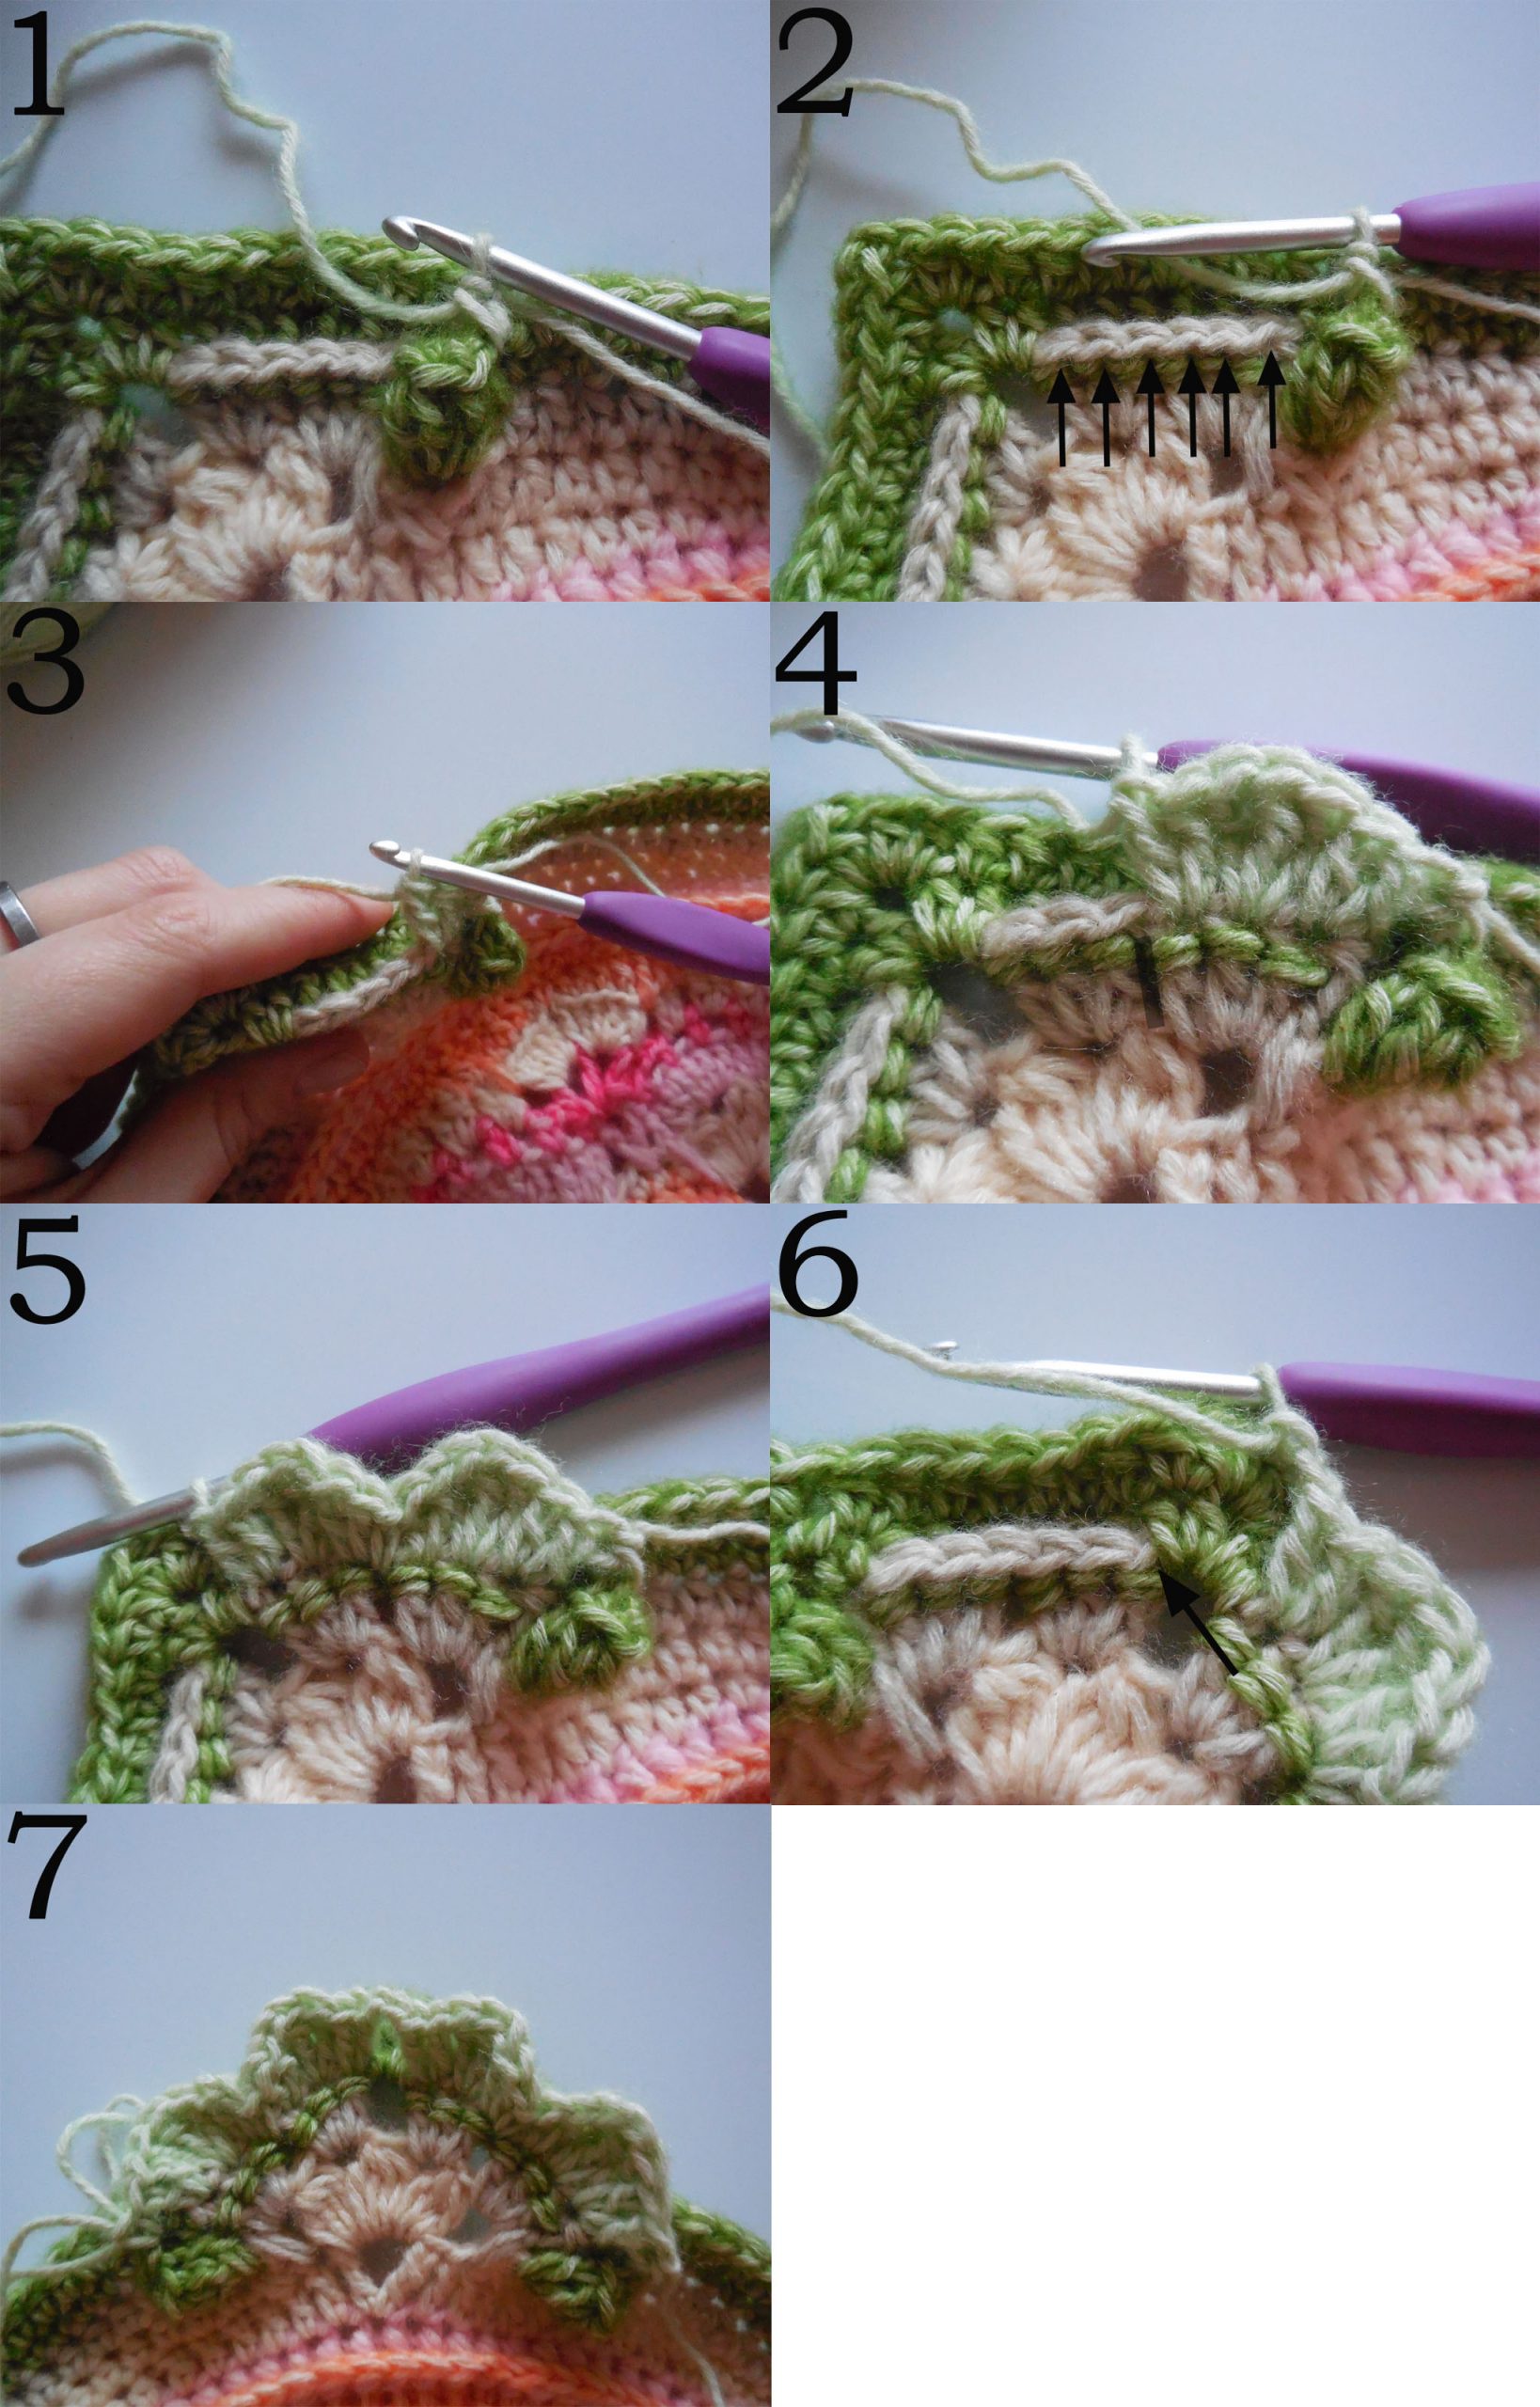
R8
1: Starting point. / Startpunt.
2: Stitches made into the space of the crossed tr. Please note that you end the last dc of the 7 dc’s in the tr before the next dtr.
Steken gemaakt in de ruimte van het gekruiste st. Let op dat je de laatste v van de 7 v eindigt in het st voor het volgende dst.
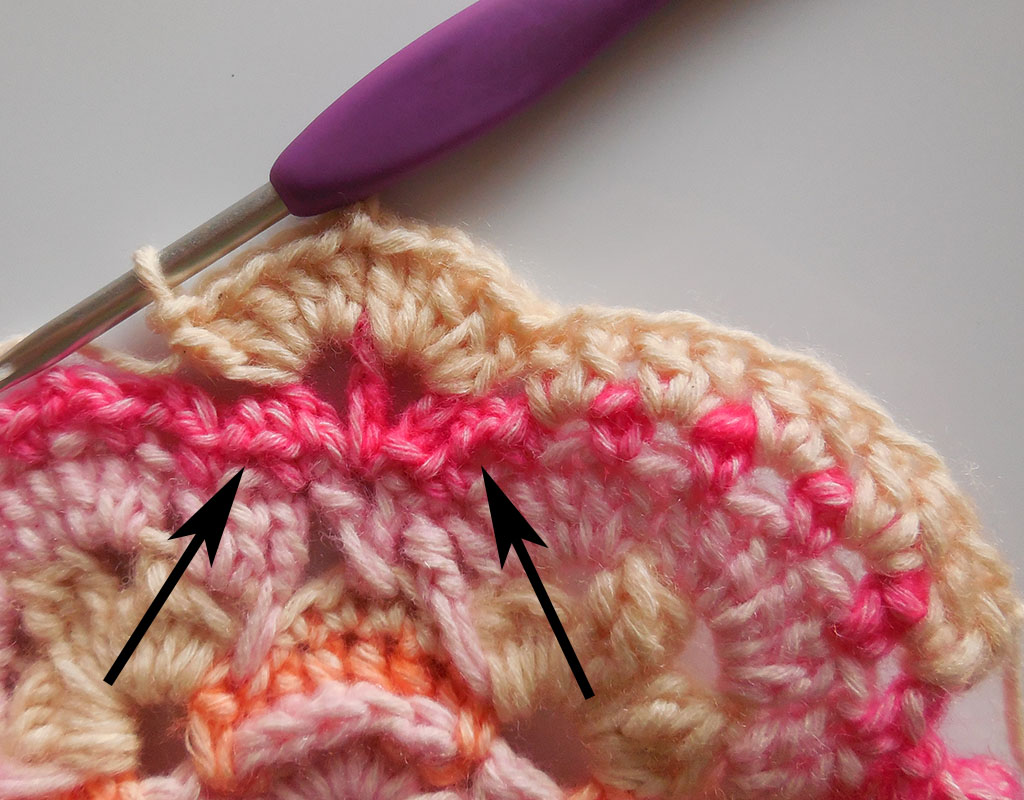
R9
Arrows in pic below indicate the chain spaces to skip.
Pijlen in de afbeelding hieronder geven de lossen ruimtes aan die je overslaat.
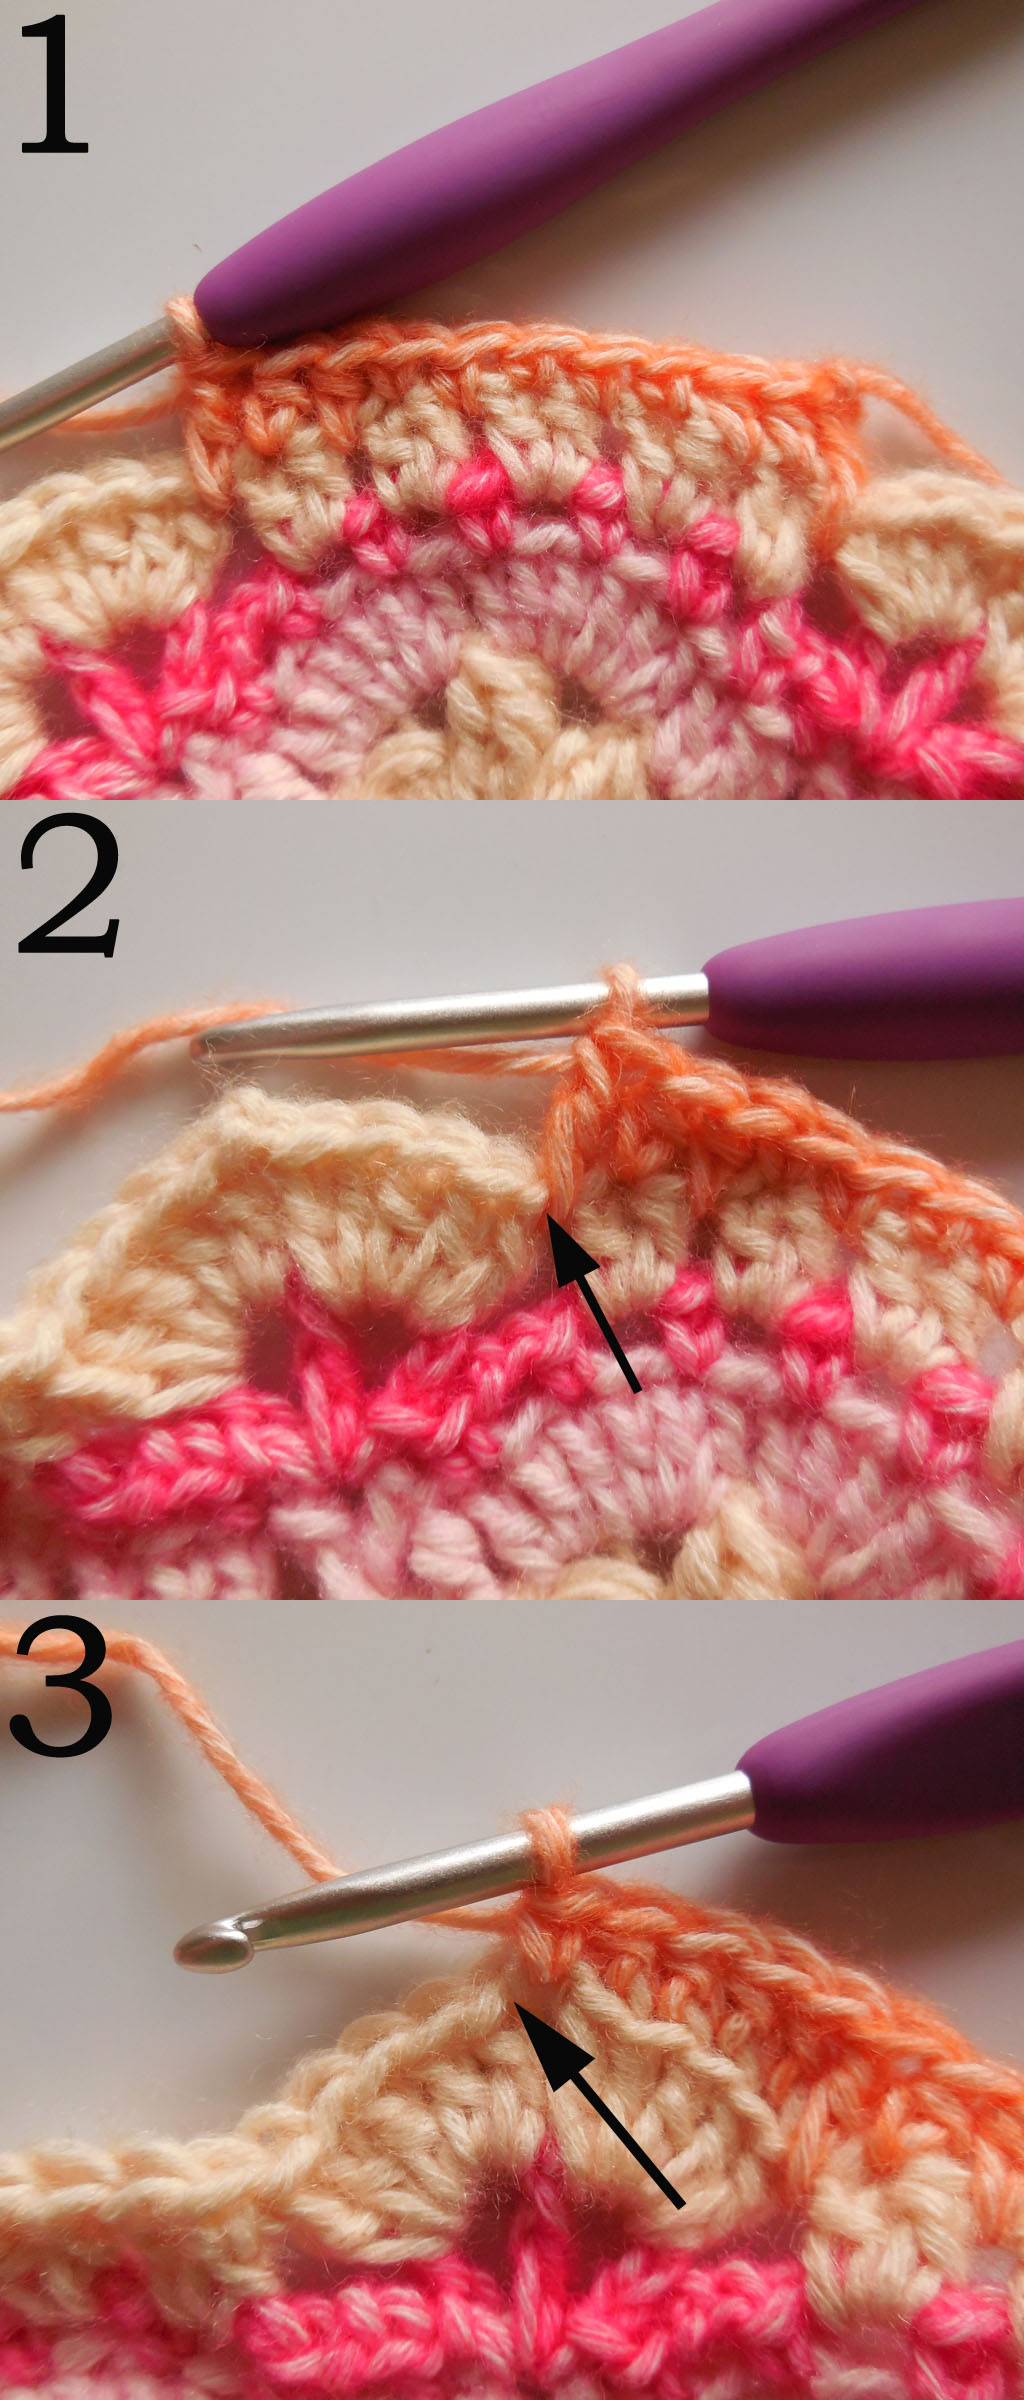
R10
1: First set of stitches done, some of which are made in between 2tr groups.
De eerste set van steken is gemaakt, sommige worden tussen 2st groepen gehaakt.
2: First st is hidden by the tr, loop is indicated with an arrow.
De eerste stk is verstopt door het st, de lus van de stk wordt aangegeven met een pijl.
3: The tr after the ch-sp is a bit hard to see, indicated with the black arrow.
Het st na de l-ruimte is een beetje moeilijk te zien, aangegeven met een zwarte pijl.
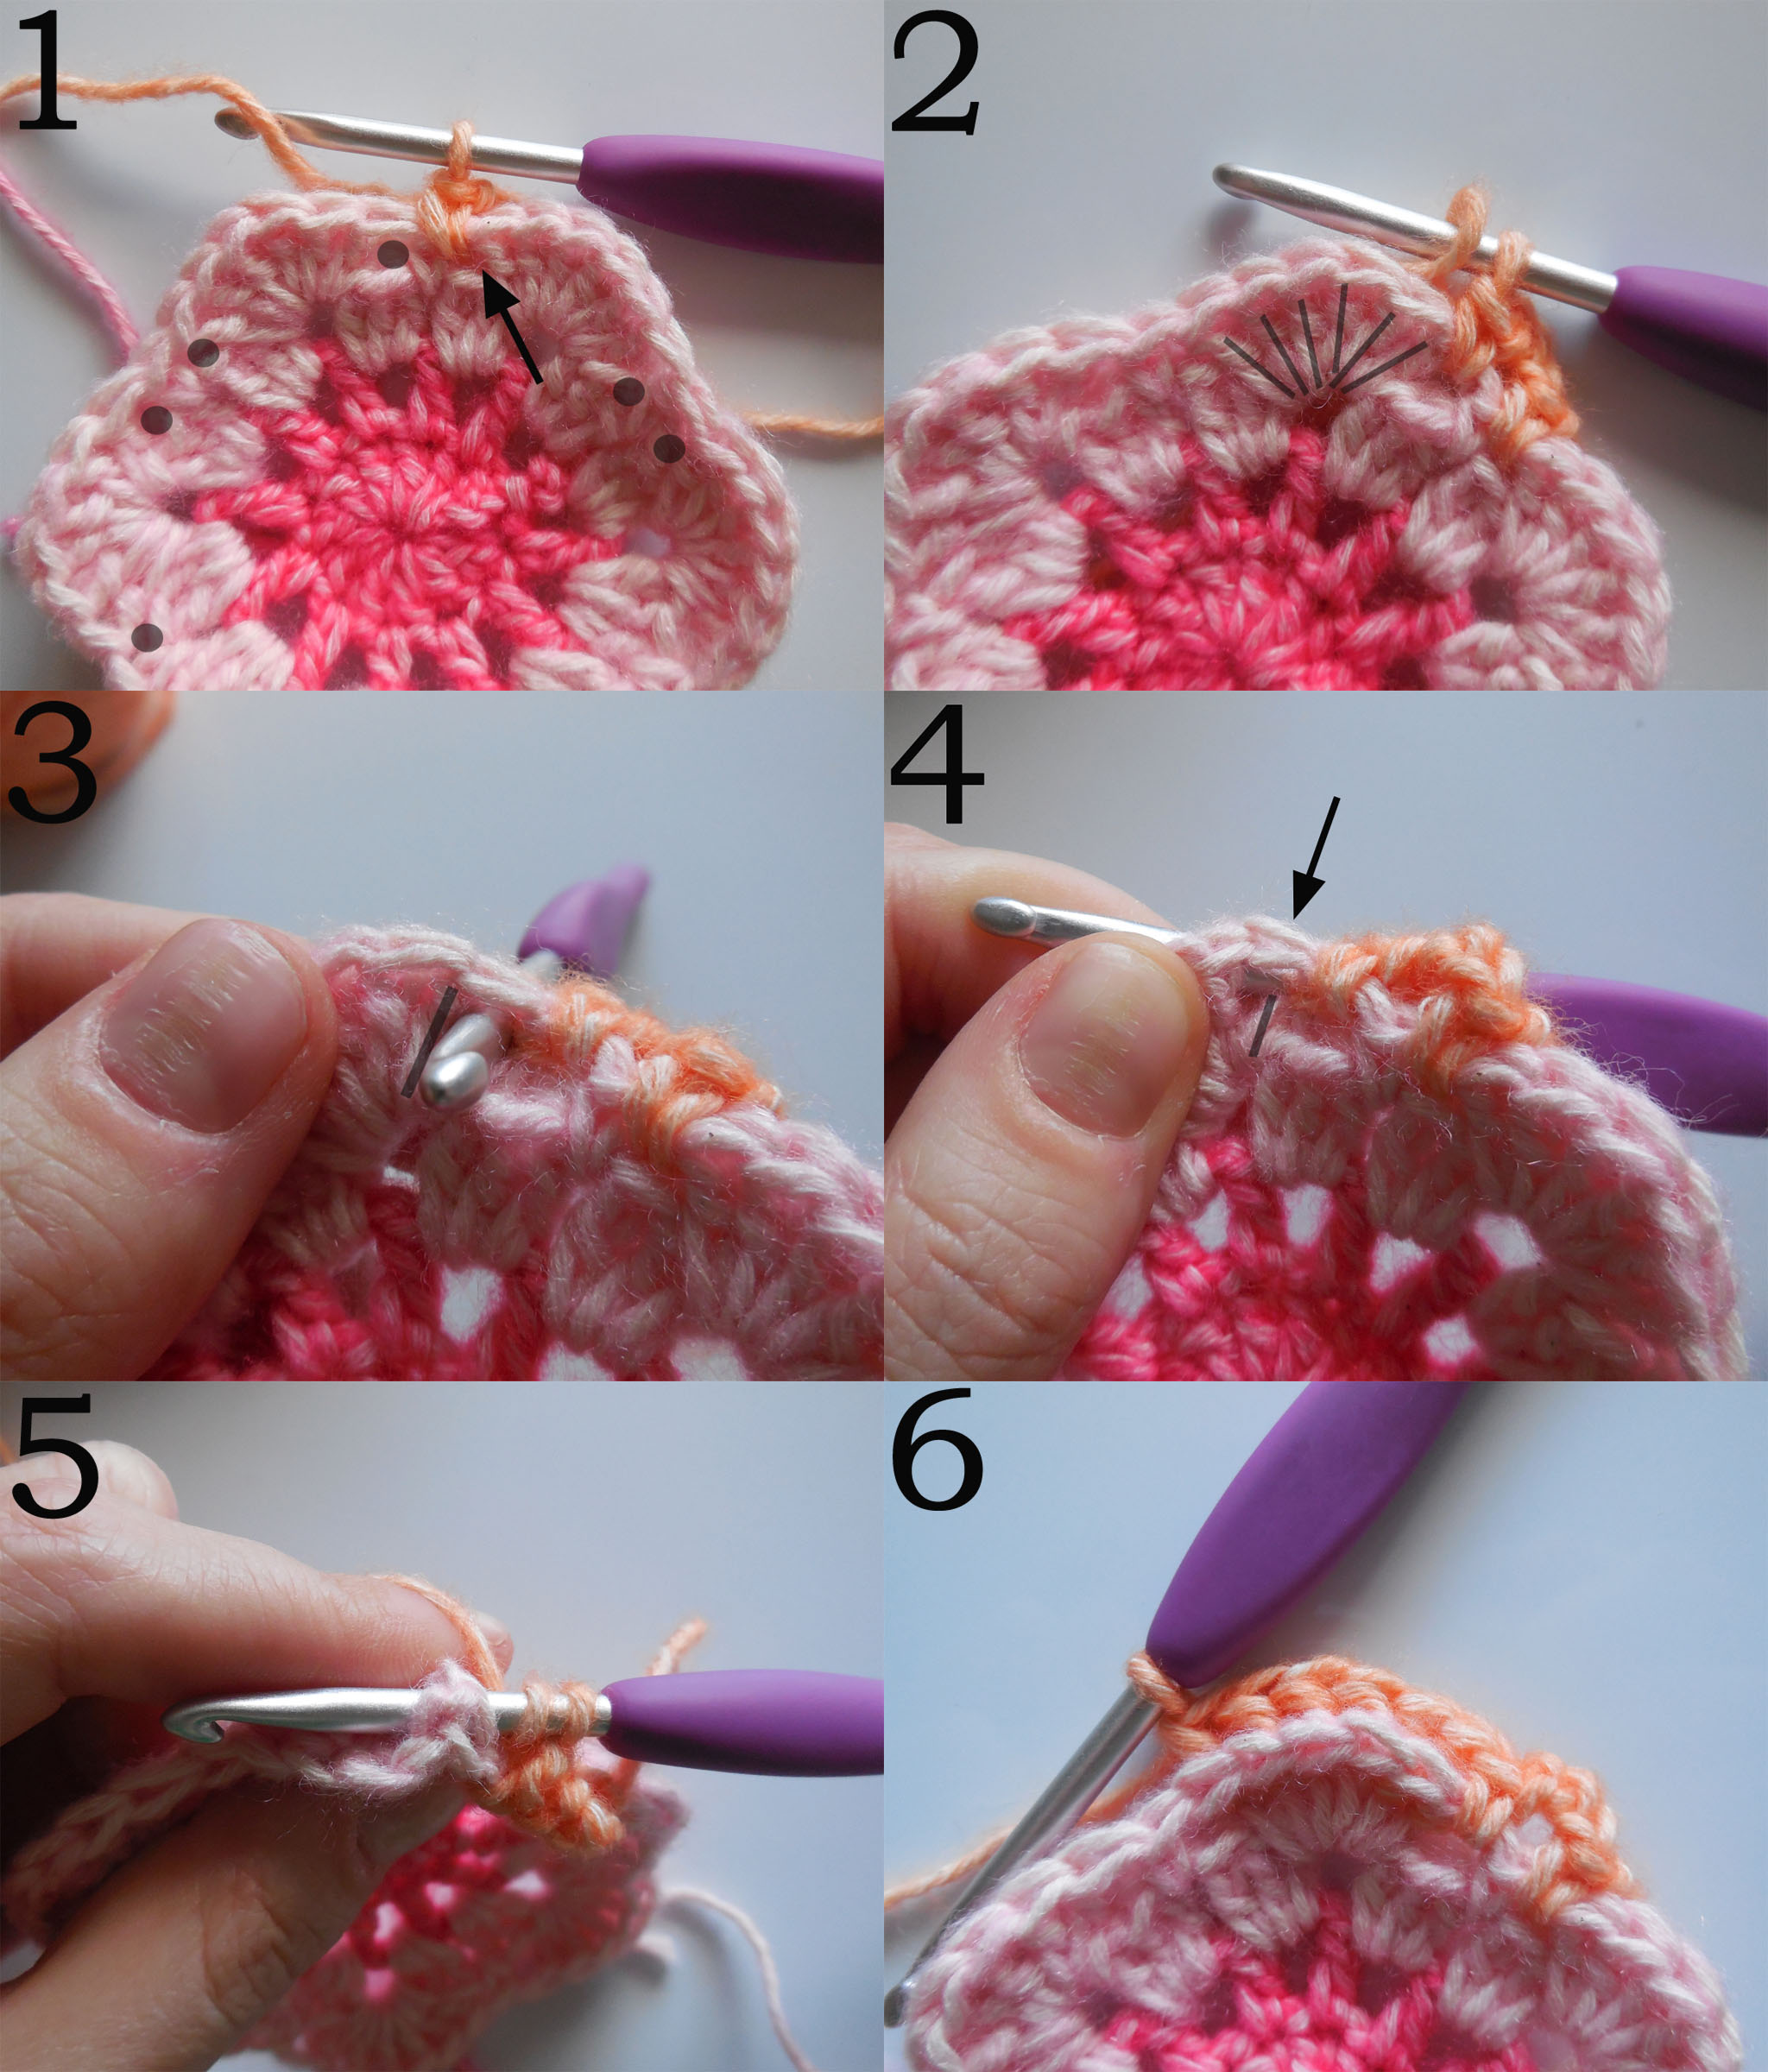
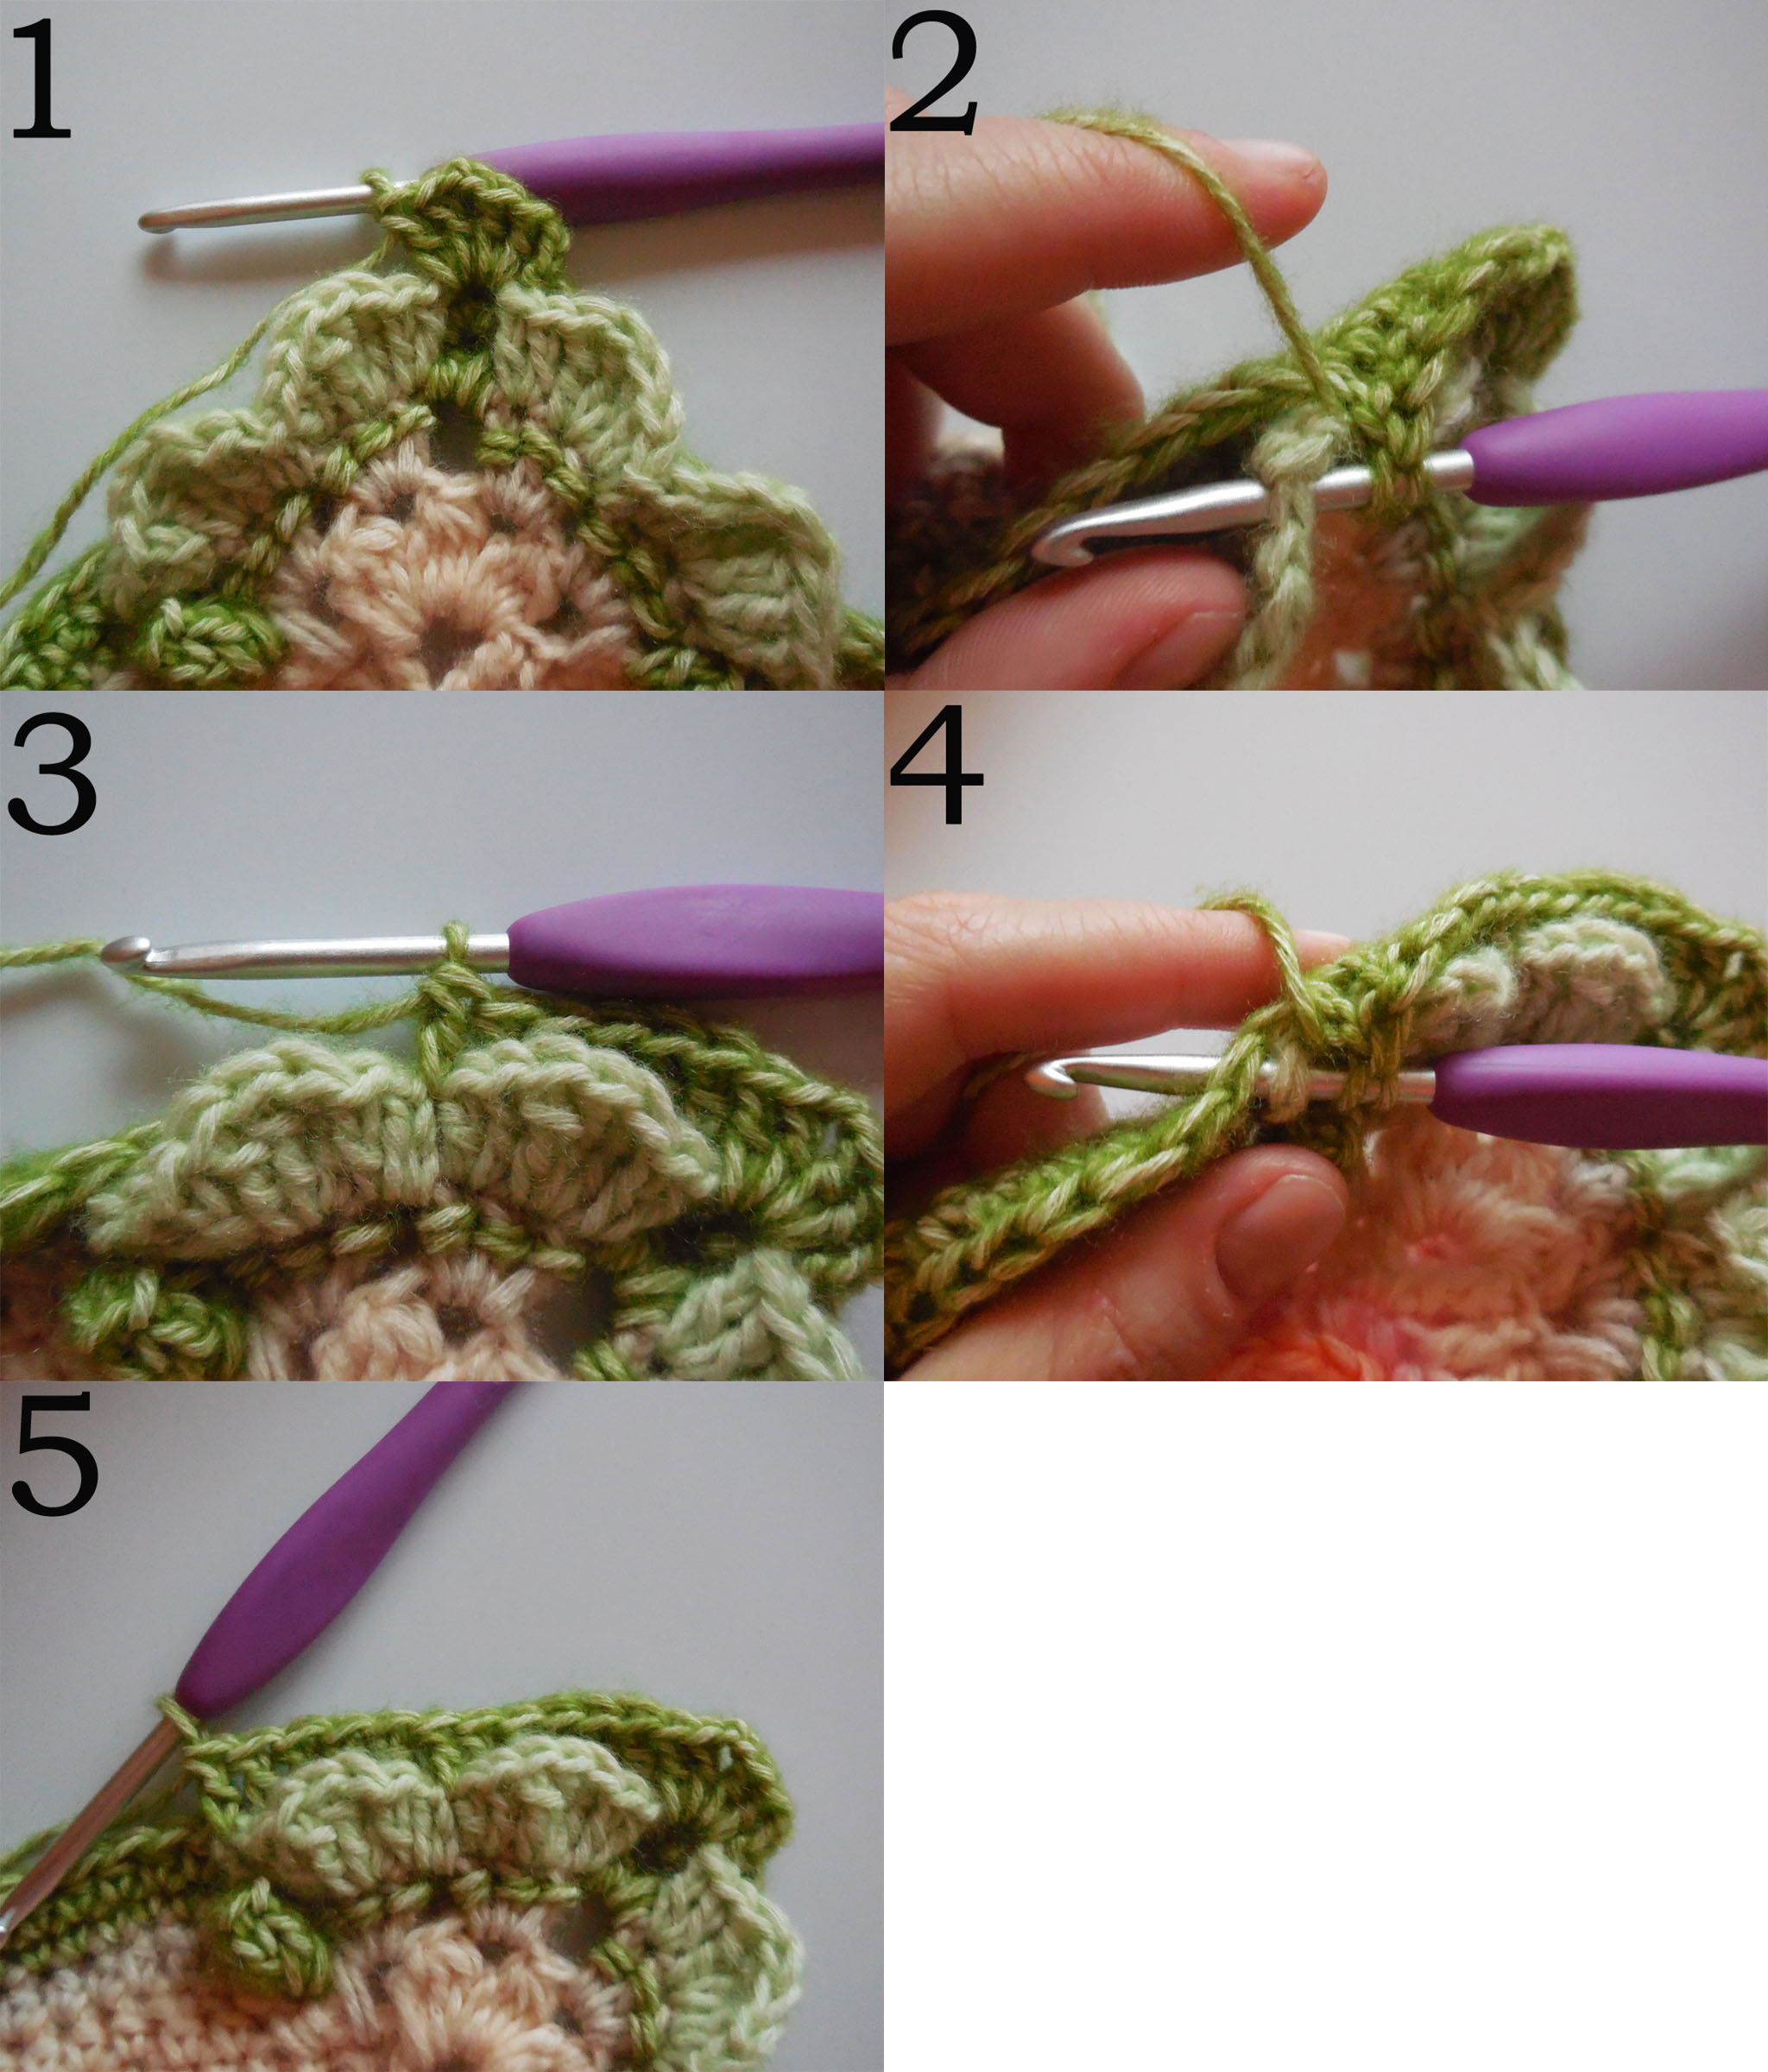
R14
1: The arrow indicates the previous stitch to work into to complete the crossed tr, it can be harder to see because of the slip stitches.
De pijl geeft de stk aan waar je in moet werken om het gekruiste st af te maken. Deze kan moeilijker te zien zijn door de hv.
2: The black arrow indicates the stitch that contains the crossed tr, but because it pulls to the side, it can look unworked. The green arrow indicates the next stitch you need to work into.
De zwarte pijl geeft de stk aan waar het gekruiste st in is gemaakt, maar omdat het naar één kant trekt, kan hij er uit zien alsof er niks in is gemaakt. De groene pijl geeft de volg stk aan waar je in moet werken.
3: The flower in the corner is completed.
De bloem in de hoek is klaar.
4: The first st is hidden by the bobble st.
De eerste stk is verstopt door de bobbel stk.
5: The arrow indicates the third chain of the ch4.
De pijl geeft de derde l van de 4l aan.

R15
1: The first st is made after the crossed tr.
De eerste stk is gemaakt na het gekruiste st.
2-3: The arrow indicates the st to work the dtr into.
De pijl geeft de stk aan waar je het dst in moet haken.
4: The first st is completely hidden by the dtr, the green arrow indicates where to work the next st into.
De eerste stk is compleet verstopt door het dst, de groene pijl geeft aan waar je de volg stk in moet haken.
R16 Popcorn-st
1: You have worked the 5 tr and have inserted the hook into the first tr. / Je hebt de 5 st gehaakt en de haaknaald in het eerste st gestoken.
2-3: Pick up the loop of the last tr and pull through the first tr. / Pak de lus op van het laatste st en trek deze door het eerste st.
R16
1: Overview of the first stitches of the round.
Eerste steken zijn gehaakt.
2: The arrow indicates the space to work into.
De pijl geeft aan waar je in moet haken.
3-4: You work the popcorn-st in front of the rest of your work (see photo’s above).
Je werkt de popcorn-stk vóór de rest van je werk (zie foto’s hierboven).
5: The first st after the popcorn-st is a bit hidden.
De eerste stk na de popcorn-stk is verstopt.

R17
Pic 1: The first st is hidden. / De eerste stk is verstopt.
2-3: The stitches before and after the popcorn-st is hidden, so push it aside for a better view.
De steken voor en na de popcorn-stk zijn verstopt, dus duw de popcorn naar de zijkant voor beter zicht.
R17a
1: Work the first dc in the popcorn-st.
Werk de eerste v in de popcorn-stk.
2: The first half of the hedge is worked in the stitches indicated with arrows.
De eerste helft van de heg is gemaakt in de steken aangegeven met pijlen.
3: You work it in front of the rest of your work, so push it to the back.
Je werkt vóór de rest van je werk, dus duw je werk naar achteren.
4: The black stripe indicates the space to work the dc into between the hedges.
De zwarte streep geeft de ruimte aan waar je de v in haakt tussen de heggen.
5: First half of the hedges are done. / De eerste helft van de heggen is klaar.
6: The first st is hidden. / De eerste stk is verstopt.
7: The hedges are complete. / De heggen zijn klaar.
R18
To secure the hedges, we are going to work into some of the stitches of the hedges AND the stitches of R17. This can cause some pulling, which can make it harder to see which stitch to work into next. Flip your work to the back when you’re unsure, because that way you can easily see the next stitch.
Om de heggen vast te zetten, werken we in sommige steken van de heggen EN de steken van R17. Hierdoor kan het wat gaan trekken, waardoor je de volgende steken wat moeilijker kunt zien. Keer je werk om naar de achterkant als je niet zeker weet waar je in moet werken, want op die manier kun je de steken makkelijker zien.
1: Work in the corner of R17 while picking up the ch-sp of the hedges.
Haak in de hoek van R17, waarbij je ook in de l-ruimte van de heggen haakt.
2-5: Pick up the dc’s of the hedges and also work it through the next st of R17.
Pak de vasten van de heggen op en h aak ook door de steken van R17.
That is chapter 1 complete! : D It might not lie completely flat, but when the blanket is done, blocking will solve that. If you are unsure, you can always choose to block this chapter as well.
Dat is Hoofdstuk 1 klaar! : D Het kan zijn dat het niet compleet plat ligt, maar wanneer de deken klaar is, kun je dat met blocken oplossen. Als je niet zeker bent, kan je er altijd nog voor kiezen dit hoofdstuk gelijk te blocken.
I hope you enjoyed this part : ) If you want to share your work with us, or if you need help with the pattern, go to the Scheepjes Facebook group.
Ik hoop dat je het leuk vond dit deel te haken : ) Als je je mooie werk wilt delen met ons of als je hulp nodig hebt met het patroon, ga dan naar de Scheepjes Facebook groep.

If you don’t want to miss any updates on the CAL, please be sure to follow the Scheepjes Facebook page and follow me on Facebook, Instagram (@aspoonfulofyarn) or subscribe via email at the bottom of this page.
Als je geen enkele update over de CAL wilt missen, volg dan de Scheepjes Facebook pagina en volg de A Spoonful of Yarn Facebook, of Instagram (@aspoonfulofyarn), of schrijf je in via email aan de onderkant van deze pagina.
************************************************************************
*Affiliate disclaimer
This post contains affiliate links. When you click this link and purchase something, I will get a small commission, but it will not cost you extra money. This way you can support my blog and I can keep making free patterns.
Deze post bevat affiliate links. Als je op deze link klikt en iets koopt, krijg ik een kleine commissie. Op deze manier kan je mijn blog steunen, terwijl het jouw niks extra’s kost. Hierdoor kan ik doorgaan met het maken van gratis patronen.
Discover more from A Spoonful of Yarn
Subscribe to get the latest posts sent to your email.