
Intro
Welcome to the first official 2020 Scheepjes CAL blogpost! Are you as excited as I am?! : D
Welkom bij de eerste officiële 2020 Scheepjes CAL blogpost! Ben je net zo enthousiast om te beginnen als ik ben?! : D
First things first! You can find Tips & Tricks PDF on the Scheepjes Website and in the Official Scheepjes Facebook group. Esther from It’s All in a Nutshell has made a video for the swatch, which you can find here. I recommend that you take the time to make the swatch as it is an important step in the CAL process and will help to ensure that you are using the proper hook size for your own personal tension. You will find photo’s for the more tricky bits of the gauge swatch and you will also find a link to a tutorial below, for how to get the right gauge.
Below you can also find a few photos for some (but not all) of the tips & tricks, which can help you in your journey. But please note it is not a substitute for the actual Tips & Tricks PDF. While the written pattern is also available in US terms, the English terms below are UK terminology, as the original Scheepjes pattern terminology is also UK terms.
Happy crocheting : )
Eerst even wat praktische zaken: Je kunt de Tips & Tricks PDF op de Scheepjes website en in de officiële Scheepjes Facebook groep vinden. Esther van It’s All in a Nutshell heeft een video gemaakt van het proeflapje. Die vind je hier. Ik raad aan om een proeflapje te haken, omdat het een belangrijk onderdeel is van het CAL proces en het zal je helpen de juiste maat haaknaald te vinden op basis van je eigen draadspanning. Even verderop vind je een aantal handige foto’s voor de meer uitdagende delen van het proeflapje en ook vind je een link naar een tutorial om je te helpen de goede stekenverhouding te krijgen.
Hieronder vind je ook wat foto’s voor sommige (niet alle) Tips & Tricks, om je te helpen in dit haakavontuur. Maar let op dat dit geen vervanging is voor de Tips & Tricks PDF.
Veel haakplezier : )
Get the full CAL PDF with added benefits! / Krijg de volledige CAL PDF met leuke extra’s!
You can now get a full PDF with ALL parts into one + added benefits! Etsy I Ravelry
Read more about this here.
Je kunt nu ook een volledige PDF krijgen met ALLE delen in één + leuke extra’s Etsy I Ravelry
Lees er hier meer over.
Links
- Main CAL page / CAL Hoofdpagina
- Get pattern support and share your work through the Scheepjes Facebook group / Stel vragen over het patroon en deel je werk via de Scheepjes Facebook groep
- The PDF for the Tips & Tricks / De PDF voor de Tips & Tricks
- CAL video for swatch (UK terms) / CAL video voor proeflapje
- Interview videos with the author of All The Light We Cannot See / Interview videos met de auteur van Als Je Het Licht Niet Kunt Zien
Shop the yarn / Bestel het garen
If you haven’t bought a kit yet and you don’t have a Scheepjes retailer nearby, please consider buying your Scheepjes kit via one of the links below. It will give me a small commission, but it won’t cost you anything extra.
That way I can keep making free patterns : )
Als je nog geen kit hebt gekocht en geen Scheepjes verkooppunt dichtbij hebt, overweeg dan je Scheepjes kit via één van onderstaande links te kopen. Hiervoor krijg ik een kleine commissie, terwijl het jou niks extra’s kost. Op die manier kan ik gratis patronen blijven maken : )
UK/International: Wool Warehouse, Black Sheep Wools or The Knitting Network
Benelux: Caro’s Atelier
List of all / Lijst van alle Scheepjes retailers:Scheepjes website
Gauge Swatch / Proeflapje
Below you will find helpful pictures for the more tricky rounds of your gauge swatch. This is also the start of your blanket, so once you have the correct gauge, please don’t frog it. If you need more visual support, please watch Esther’s super clear tutorial video.
Hieronder vind je handige foto’s voor de lastigere toeren van je proeflapje. Dit is ook het begin van je deken, dus wanneer je de juiste stekenverhouding hebt, haal dit dan niet weer uit. Als je meer visuele ondersteuning nodig hebt, kijk dan Esther’s super duidelijke tutorial video.
Adjusting gauge with tension / Stekenverhouding aanpassen met draadspanning
If you cannot seem to get to the right gauge, here is a very good tutorial by Esther about getting the right gauge and what you can do to alter it.
Als het erop lijkt dat je niet tot de goede stekenverhouding kan komen, dan raad ik deze tutorial aan van Esther, die gaat over hoe je de goede stekenverhouding krijgt en wat je allemaal kunt doen om die aan te passen.
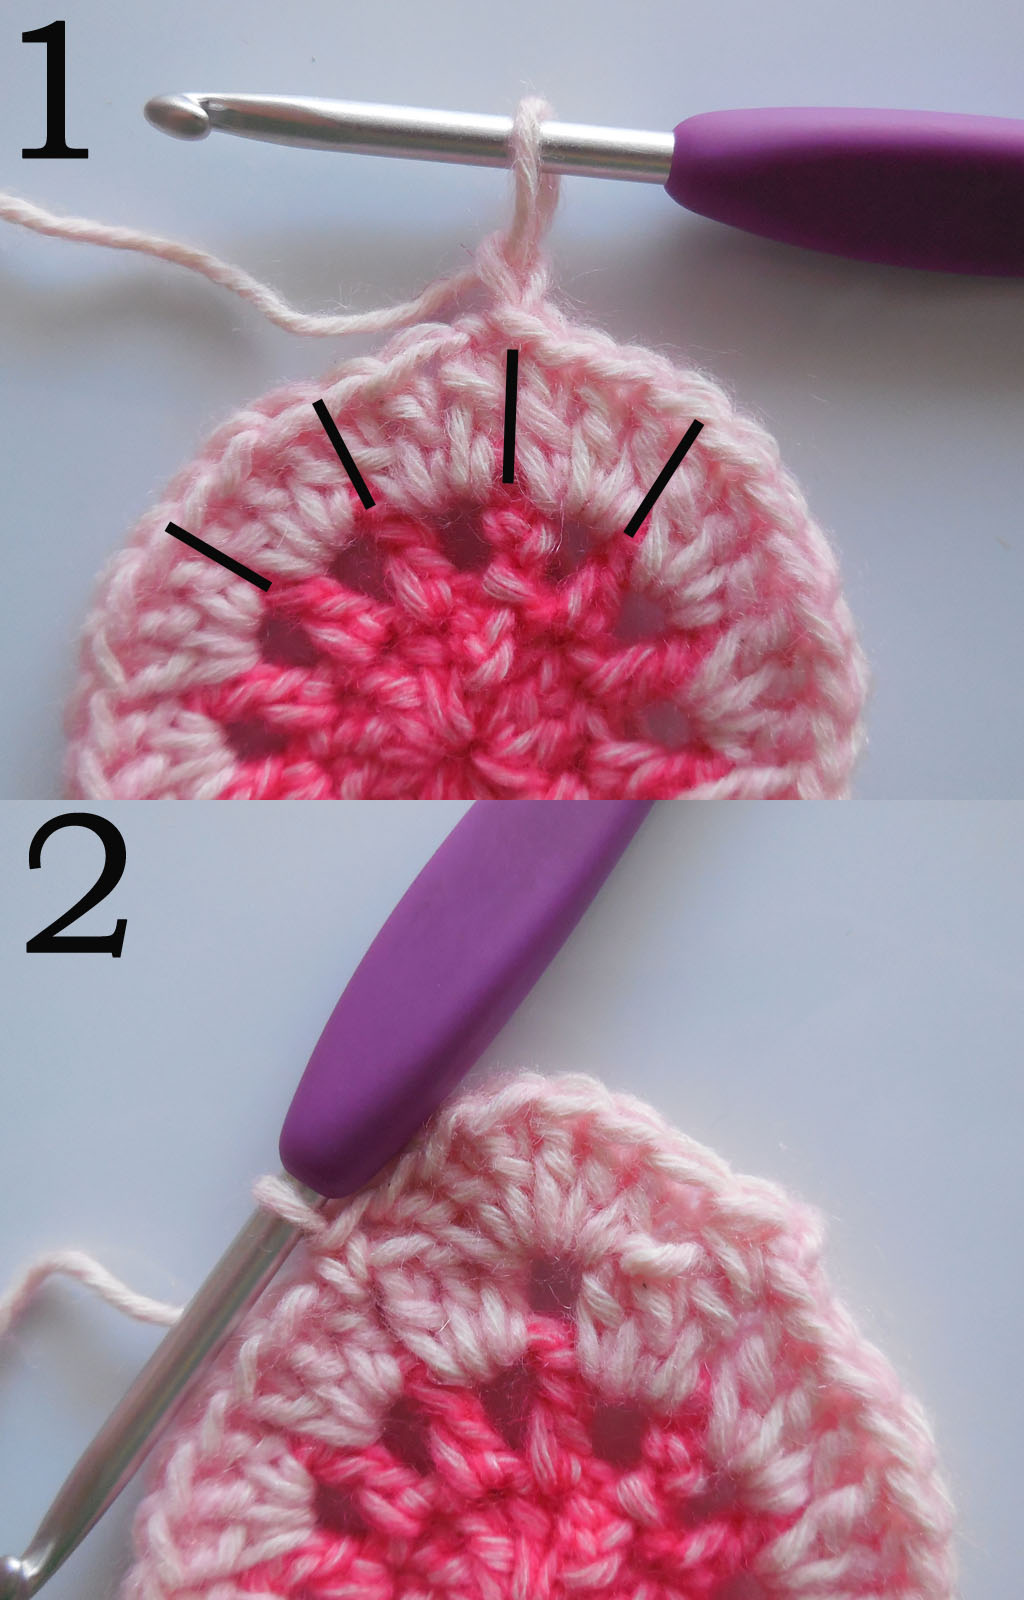
R4
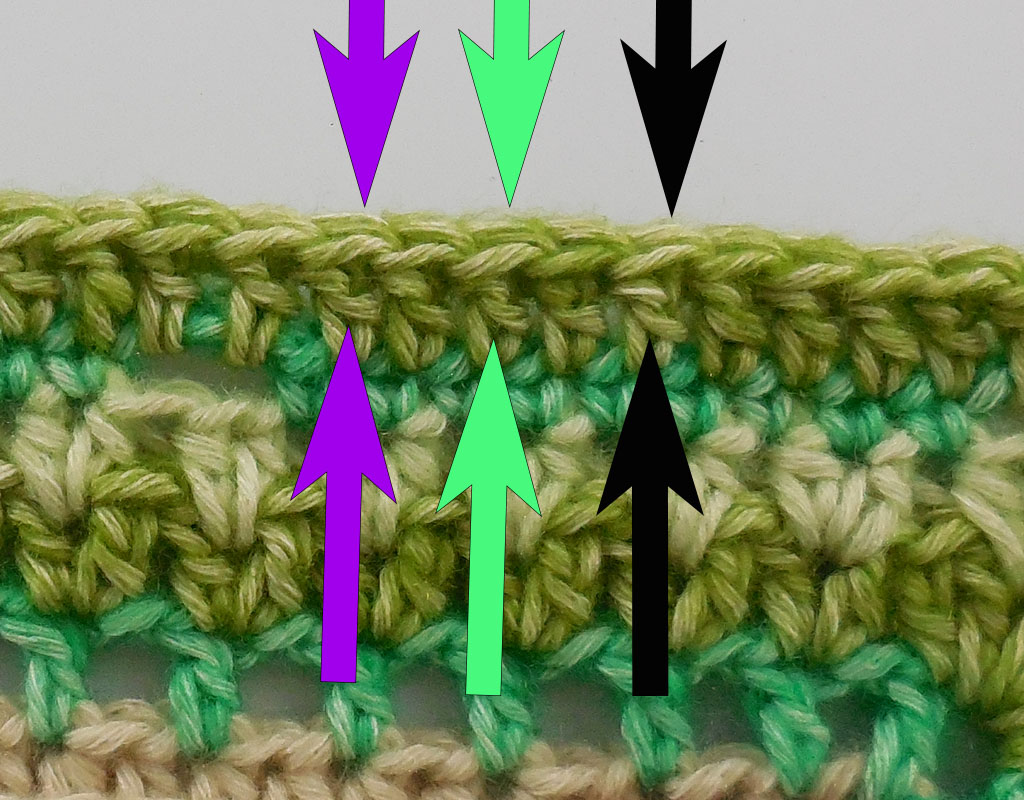
1/2: Stitches are made in between 3tr-groups and are indicated with black lines. / Steken worden gemaakt tussen twee 3st-groepen en weergegeven met zwarte lijnen.
R5
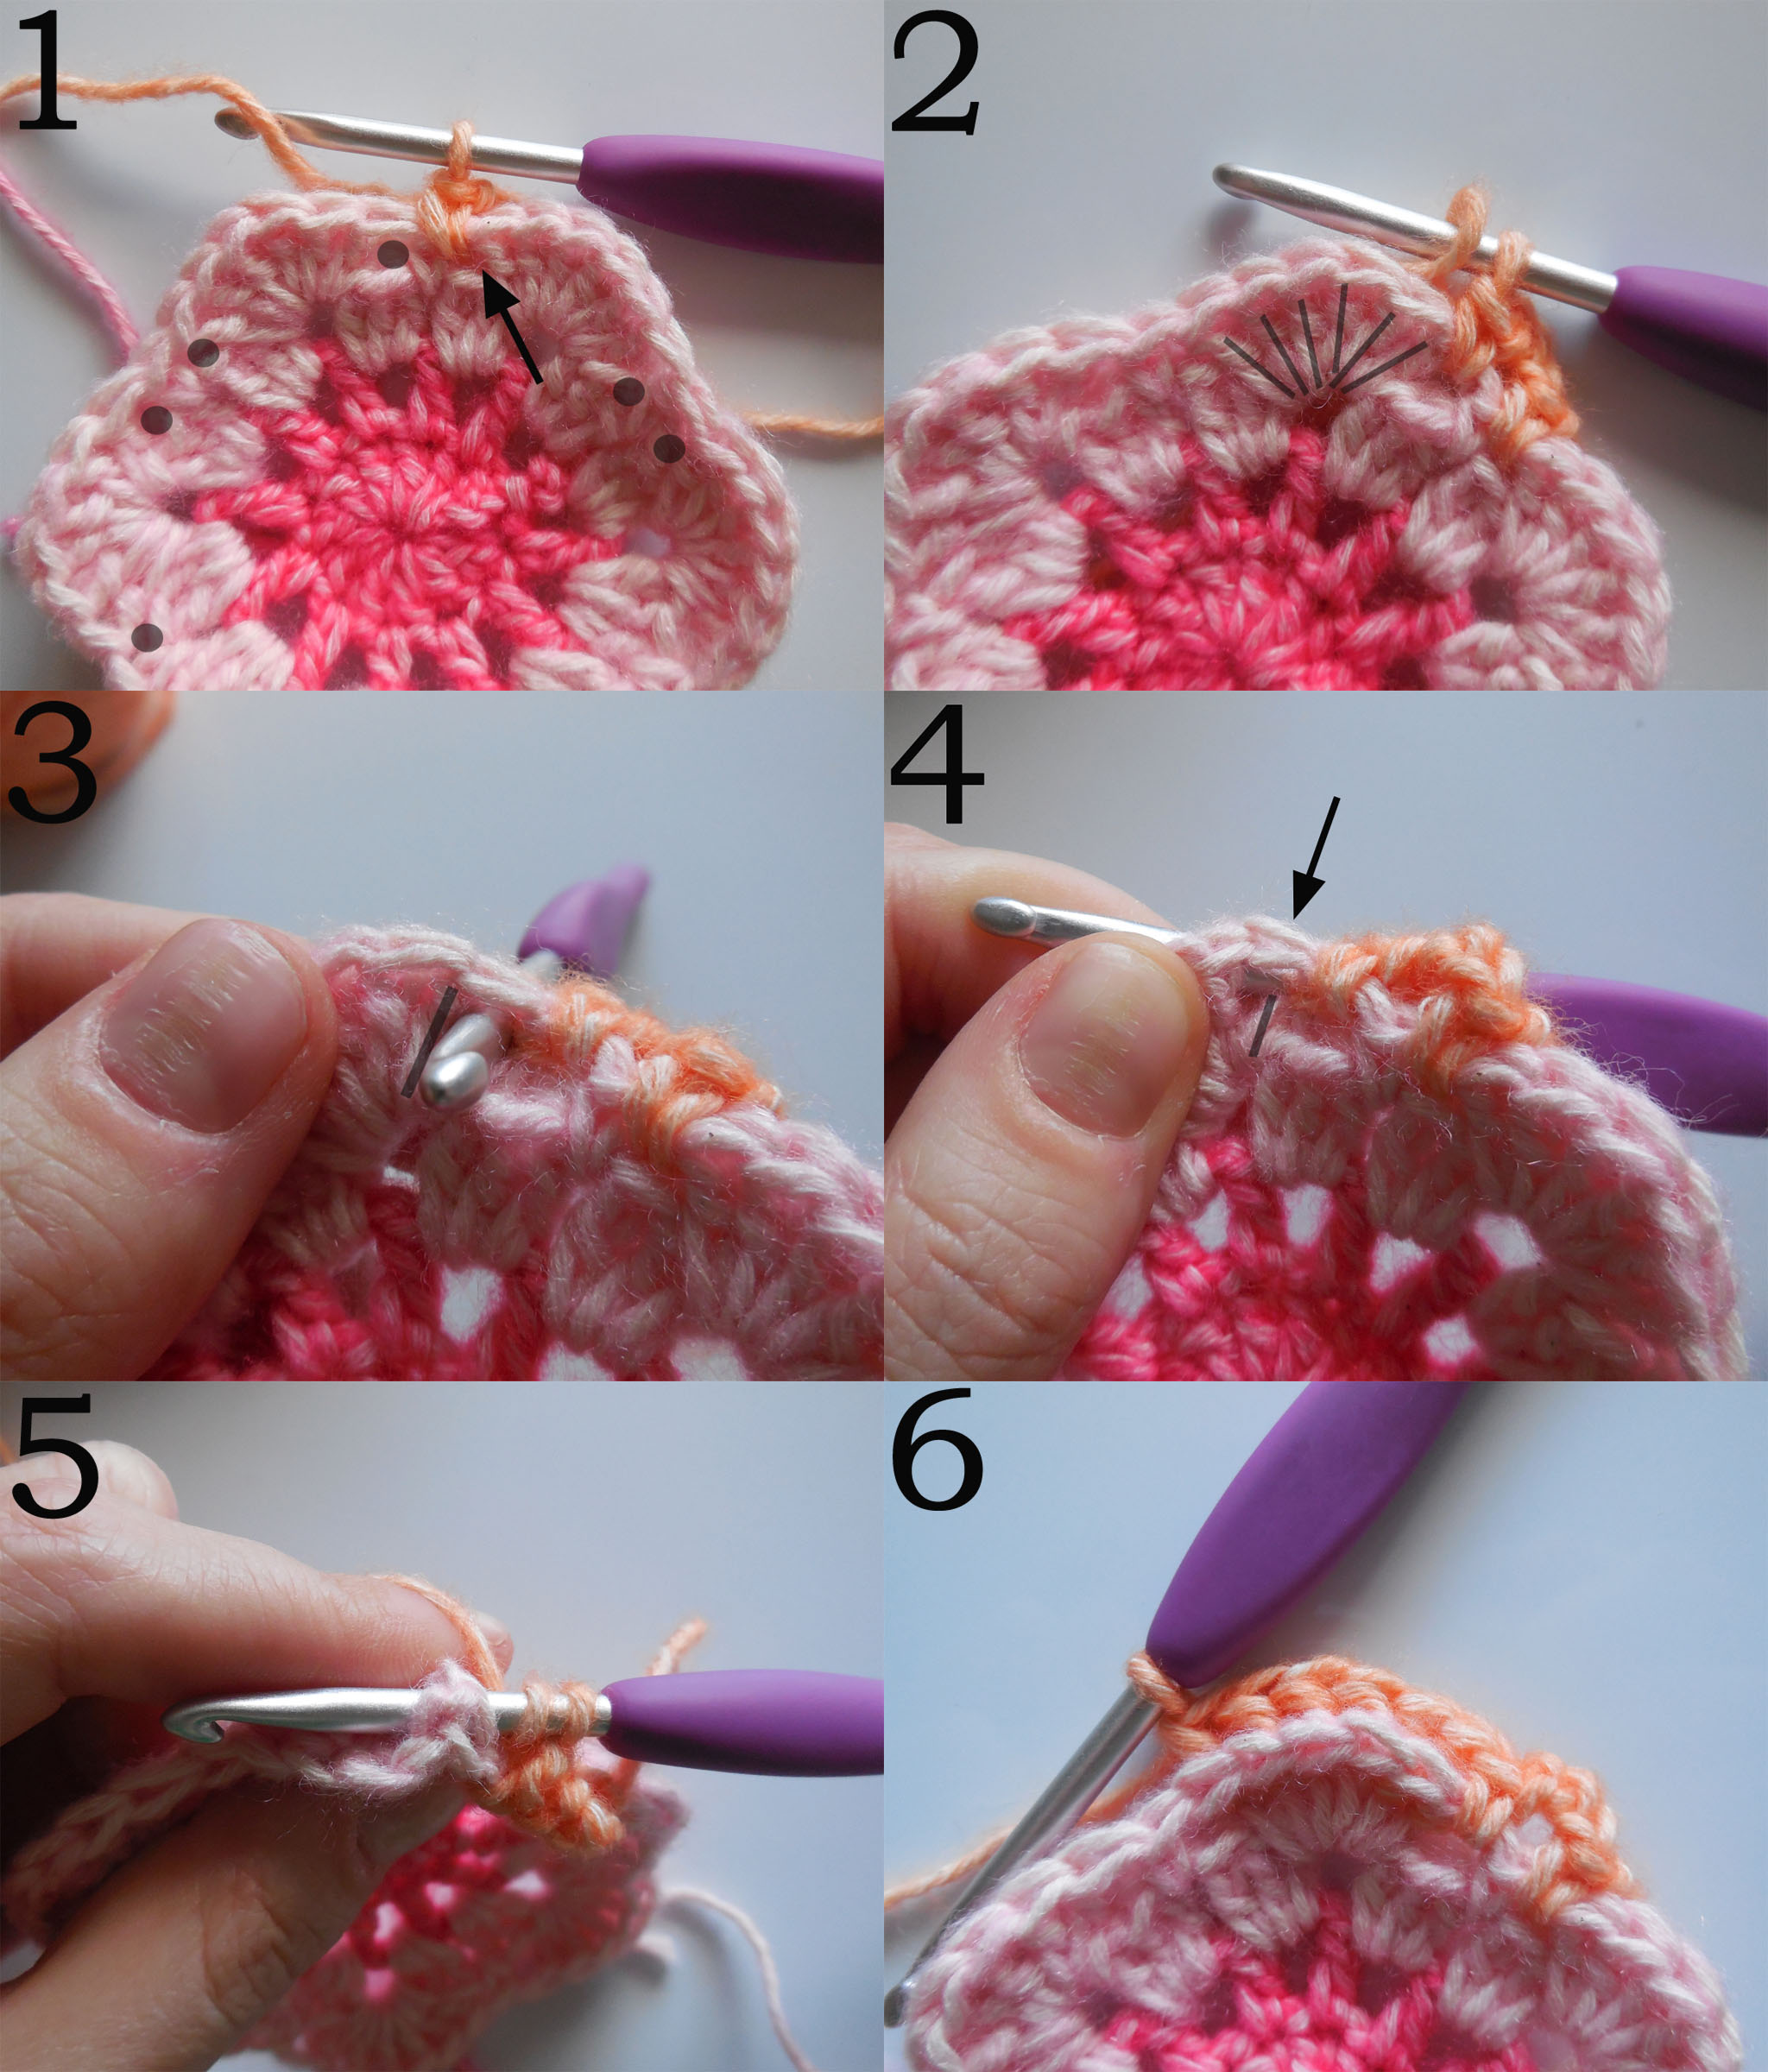
1: The spaces you need to work into are indicated with the black circles.
De ruimtes waar je in moet werken worden weergegeven met zwartje puntjes.
2-5: The black lines indicate the posts of the stitches you need to go around to make the bphtr.
De zwarte lijnen geven de staanders weer van de steken waar je omheen moet werken om een RhstA te haken.
4: The arrow indicates the loop of the stitch, the line indicates the post of the stitch, this will help you understand the stitch anatomy.
De pijl geeft de lus van de steek aan, de lijn geeft de staander van de steek aan, dit helpt je om de anatomie van de steek te begrijpen.
Measure your swatch across the motif as indicated below. It should measure 9cm/3.6″ in Scheepjes Stone Washed/River Washed and 10cm/4″ in Scheepjes Colour Crafter. Go up a hooksize if your swatch is smaller, go down a hooksize if your swatch is bigger.
Meet je proeflapje op over het motief zoals hieronder aangegeven. Het zou 9cm moeten meten in Scheepjes Stone Washed/River Washed en 10cm in Scheepjes Colour Crafter. Probeer een haaknaald groter als je motief kleiner is en probeer met een haaknaald kleiner als je motief groter is.


Tips & Tricks Tutorial photos
Please note the blanket uses a variety of stitches, the more unusual ones are shown in tutorial photos. You can find the tutorial photos per Chapter through the main CAL page. So they will not be shown separately here.
Let op dat de deken veel verschillende steken gebruikt. De minder gebruikte steken worden met tutorial foto’s uitgelegd. Je vindt deze foto’s per Hoofdstuk via de Hoofdpagina van de CAL. Dus ze worden hier niet nog een keer getoond.
Magic ring / Magische ring
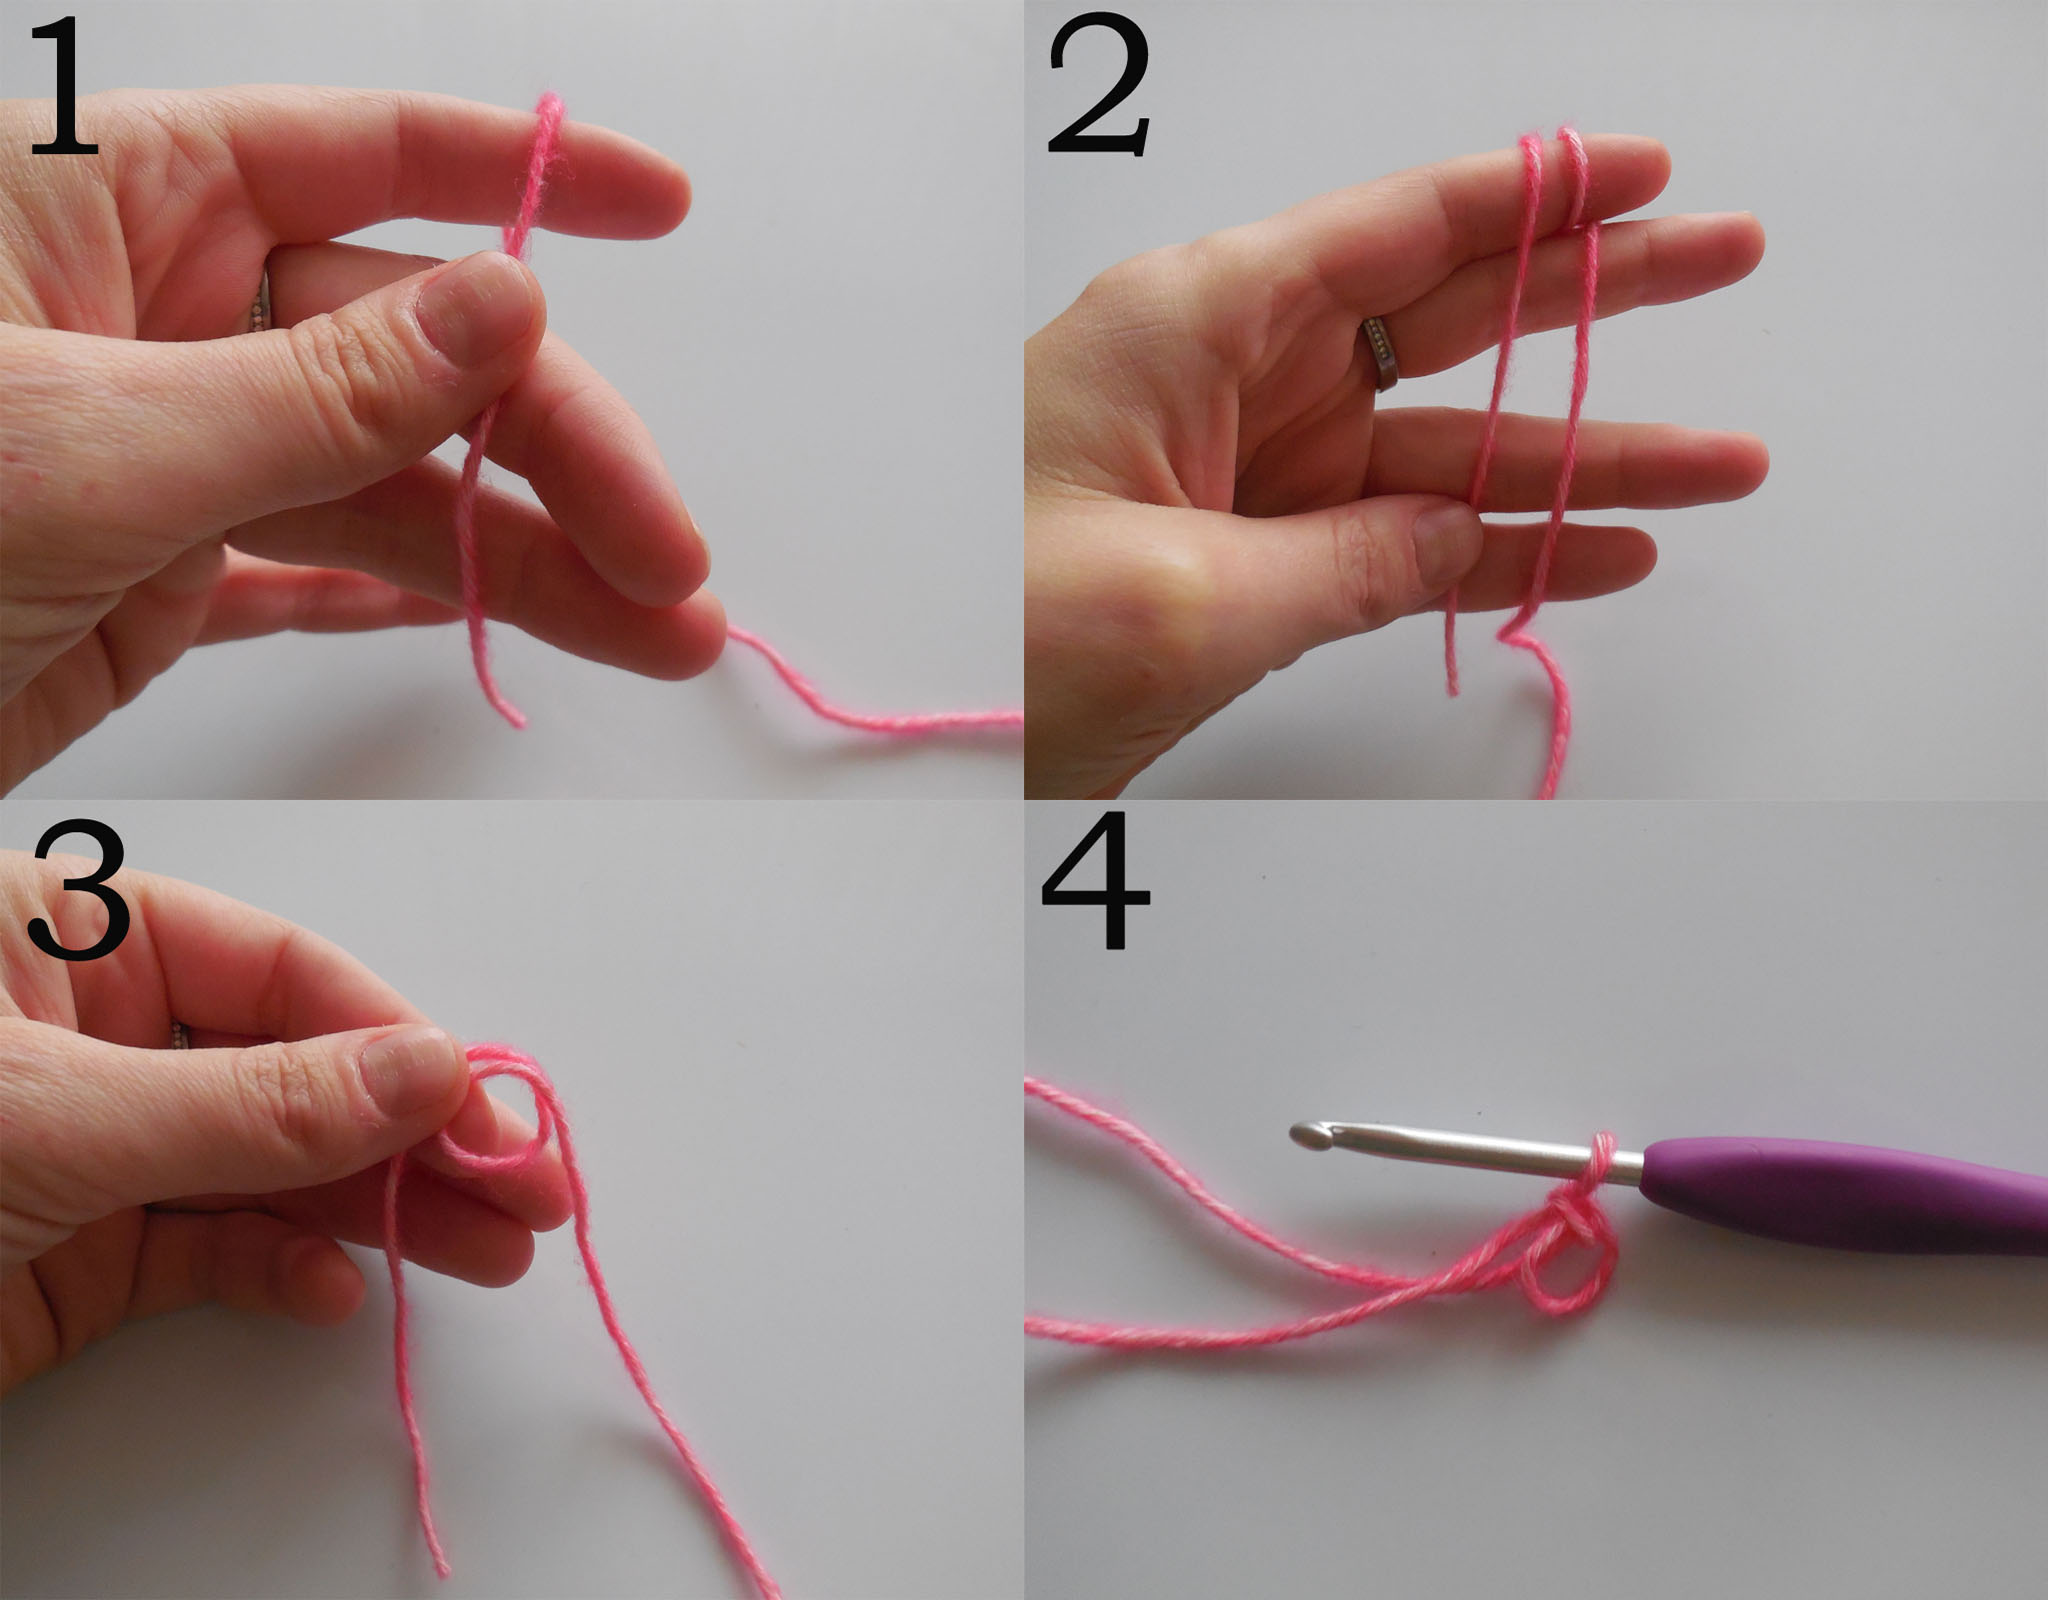
1: Place yarn over your left index finger with the yarn end towards you and hold it in place. / Plaats garen over linker wijsvinger met het gareneindje naar je toe en hou het op z’n plek.
2: Wrap the other end of the yarn (the working yarn) clockwise over your index finger, just like you would make a slip knot. / Wikkel het andere einde (je werkgaren) met de klok mee over je wijsvinger, net als wanneer je een schuiflus maakt.
3: Remove the loop from your finger and hold it with your thumb and index finger. / Haal de lus van je vinger en houd de lus vast met je duim en wijsvinger.
4: Insert your hook into the loop, grab the working yarn with your hook and pull it through the loop, ch1 to secure the loop. / Steek je haaknaald in de lus, grijp het werkgaren met je haaknaald en trek het door de lus, haak 1l om de lus vast te zetten.
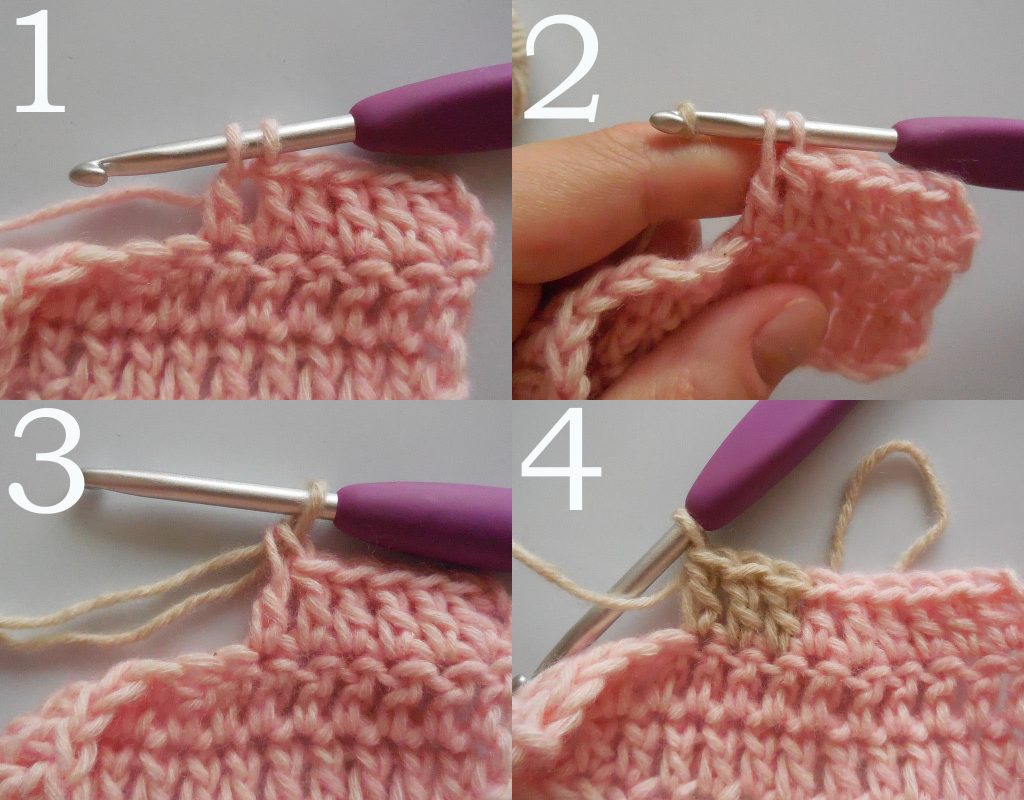
Standing stitches / Staande steken
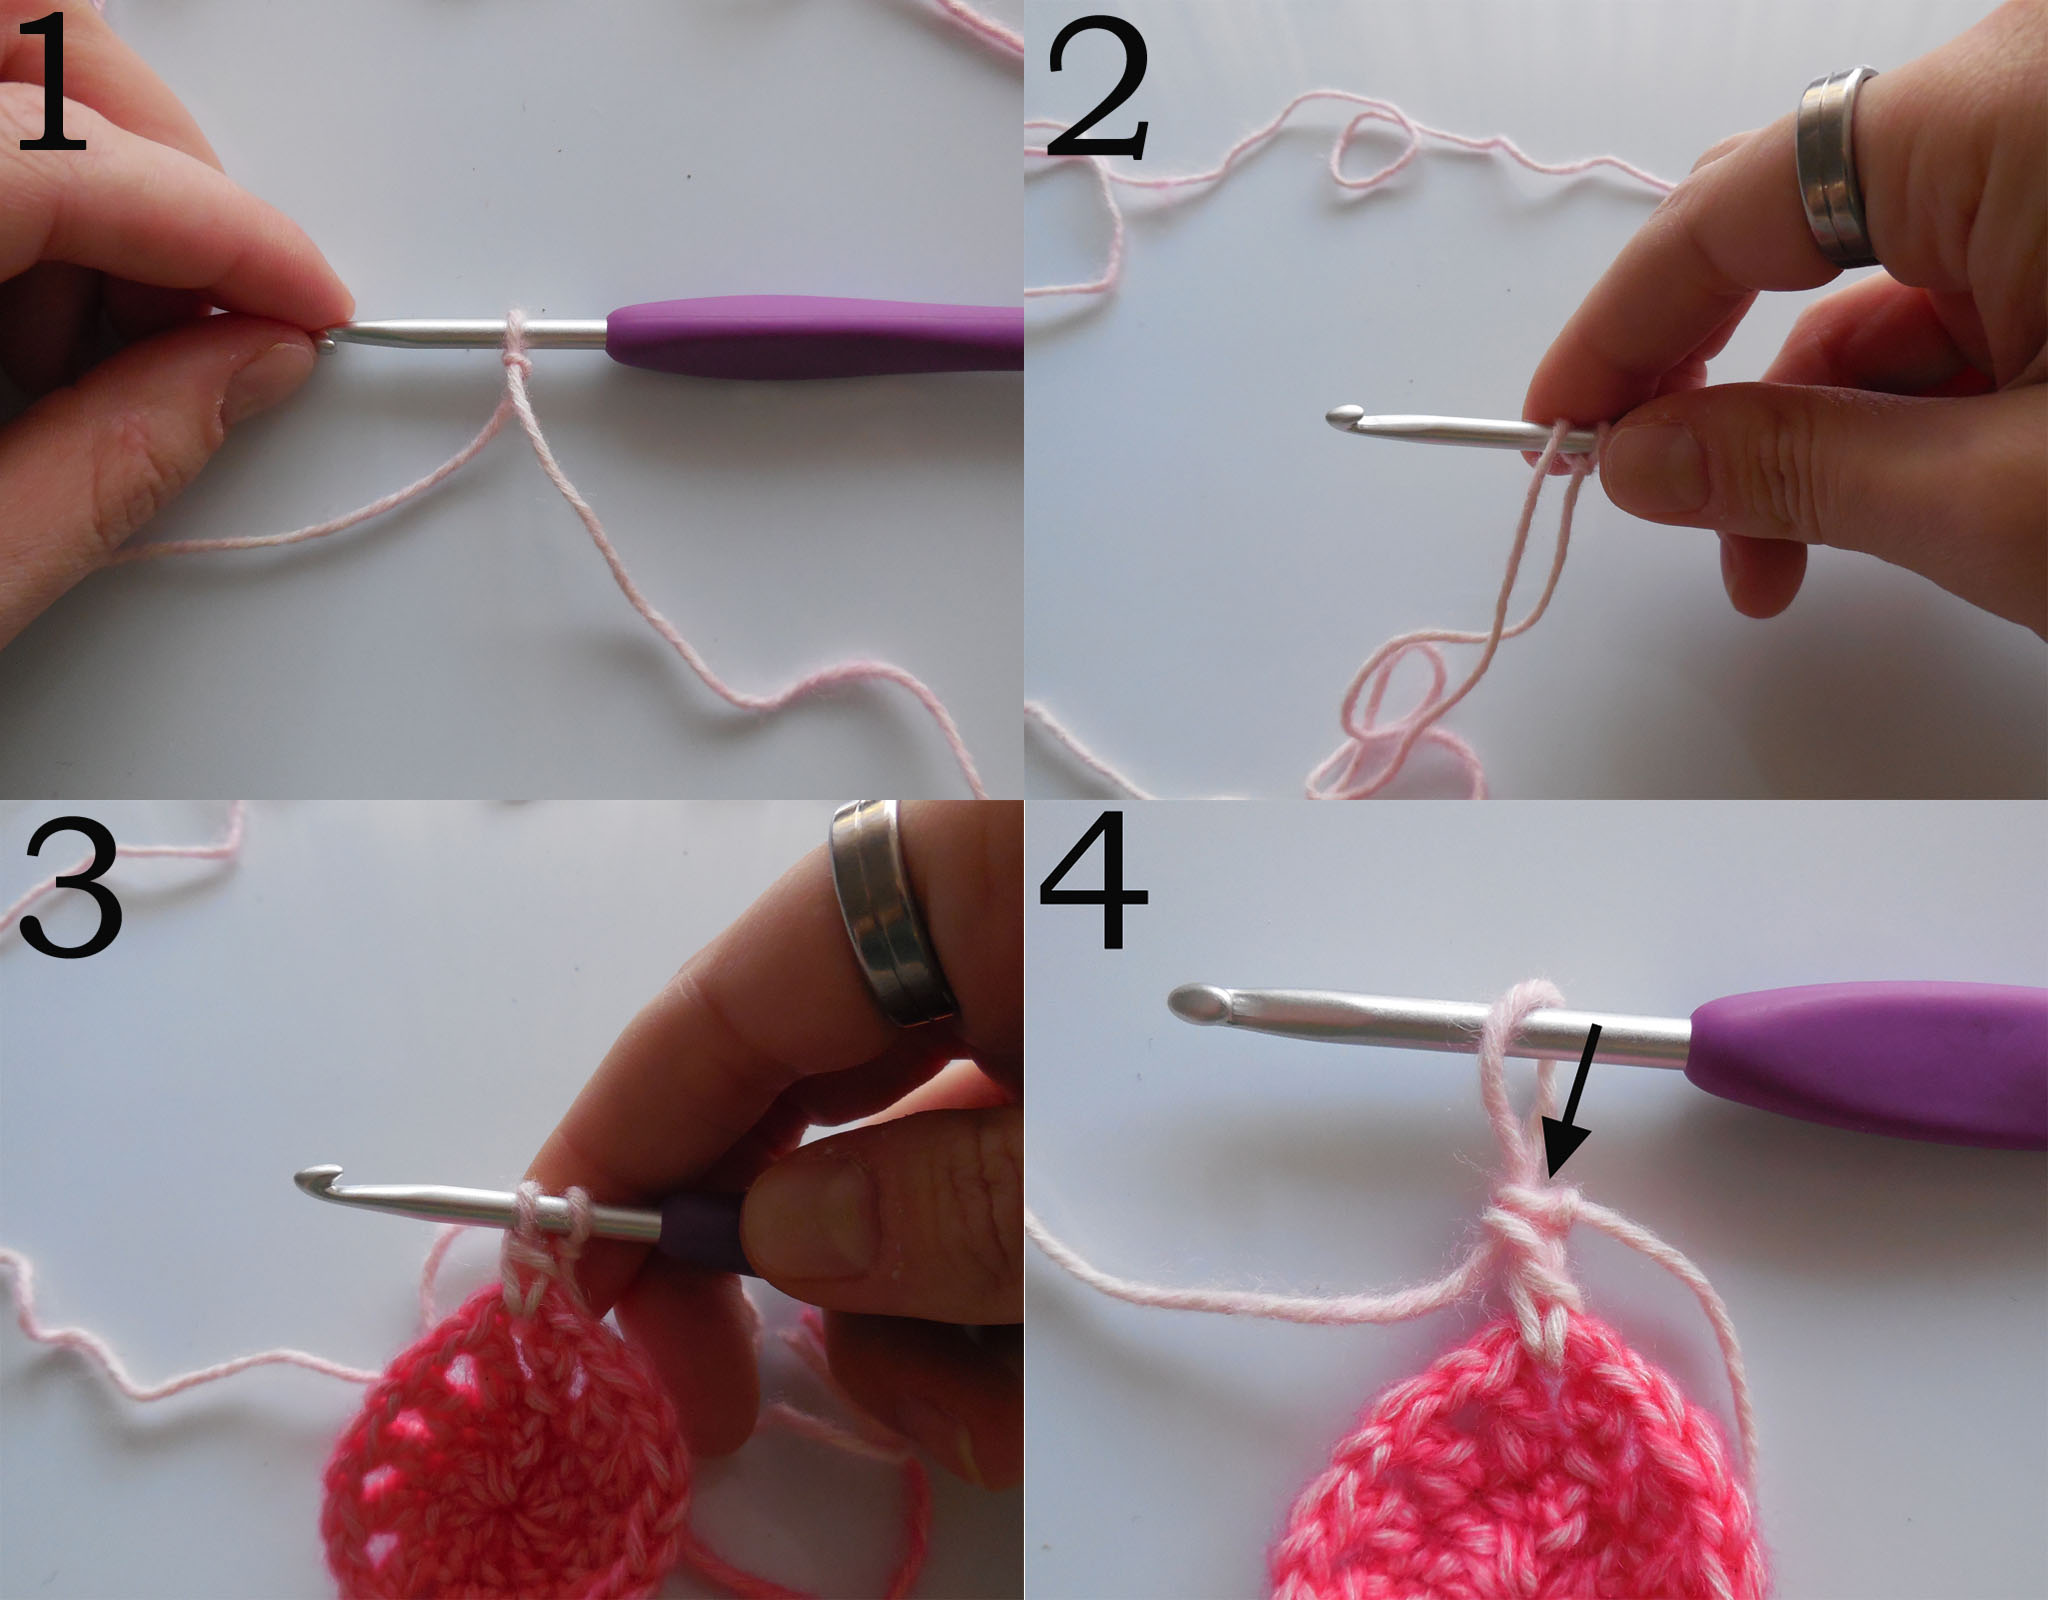
1: To make a standing stitch, start with a slip knot on your hook. / Om een staande steek te maken, begin je met een schuiflus op je haaknaald.
2-4: Hold the slip knot with your finger and make the stitch like normal (a tr in the picture shown). The arrow shows the loop of the st. / Maak de stk zoals je normaal zou doen (in de foto een st). De pijl heeft de lus van de stk weer.
Needle join (invisible join) / Ronde sluiten met naald (onzichtbare sluiting)
1-2: Pull up a loop of approximately 10cm/4” of your last stitch and cut the yarn. Thread the yarn in your needle and insert the needle in the loop of the second st of the round. The first st is skipped. / Trek een lus van ong. 10cm na je laatste stk en knip garen door. Rijg het draadeindje door je naald en steek naald in de lus van de 2e stk van de ronde. De eerste stk wordt overgeslagen.
3: Put your needle in the back loop of the last stitch you made and the loop that’s right behind the back loop. / Steek naald in de achterste lus en de lus daarachter van de laatste stk van de ronde.
4: Pull until the loop you just made looks like all the other stitches and work away your ends. / Trek het draadeindje aan totdat de lus lijkt op alle andere steken en werk eindjes weg.

How to recognize stitches / Hoe herken je steken
The blanket is worked on the RS for the most part. When the pattern doesn’t state to turn, you will only work on the RS. When you work with the RS of the sts facing you, the loop of the stitch comes before the post of the stitch, i.e.: the loop of the stitch is situated to the right of the post of the stitch.
De deken wordt voor het merendeel aan de GK gehaakt. Als het patroon niet aangeeft te keren, blijf je aan de GK haken. Als je haakt met de GK van de deken naar voren, dan komen de lussen van de s vóór de staander van de s, dus de lus van de s zit rechts van de staander.
There are also a few rounds where you work with the WS of the sts facing you. When this is the case, the loop of the stitch comes after the post of the stitch, in other words: the loop of the stitch is situated to the left of the post of the stitch.
Er zijn ook een paar toeren die aan de AK worden gehaakt. Als dit het geval is, komen de lussen van de s na de staander van de s, dus de lus van de s zit links van de staander.

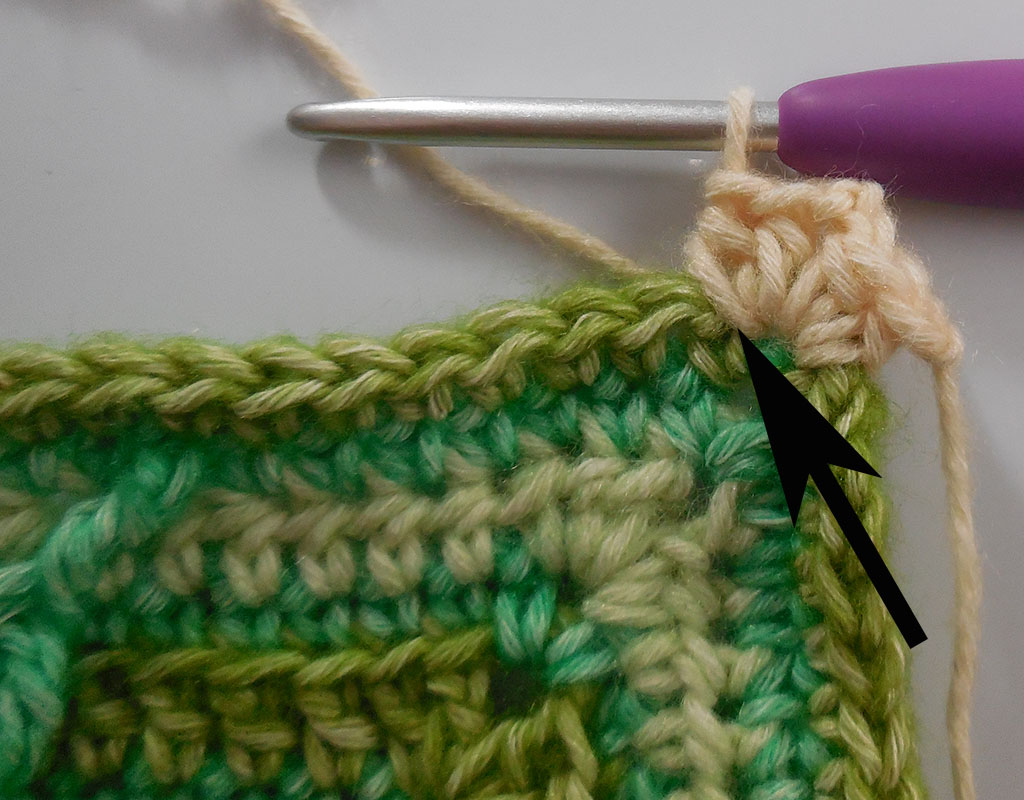
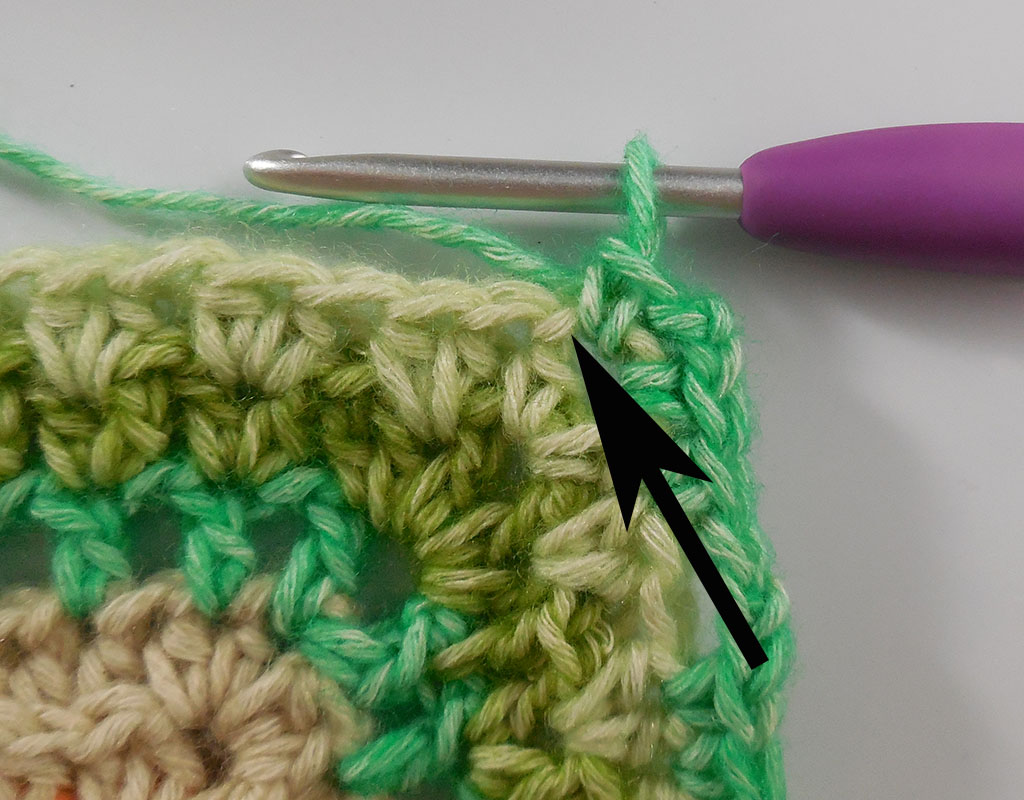
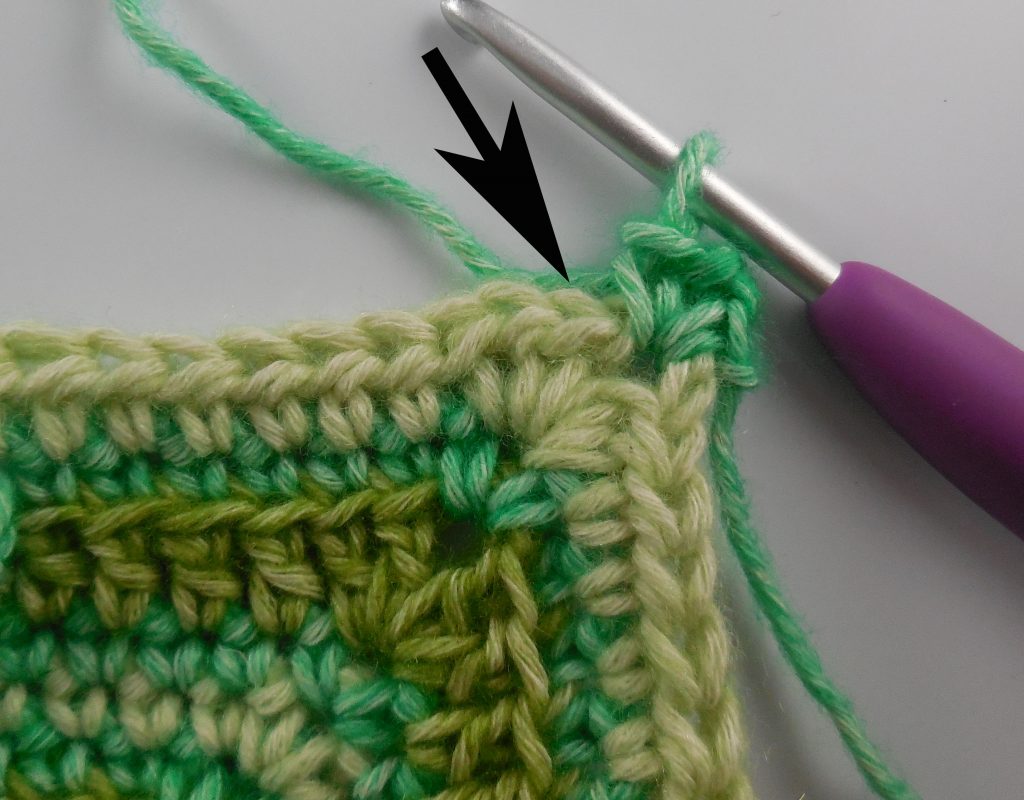
Hidden stitches / Verstopte steken
Below you will see a few pictures of the hidden stitch. Because the loop of the stitch is to the right of the post (when working on the RS only), it can be hidden beneath your corner stitches or other stitches covering it. The hidden stitches will always be indicated in the tutorial photos that I made for this pattern. But it is also handy to learn how to recognize them yourself. The dc and htr can be especially tough to spot (see first 2 photos).
Hieronder zie je een aantal foto’s met verstopte steken. Omdat de lus van de stk rechts van de staander zit (als je alleen aan de GK werkt), kan het zijn dat hij verstopt raakt door de hoeksteken of andere steken die eroverheen vallen. De verstopte steken worden steeds aangegeven in de tutorial foto’s die ik heb gemaakt voor dit patroon. Maar het is ook handig om ze zelf te leren herkennen. De vaste en het halfstokje kunnen bijzonder moeilijk te herkennen zijn (zie eerste twee foto’s).
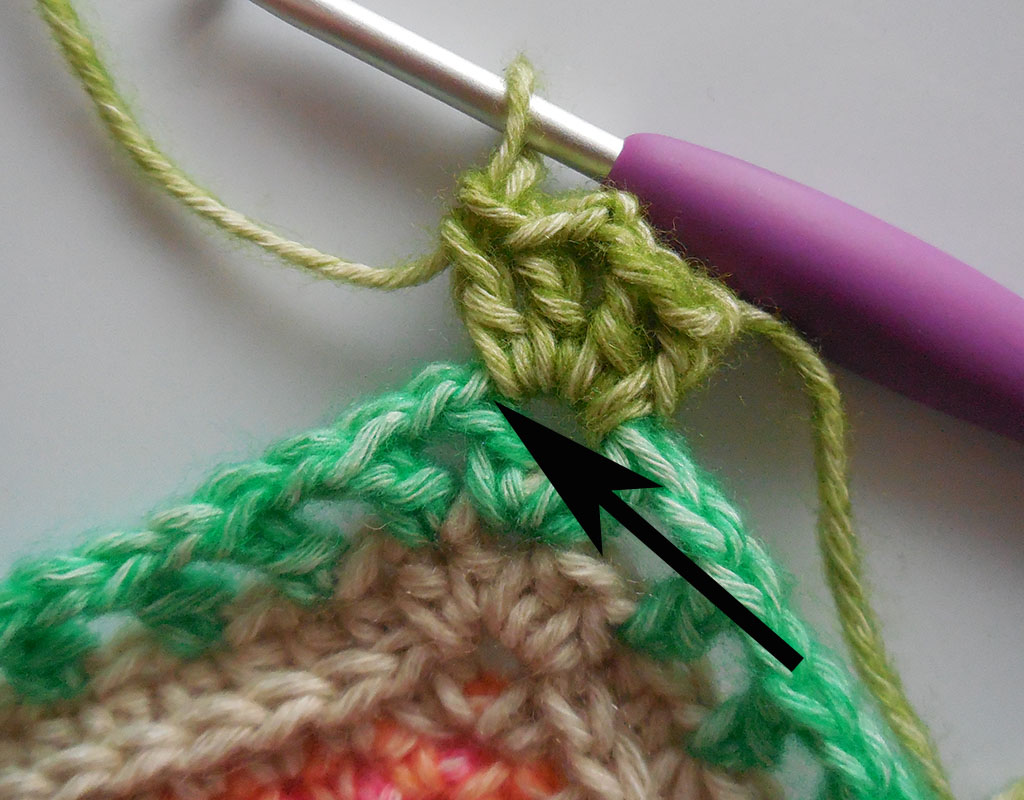
When working on the wrong side, you will see that the loop of the stitch is on the left of the post of the stitch. That way it is not hidden anymore.
Als je aan de verkeerde kant werkt, zie je dat de lus aan de linkerkant van de staander zit. Daardoor is hij niet verstopt meer.
Attaching new yarn in the middle of the round / Nieuw garen aanhechten midden in de ronde
The photos show two colors to illustrate where the new ball is attached. In the last stitch using the old ball of yarn:
1: Work the last stitch in the old yarn until you have two loops left on your hook and drop the yarn end of the old yarn. / Haak de laatste s in het oude garen tot je nog 2 lussen op je haaknaald over hebt. Laat het draadeinde van het oude garen los.
2-3: Pick up the new ball of yarn by pulling a loop of the new colour through both loops on your hook. This will complete the stitch. / Pak het nieuwe garen op door een lus van het nieuwe garen door de laatste 2 lussen van het oude garen te trekken. Dit maakt de s af.
4: Work away the ends as normal. Now you can continue your work. / Werk de eindjes weg zoals je normaal ook zou doen. Nu kun je weer door zoals normaal met de nieuwe bol.
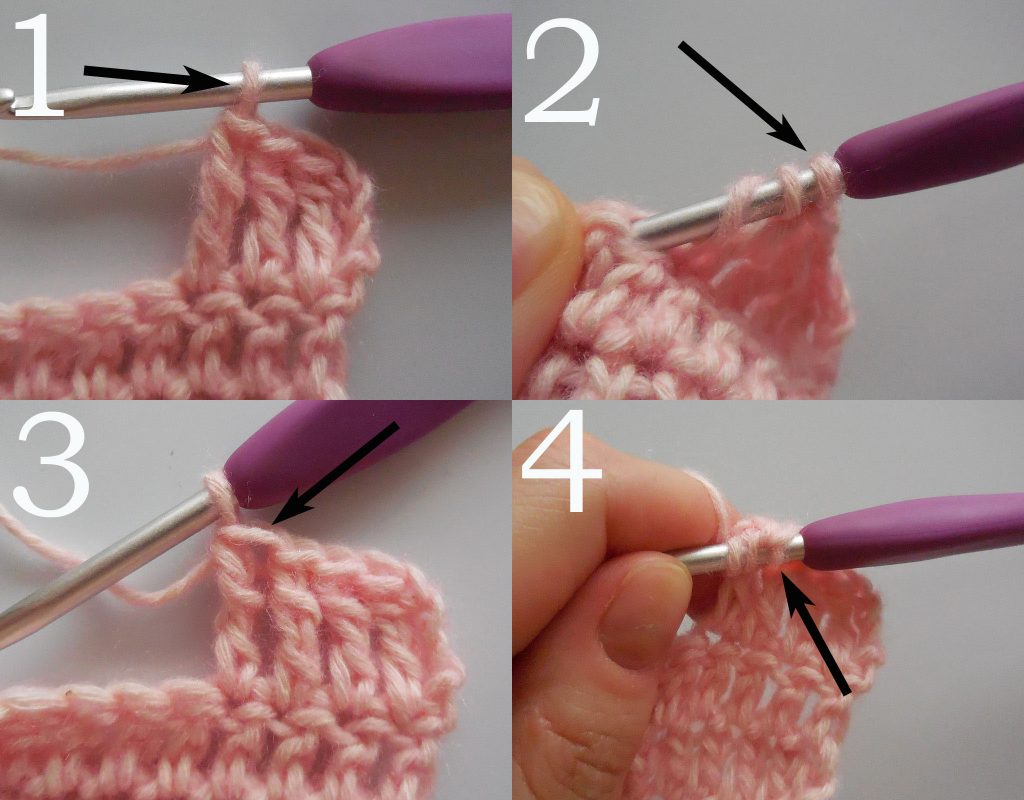
How to avoid big loops when making long stitches / Hoe voorkom je grote lussen als je lange steken haakt
1: The loop on your hook determines the size of the top loops of your stitches. / De lus op je haaknaald bepaalt de grote van de bovenste lus van je steken.
2-3: If you make a longer stitch, dtr and longer, you need to make more yarn overs, and this causes the loop on your hook to loosen. Als je een langere steek moet haken, dst of langer, dan moet je meerdere omslagen maken, waardoor de lus op je haaknaald losser raakt.
4: By pulling at the yarn overs, the loop on your hook will slip over the top of the hook towards you, making it tighter and thus making the top loop of your stitch the same size as your lower stitches. / Door de omslagen aan te trekken, schuift de lus op je haaknaald over de bovenzijde van de haaknaald naar je toe, waardoor hij strakker komt te staan en waardoor de bovenste lus van de steek net zo groot wordt als je lagere steken.
Unraveling Stone Washed/River Washed yarn / Stone Washed/River Washed garen uithalen
With every new project, there might be some unraveling. When working with the gorgeous, fluffy Stone Washed and River Washed yarns, this might be a bit of a challenge, but not if you know how to unravel it.
Tip 1: Always pull at a 45 degrees angle with your work to your left and the unraveling yarn to your right. / Trek altijd uit met een hoek van 45 graden en je werk aan je linkerkant en het uit te halen garen naar rechts.
Tip 2: If you feel the slightest resistance, don’t try pulling harder, but immediately stop pulling. / Als je ook maar een beetje merkt dat het garen niet meer wil, ga dan niet harder trekken, maar stop gelijk.
Tip 3: Take a darning needle or something else that’s pointy but not sharp and put it in between the two pieces that are stuck together and under the matted fluff that keeps it from unraveling (see photo below.) Pull the needle up and towards you to break the matted fluff. Now you can continue until you feel another piece of resistance and repeat tip 3 : )
Pak een wolnaald of iets anders puntig maar niet scherp en steek het tussen de twee delen die aan elkaar zitten en onder de vervilte fluff (zie foto hieronder). Trek de naald omhoog en naar je toe om de vervilting op te breken. Nu kun je weer door met uithalen totdat je weer een vervilt stukje tegen komt en kan je tip 3 herhalen : )
Trust me, in the end this works much quicker than just keep pulling at it in frustration ; )
Geloof me, uiteindelijk is dit veel sneller dan om maar uit frustratie te blijven trekken ; )

The CAL officially starts on Wednesday the 23rd of September. The files will be released in the Official Facebook groups and on Scheepjes.com. You can find the complete CAL schedule here. I am really excited to start and I hope to meet you in the Scheepjes Facebook group where the CAL is being held and you can share with the community, ask all of your questions and receive support from myself and mod and admins during the CAL!
If you don’t want to miss any of updates on the CAL posts, please be sure to follow the Scheepjes Facebook page and follow me on Facebook, Instagram (@aspoonfulofyarn) or subscribe via email at the bottom of this page.
De CAL gaat op woensdag 23 september officieel van start! Vind updates in de Officiële Scheepjes facebook groepen en op Scheepjes.com. Je vindt de hele CAL planning hier.
Ik heb er erg veel zin in en ik hoop je te zien in de Scheepjes Facebook groep waar de CAL wordt gehouden en waar je je voortgang kunt delen met anderen en je al je vragen over de CAL kunt stellen! Ik en de mod en admins staan daar voor je klaar tijdens de CAL!
Als je geen enkele update over de CAL wilt missen, volg dan de Scheepjes facebook pagina, of volg me op Facebook, via Instagram (@aspoonfulofyarn), of schrijf je in via email aan de onderkant van deze pagina.
************************************************************************
*Affiliate disclaimer
This post contains affiliate links. When you click this link and purchase something, I will get a small commission, but it will not cost you extra money. This way you can support my blog and I can keep making free patterns.
Deze post bevat affiliate links. Als je op deze link klikt en iets koopt, krijg ik een kleine commissie. Op deze manier kan je mijn blog steunen, terwijl het jouw niks extra’s kost. Hierdoor kan ik doorgaan met het maken van gratis patronen.
Discover more from A Spoonful of Yarn
Subscribe to get the latest posts sent to your email.
9 Comments
Comments are closed.
Please register me for updates/notifications. I do follow the facebook Scheepjes group but I do not do instagram
If you want to register by email, please fill in your email address at the bottom of the blog page.
Thank you for the details!
Graag ontvang ik steeds het patroon van de call
Als je updates wilt ontvangen, vul dan je email adres in het invulvak aan de onderkant van de blogpagina in.
Ik wil graag de emails ontvangen, dank u!
Als je updates wilt ontvangen, vul dan je email adres in het invulvak aan de onderkant van de blogpagina in.
Graag ontvang ik het patroon per email
Als je updates wilt ontvangen, vul dan je email adres in het invulvak aan de onderkant van de blogpagina in.